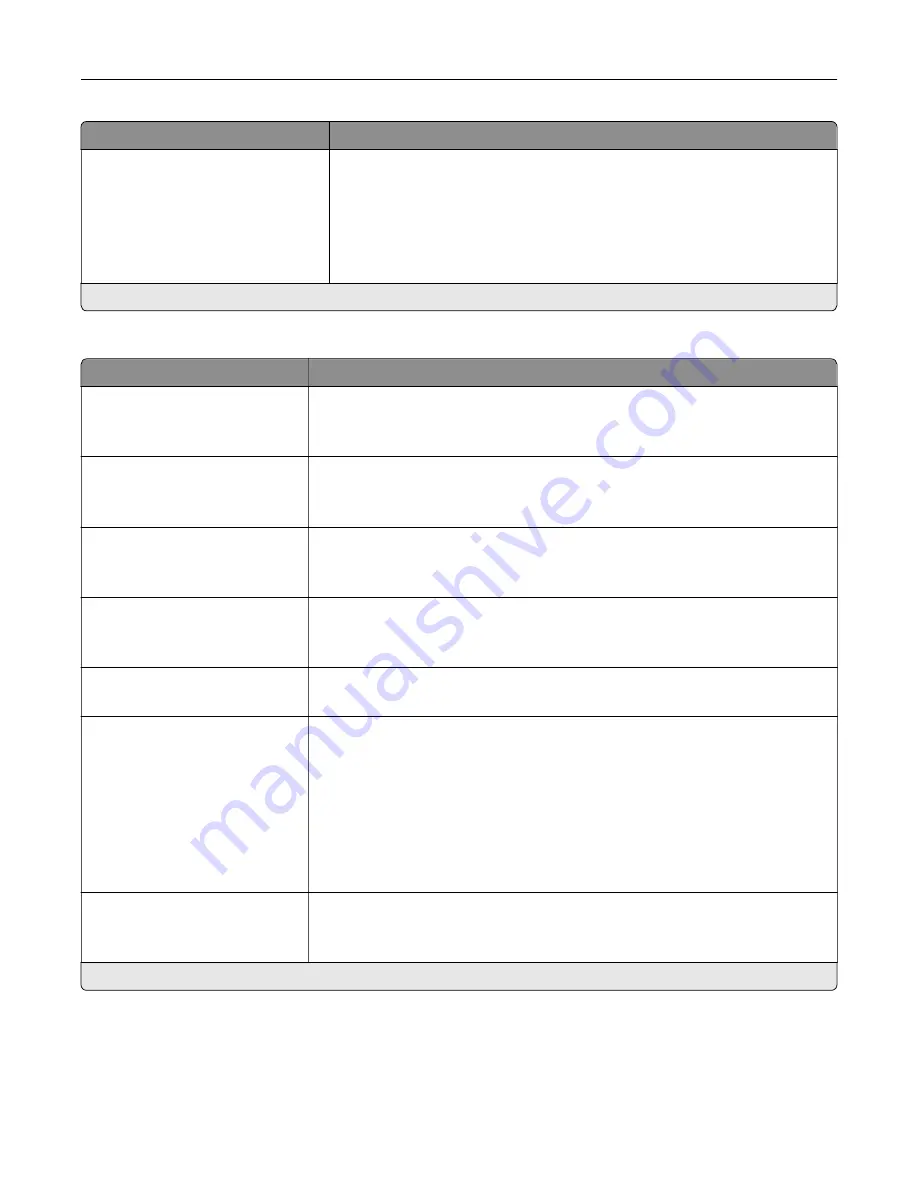
Menu item
Description
Holding Faxes
Held Fax Mode
Off*
Always On
Manual
Scheduled
Hold received faxes from printing until they are released.
Note:
An asterisk (*) next to a value indicates the factory default setting.
Admin Controls
Menu item
Description
Enable Fax Receive
On*
Off
Set the printer to receive fax.
Enable Color Fax Receive
On*
Off
Set the printer to receive fax in color.
Enable Caller ID
On*
Off
Show the number that is sending the incoming fax.
Block No Name Fax
On
Off*
Block incoming faxes sent from devices with no station ID or fax ID specified.
Banned Fax List
Add Banned Fax
Specify the phone numbers that you want to block.
Answer On
All Rings*
Single Ring Only
Double Ring Only
Triple Ring Only
Single or Double Rings Only
Single or Triple Rings Only
Double or Triple Rings Only
Set a distinctive ring pattern for incoming fax.
Auto Answer
On*
Off
Set the printer to receive fax automatically.
Note:
An asterisk (*) next to a value indicates the factory default setting.
Understanding the printer menus
98
Summary of Contents for XC4140
Page 60: ...5 Touch Scan Here If necessary change the scan settings 6 Scan the document Scanning 60 ...
Page 155: ...2 Remove the waste toner bottle 3 Remove the imaging kit Maintaining the printer 155 ...
Page 157: ...8 Insert the black toner cartridge 9 Insert the imaging kit Maintaining the printer 157 ...
Page 159: ...2 Remove the waste toner bottle 3 Remove the imaging kit Maintaining the printer 159 ...
Page 161: ...8 Insert the toner cartridges 9 Insert the new imaging kit Maintaining the printer 161 ...
Page 190: ...4 Close the duplex cover and door A Clearing jams 190 ...
Page 236: ...4 Insert the memory card until it clicks into place Upgrading and migrating 236 ...
Page 239: ...5 ISP extended cable 4 Install the ISP into its housing Upgrading and migrating 239 ...
Page 240: ...5 Attach the housing to the controller board access cover Upgrading and migrating 240 ...
Page 246: ...5 Open door B 6 Open door C Upgrading and migrating 246 ...


