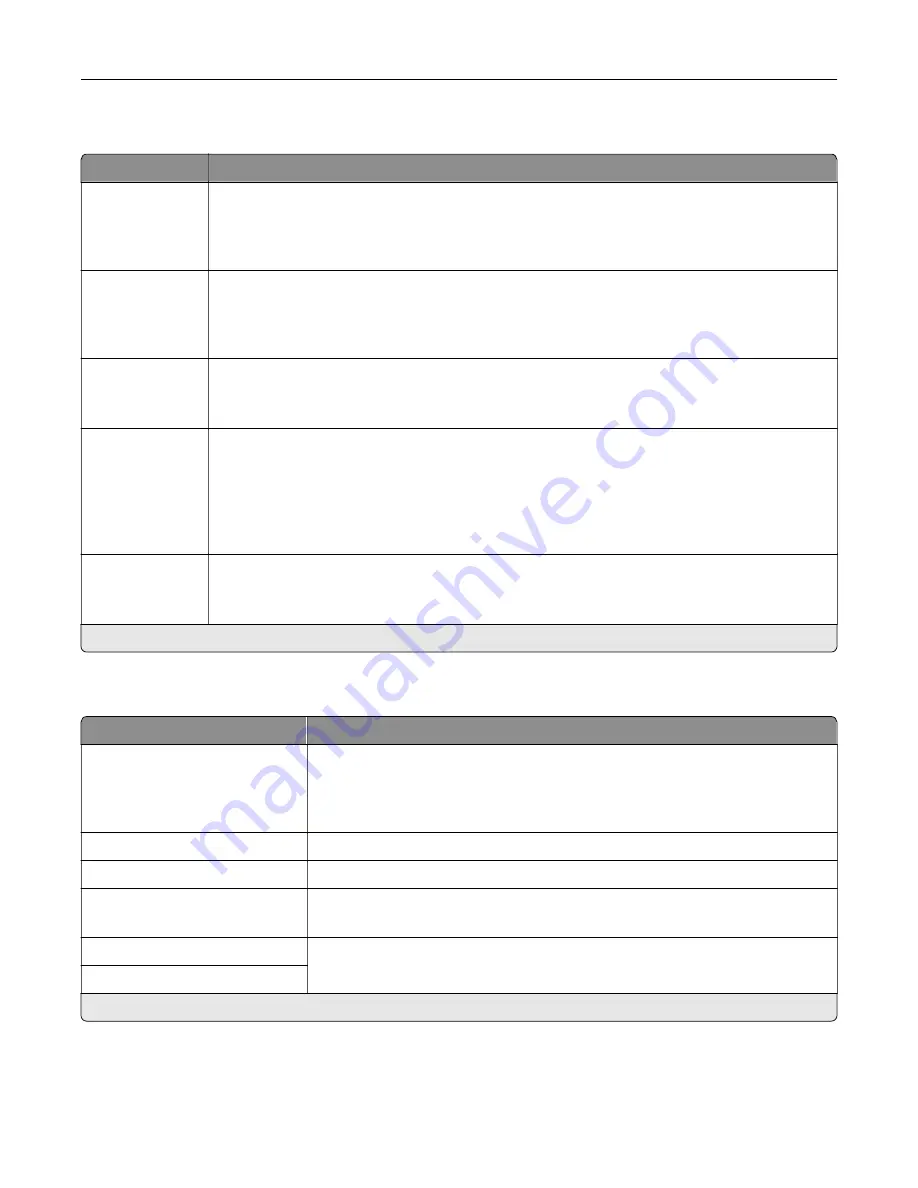
USB
Menu item
Description
PCL SmartSwitch
Off
On*
Set the printer to switch to PCL emulation when a print job received through a USB port requires
it, regardless of the default printer language.
Note:
When this setting is disabled, the printer does not examine incoming data and uses the
default printer language specified in the Setup menu.
PS SmartSwitch
Off
On*
Set the printer to switch to PostScript emulation when a print job received through a USB port
requires it, regardless of the default printer language.
Note:
When this setting is disabled, the printer does not examine incoming data and uses the
default printer language specified in the Setup menu.
Job Buffering
Off*
On
Temporarily store jobs on the hard disk before printing.
Note:
This menu item appears only when a hard disk is installed.
Mac Binary PS
Auto*
On
Off
Set the printer to process Macintosh binary PostScript print jobs.
Notes:
•
Auto processes print jobs from computers using either Windows or Macintosh operating
systems.
•
Off filters PostScript print jobs using the standard protocol.
Enable USB Port
Off
On*
Enable the front USB drive port.
Note:
An asterisk (*) next to a value indicates the factory default setting.
Restrict external network access
Menu item
Description
Restrict external network
access
Off*
On
Restrict access to network sites.
External network address
Specify the network addresses with restricted access.
E
‑
mail address for notification
Specify an e
‑
mail address to send a notification of logged events.
Ping frequency
1–300 (10*)
Specify the network query interval in seconds.
Subject
Specify the subject and message of the notification e
‑
mail.
Message
Note:
An asterisk (*) next to a value indicates the factory default setting.
Understanding the printer menus
129
Summary of Contents for XC4140
Page 60: ...5 Touch Scan Here If necessary change the scan settings 6 Scan the document Scanning 60 ...
Page 155: ...2 Remove the waste toner bottle 3 Remove the imaging kit Maintaining the printer 155 ...
Page 157: ...8 Insert the black toner cartridge 9 Insert the imaging kit Maintaining the printer 157 ...
Page 159: ...2 Remove the waste toner bottle 3 Remove the imaging kit Maintaining the printer 159 ...
Page 161: ...8 Insert the toner cartridges 9 Insert the new imaging kit Maintaining the printer 161 ...
Page 190: ...4 Close the duplex cover and door A Clearing jams 190 ...
Page 236: ...4 Insert the memory card until it clicks into place Upgrading and migrating 236 ...
Page 239: ...5 ISP extended cable 4 Install the ISP into its housing Upgrading and migrating 239 ...
Page 240: ...5 Attach the housing to the controller board access cover Upgrading and migrating 240 ...
Page 246: ...5 Open door B 6 Open door C Upgrading and migrating 246 ...


