background image


                                                        Chapter 7  WEB Management         

- 35 - 


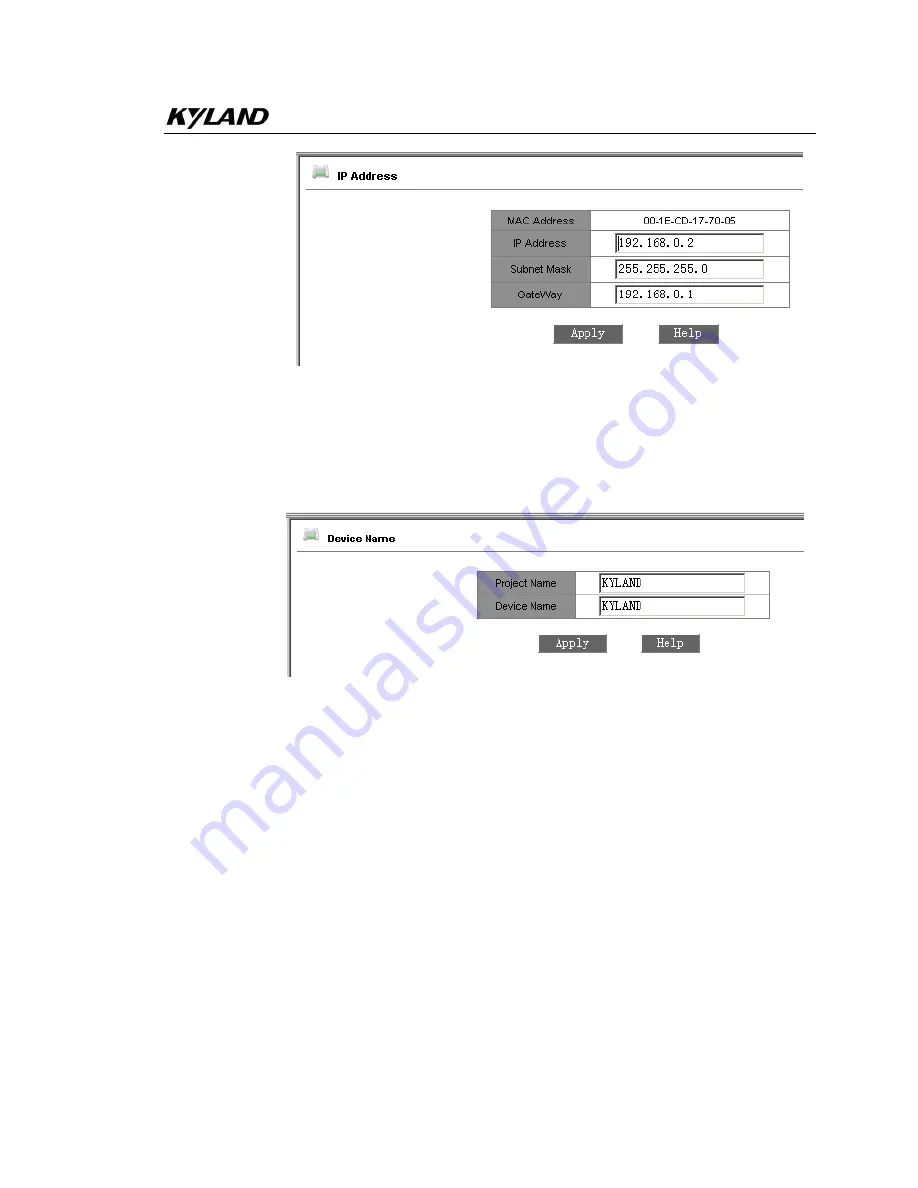
Figure 7-6 Configure IP Address 

7.3.2


Configure Device Name 

Click the “Device Name” in the left menu and enter the page (as Figure 7-7), fill in the 

device name and click “Apply” button. 


Figure 7-7 Configure Device Name 

7.3.3


Port Configuration 

Click the “Port Configuration” in the left menu and enter the page (as Figure 7-8), where 

you can configure port state (enable/disable), auto-negotiation (enable/disable), port 

speed (10/100M), duplex (full/half), flow control (open/close). After configuration, click 

“Apply” to make it take effect.   

Summary of Contents for SICOM3024SM

Page 1: ...SICOM3024SM Industrial Ethernet Switch User s Manual KYLAND Technology Co Ltd...

Page 2: ...nnotated or duplicated in any form or by any means without the prior written permission of KYLAND Corporation Publisher KYLAND Technology CO LTD Address Chongxin Creative Building Shixing East Road 18...

Page 3: ...stallation and commissioning network management etc to provide users with references in startup expansion and routine maintenance It is a practical teaching material that can be used for knowledge and...

Page 4: ...y upgrades and improves constantly the contents of this document may not completely accord with the actual product For product upgrading information please visit our company s website or directly cont...

Page 5: ...cases please immediately disconnect the power supply and contact with our company 1 Water gets into the equipments 2 Equipment damage or shell breakage 3 Abnormal operation conditions of equipment or...

Page 6: ...tention to the notes behind the mark improper operation will result in serious damage of the switch or injury of operation personnel Caution attention warning danger remind the positions requiring att...

Page 7: ...ure 11 3 1 System Structure 11 3 2 Switch Structure 11 3 2 1 Case 11 3 2 2 Front Panel 12 3 2 3 Back panel 13 Chapter 4 Hardware Installation 21 4 1 Installation requirement 21 4 2 Mainframe installat...

Page 8: ...e upload and download 38 7 4 Device Advanced Configuration 38 7 4 1 Port Traffic Flow 39 7 4 2 VLAN 39 7 4 3 Port Mirroring 41 7 4 4 Port Trunking 42 7 4 5 Static Multicasting Address Table 43 7 4 6 I...

Page 9: ...onfigurations 61 7 7 Load Default 62 Appendix A Twisted pair and Pin Distribution 63 Appendix B Cable Type and Specifications 65 Appendix C Glossary 67 Appendix D FTPApplication for Switch Software Up...

Page 10: ......

Page 11: ...x guarantee for reliable operation of the system SICOM3024SM series Gigabit industrial Ethernet switch offers strong web management which support CLI Telnet WEB SNMP and OPC based network management S...

Page 12: ...and forward IGMP Snooping Port mirroring Port trunking DT Ring DT Ring RSTP protocols etc VLAN Tag ACL function Alarm function SNMP protocol POE function 802 1P IP TOS DSCP priority Transparent trans...

Page 13: ...bject is used to unclench the case do not overly extend the hard object into the case to avoid damage of the equipments inside the case After opening the case check the amount of SICOM3024SM equipment...

Page 14: ......

Page 15: ...d Switching bandwidth of system 12 8G Electromagnetic compatibility interference EN55022 Electromagnetic compatibility immunity EN50082 2 Ethernet Port Physical port shielded RJ 45 RJ 45 port 10Base T...

Page 16: ...n distance is 100m max 2 1 to 24 pairs of redundant 100Base FX single mode or multi mode optical fiber interfaces The maximum throughput of each pair of optical fiber interface is 100Mbps and it is fo...

Page 17: ...security and manageability SICOM3024SM series supports IEEE802 1q VLAN tag It can be divided into up to 4094 VLANs based on ports The VLAN division can be realized via WEB CLI etc VLAN Tag packet is t...

Page 18: ...bles Users can manually configure the multicasting communication according to their needs Static multicasting can not be used together with IGMP simultaneously IGMP IGMP is Internet Group Multicast Pr...

Page 19: ...alarming functions can be enabled or disabled The alarming information is shown from management interface SNMP SNMP Simple Network Management Protocol offers frame structure for low level network man...

Page 20: ...ows that a domain value is set for critical parameters so as to automatically send alarm signal to manager control center POE function SICOM3024SM support POE function SICOM3024SM POE board can be use...

Page 21: ...ransfer of data packets 2 Integrated module of transmitting and receiving for fiber interfaces 3 Industrial power supply with protection of over current over voltage and EMC 4 EMC protection for all R...

Page 22: ...e traditional form of axial fan heat dispersion reduces power consumption of the entire unit and increases the stability of the system The figuration of SICOM3024SM case is shown in Figure 3 2 Its con...

Page 23: ...3 4 Back panel of SICOM3024SM SFP Gigabit Optical Fiber TP interface SICOM3024SM offers four pairs of redundant 1000Base LX full duplex single mode or multi mode optical fiber interface LC connector o...

Page 24: ...break on Ethernet port RJ45 of SFP unit z Insert the SFP into case backward to the PCB board The position is right when you hear a sound Ready for use if the SFP handle horizontal with connector Pull...

Page 25: ...ments servers hubs or other switches in straight through or cross over way Each port supports IEEE802 3x self adaptation so the most suitable transmission mode half duplex or full duplex and data rate...

Page 26: ...ection has been established for the port Blinking Network activities are available at the port LINK ACT Green Off No effective network connection has been established for the port DC Power input termi...

Page 27: ...cores wire is used to for power connection The terminal integrates a fuse socket which is convenient to fix new AC power fuse Steps of replacing fuse are as follows 1 Pull out fuse holder from the AC...

Page 28: ...tion Figure 3 9 9 5mm POE power input terminal RS232 Network management interface CONSOLE The network management interface of SICOM3024SM is shielded RJ45 connector and its interface communication sta...

Page 29: ...switch has a grounding screw hole in the rear panel After connecting one terminal of grounding wire with the cold pressing terminal insert it to the grounding hole and screw it down with grounding scr...

Page 30: ......

Page 31: ...stance 5 4 Make sure all fiber cables and connectors are ready for use 5 Avoid sunshine and strong EMC area 6 19 inches rack is ready for SICOM3024SM 7 Check if you have all necessary cables and conne...

Page 32: ...such as quality assurance certificate etc 3 The specifications quantities route directions and laying position of the cables to be laid should meet the design requirements of construction drawings The...

Page 33: ...iber cable minimize the amount of turnings and avoid turnings with overly small radius Bundle pigtails in proper tightness and avoid too tightly bundling If laid on a cabling rack it should be placed...

Page 34: ......

Page 35: ...00M or always off PC work on 10M the green light should be blinking In the same way test all other RJ45 ports Operations on PING command is shown as the following example PC1 PC2 Figure 5 1 TP port te...

Page 36: ...are connected to fiber chain network connecting any one RJ45 port in each device to PCs by straight through cable and sending Ping command to each other They can both get command from each other with...

Page 37: ...sending Ping 192 168 100 11 l 1000 t operate the begin menu on the second computer and select the operation item input cmd or command sending ping 192 168 100 10 l 1000 t return Reply from 192 168 10...

Page 38: ......

Page 39: ...OM3024SM supply maximum 24 pairs of redundant fiber port of 100Base FX SM MM or RJ45 ports which can form 100M redundant ring network with the recovery time less than 50ms It is widely used in electri...

Page 40: ...battery feed input SM3 6S M 6 100Base FX SM MM fiber ports FC SC ST SM3 5S M 1TX 5 100Base FX SM MM fiber ports FC SC ST 1 10Base T 100Base TX RJ45 port SM3 4S M 2TX 4 100Base FX SM MM fiber ports FC...

Page 41: ...h with a computer input the IP address eg 192 168 0 2 in the IE browser a window will appear as Figure 7 1 the default user name and password are admin and 123 click OK to enter Figure 7 1 Login Page...

Page 42: ...atus Display The menu of device status includes three submenus Basic Information Port state Port Traffic Flow 7 2 1 Basic Info Click Basic info and enter the interface as shown in Figure 7 3 which dis...

Page 43: ...he page as shown in Figure 7 4 which displays the link state port speed full half duplex and flow control state etc Figure 7 4 Port State 7 2 3 Port Traffic Flow Click Port Flow and enter the page as...

Page 44: ...e IP address device name port to change password query software version and upgrade software upload and download configuration etc 7 3 1 Configure IPAddress Click the IP address in the left menu and e...

Page 45: ...e device name and click Apply button Figure 7 7 Configure Device Name 7 3 3 Port Configuration Click the Port Configuration in the left menu and enter the page as Figure 7 8 where you can configure po...

Page 46: ...4 Change Password Click the Change Password in the left menu and enter the page as Figure 7 9 enter old password and new password click Apply to take effect Figure 7 9 Change Password 7 3 5 Upgrade So...

Page 47: ...e in the same network segment z Wait for upgrading and see the successful message z Click Software Version in navigation bar set the software ID as startup version and click OK as shown in the Figure...

Page 48: ...or download file and set FTP server IP address file name user name password and file name to be upgraded click Apply as shown in Figure 7 12 FTP server address and IP address of switch should be in t...

Page 49: ...100M 500M 1000M for Gigabit port Click Apply to finish configuration Figure 7 14 Port Traffic Flow 7 4 2 VLAN Click the VLAN in the left menu and enter the page as Figure 7 15 and select based on 802...

Page 50: ...SICOM3024SM Industrial Ethernet Switch User Manual 40 Figure 7 15 Add VLAN Figure 7 16 VLAN Configuration Figure 7 17 VLAN configuration successfully...

Page 51: ...ort Mirroring Click the Port Mirroring in the left menu and enter the page as Figure 7 19 select mirroring port from range of Module1 4 FE1 FE6 Module0 GE1 GE4 and mirrored port from the range of TX R...

Page 52: ...1 six trunk groups are supported Each group allows max 4 ports Choose the port from the froup and Click to add or delete trunked port Click Apply to finish configuration See the sample at figure 7 22...

Page 53: ...d static multicasting MAC address VLAN ID and select port as shown in Figure 7 24 click Apply When it is finished click the Static Multicasting Address Table in left menu and see figure 7 25 To config...

Page 54: ...SICOM3024SM Industrial Ethernet Switch User Manual 44 Figure 7 23 Static Multicast address table Figure 7 24 Static Multicast filling sample...

Page 55: ...Figure 7 26 enable IGMP SNOOPING and auto query click Apply to finish configuration Click IGMP Snooping in the left menu again to show configuration result as Figure 7 27 Note Before enabling IGMP Sn...

Page 56: ...ead read write name enter TRAP server IP address TRAP port no and click Apply to finish configuration By SNMP configuration the device only receive the message which name is line with the setting name...

Page 57: ...WEB Management 47 Figure 7 28 SNMP configuration 7 4 8 Alarm configuration Click the Port Alarm in the left menu and enter the page as Figure 7 29 to configure port and ring alarm click Apply to take...

Page 58: ...7 30 click port configuration and enter the page as Figure 7 31 choose anble disable for all ports click apply to finish port status configuration Click Add List from Figure 7 30 enter the page as Fig...

Page 59: ...or STP to configure fill out in the items Spanning Tree Priority From 0 to 65535 The default is 32768 with the step of 4096 Hello Time from 1 to 10 The default is 2 Max Age Time From 6 to 40 The defau...

Page 60: ...n this device you can select this function and enable it select standby port and click Apply Click ring name and see ring state in the DT Ring page as Figure 7 37 see it as Figure 7 36 Attention Each...

Page 61: ...with the recovery time less than 50m Configure four switches connecting by DT Ring there are only two standby ports in two rings The two standby ports are chosen from one ring Figure 7 34 DT Ring Fig...

Page 62: ...SICOM3024SM Industrial Ethernet Switch User Manual 52 Figure 7 36 DT Ring configuration based on ports...

Page 63: ...Disable for all ports In the Enable state POE function can work The output power consumption is 5W 10W and 15W which can be chosen according to the power consumption of PD Support function of voltage...

Page 64: ...enter the page as Figure 7 39 enable QoS weight WRR and preemption mode Priority based on 802 1P or IO TOS DSCP and port are for options The priority based on 802 1p and IP TOS DIFF can be used at the...

Page 65: ...gure 7 39 Qos configuration Click 802 1P Priority and enter the page as figure 7 40 There are total 8 classes for 802 1P SICOM3024SM supports four classes You can select it and click Apply Figure 7 40...

Page 66: ...41 There are total 8 classes for IPTOS SICOM3024SM supports four of them You can select it and click Apply Figure 7 41 IPTOS priority configuration Click DSCP Priority and enter the page as figure 7 4...

Page 67: ...rations of broadcasting storm control and MAC aging time There are totally five options for broadcasting storm control disable 1 2 1 4 1 8 1 16 1 32 When the broadcasting packets occupy 1 2 1 4 1 8 1...

Page 68: ...index no from 1 65535 owner serial no 1 32 and select port no ifindex 0 1 4 1 1 6 2 1 6 3 1 6 4 1 6 Click Apply to finish Figure 7 44 RMON Statistics configuration 7 4 15 2 RMON history Click RMON Hi...

Page 69: ...OID will finish automatically In this page enter index no from 1 65535 owner serial no 1 32 and select port no ifindex 0 1 4 1 1 6 2 1 6 3 1 6 4 1 6 sampling type absolute delta alarm type rising alar...

Page 70: ...6 RMON Alarm configuration 7 4 15 4 RMON Event Click RMON Event in the left menu to configure as figure 7 47 Enter index no from 1 65535 owner serial no 1 32 event type LOG SNMP trap Log and Trap even...

Page 71: ...enu and enter the page as figure 7 48 Click Reboot to reset the device Figure 7 48 Reboot 7 5 2 Logout Click Logout in the left menu and enter the page as figure 7 49 Click Logout to exit Figure 7 49...

Page 72: ...4SM Industrial Ethernet Switch User Manual 62 7 7 Load Default Click Load Default in the left menu and enter the page as figure 7 51 Click Load Default to restore all default settings Figure 7 51 Load...

Page 73: ...wisted pair STP will be used for the connection of RJ 45 for the connection of 10Mbps category 3 4 and 5 of 100 ohm will be used and cat 5 of 100 ohm will be used for 100Mbps Additionally do make sure...

Page 74: ...ta RD Output data TD 2 Receiving data RD Output data TD 3 Output data TD Receiving data RD 6 Output data TD Receiving data RD 4 5 7 8 Unused Unused Note denoting cable polarity Definition of straight...

Page 75: ...0Base T Cat 3 4 and 5 100 ohmUTP 100m RJ 45 100Base TX Cat 5 100ohmUTP 100m RJ 45 100Base FX 50 125 or 62 5 125 m core multi mode fiber MMF 5km 1310nm MM SC FC ST 100Base FX 9 125 m single mode fiber...

Page 76: ......

Page 77: ...that is automatically configured to adaptive mode for the speed duplex and traffic control port Bandwidth The information capacity that the channel can transmit For instance the bandwidth of the Fast...

Page 78: ...N and allow them to receive and send data packet at the same time Half Duplex The communication for two nodes can only move toward one direction at the same time but can not move toward both direction...

Page 79: ...Ftp server Before update you need to setup the Ftp server FTP server is well known software and can be downloaded on the internet Here is the step for configuring FTP server 1 Install WFTPD in PC Star...

Page 80: ...word in New Password and Verify area for example test click OK Figure D 4 WFTPD configure password 5 Set main path in home directory here is E study Figure D 5 configure user information Click Done to...

Page 81: ...te as Figure D 6 Figure D 6 Software Update 2 Set FTP server IP address user name password Update software name click Apply button record update software ID 3 Wait for upgrade software Update successf...

Page 82: ...User Manual 72 6 Wait for 30 seconds start Web management system click on navigation bar to check equipment basic information software version sure about the update successfully As Figure D 9 Figure...

Page 83: ......

Reviews: