


OPERATION
5
67
OPTISYS SLM 2100
www.krohne.com
01/2017 - 4002737304 - MA OPTISYS SLM 2100 R04 en
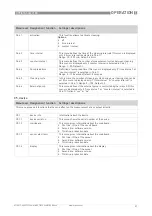
Step 4b (I): save raw values (ADC)
Step 4c (II): calibrate conc. with reference value of laboratory results
Start the calibration process with step 2: move sensor
Press
↓
or
↑
until the submenu calibrate conc.
calibrate conc.
calibrate conc.
calibrate conc. is highlighted.
Press >>>> to enter the chosen menu.
reference value
reference value
reference value
reference value is shown.
Press
^
^
^
^
to skip this function.
ADC value
ADC value
ADC value
ADC value is shown.
Press
↓
or
↑
to choose between stored value
stored value
stored value
stored value to use the stored value or actual value
actual value
actual value
actual value to use the
actual value for calibration.
Press
↓
or
↑
to select actual value
actual value
actual value
actual value.
Press
^
^
^
^
to enter the chosen menu.
actual value
actual value
actual value
actual value is shown.
Press
^
^
^
^
to confirm the value.
use value
use value
use value
use value is shown.
Press
↓
or
↑
to choose between break
break
break
break to interrupt the calibration, calibrate
calibrate
calibrate
calibrate
to adjust the actual value to the reference value or save ADC value
save ADC value
save ADC value
save ADC value to save
the actual value.
Press
↓
or
↑
to select save ADC value
save ADC value
save ADC value
save ADC value.
Press
^
^
^
^
to enter the chosen menu.
Press
^
^
^
^
several time until you reach the measuring mode again.
Choose yes
yes
yes
yes to safe and confirm your selection.
A sludge sample from the same position where the sensor was for calibration has to be taken and
analysed in the lab -> once the lab result is determined return to the meter and enter the reference value
in order to calibrate the meter.
Press
↓
or
↑
until the submenu calibrate conc.
calibrate conc.
calibrate conc.
calibrate conc. is highlighted.
Press >>>> to enter the chosen menu.
reference value
reference value
reference value
reference value is shown.
Press
↓
or
↑
to enter the reference value.
Press
^
^
^
^
to confirm the value.
ADC value
ADC value
ADC value
ADC value is shown.
Press
↓
or
↑
to choose between stored value
stored value
stored value
stored value to use the stored value or actual value
actual value
actual value
actual value to use the
actual value for calibration.
Press
↓
or
↑
to select stored value
stored value
stored value
stored value.
Press
^
^
^
^
to enter the chosen menu.
stored value
stored value
stored value
stored value is shown.
Press
^
^
^
^
to confirm the value.
use value
use value
use value
use value is shown.
Press
↓
or
↑
to choose between break
break
break
break to interrupt the calibration, calibrate
calibrate
calibrate
calibrate
to adjust the actual value to the reference value or save ADC value
save ADC value
save ADC value
save ADC value to save
the actual value.
Press
↓
or
↑
to select calibrate
calibrate
calibrate
calibrate.
Press
^
^
^
^
to enter the chosen menu.
Press
^
^
^
^
several time until you reach the measuring mode again.
Choose yes
yes
yes
yes to safe and confirm your selection.
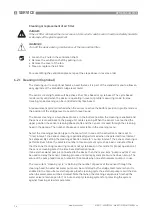
INFORMATION!
When the zero calibration of the sensor is done in a medium with a higher turbidity than used for
the concentration reference point, it will cause invalid mapping of sensor values to the mapped
unit (g/l). The device automatically detects this failure and will report an application error
message "sensor calibration wrong" on the message screen. The error will remain until the
sensor is correctly calibrated by the user.
Summary of Contents for OPTISYS SLM 2100
Page 85: ...NOTES 8 85 OPTISYS SLM 2100 www krohne com 01 2017 4002737304 MA OPTISYS SLM 2100 R04 en ...
Page 86: ...8 NOTES 86 OPTISYS SLM 2100 www krohne com 01 2017 4002737304 MA OPTISYS SLM 2100 R04 en ...
Page 87: ...NOTES 8 87 OPTISYS SLM 2100 www krohne com 01 2017 4002737304 MA OPTISYS SLM 2100 R04 en ...