


5
OPERATION
60
OPTISYS SLM 2100
www.krohne.com
01/2017 - 4002737304 - MA OPTISYS SLM 2100 R04 en
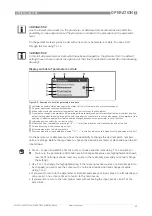
5.7.2 Initial configuration in extended settings
Before start of the operation a few important entries have to be made at the measuring device.
For further information refer to
Definition of positions and zones
on page 59. These settings will
also automatically scale the 4...20 mA outputs. Execute the following steps before starting the
first measurement:
First step: Change the working mode
•
Change the measuring function to manual operation and lower the sensor by using the arrow
keys.
Second step: Find out the distances
•
Lower the sensor head 0.3 m / 1 ft below the liquid surface and note the level as the blind
zone. Lower the sensor further until it reaches the bottom of the tank. (You can identify this
point by watching the cable got slack.) Pull up the sensor until you have about 5 cm / 2" of
clearance between the bottom of the clarifiers and the sensor. Note the level as the maximum
depth.
Third step: Entering the distances
•
Select the menu
“
Extended setup
”
and enter blind zone and max. depth.
•
If rake is present you can go to the option rake height and enter the value.
Summary of Contents for OPTISYS SLM 2100
Page 85: ...NOTES 8 85 OPTISYS SLM 2100 www krohne com 01 2017 4002737304 MA OPTISYS SLM 2100 R04 en ...
Page 86: ...8 NOTES 86 OPTISYS SLM 2100 www krohne com 01 2017 4002737304 MA OPTISYS SLM 2100 R04 en ...
Page 87: ...NOTES 8 87 OPTISYS SLM 2100 www krohne com 01 2017 4002737304 MA OPTISYS SLM 2100 R04 en ...