Solving Other Problems
208
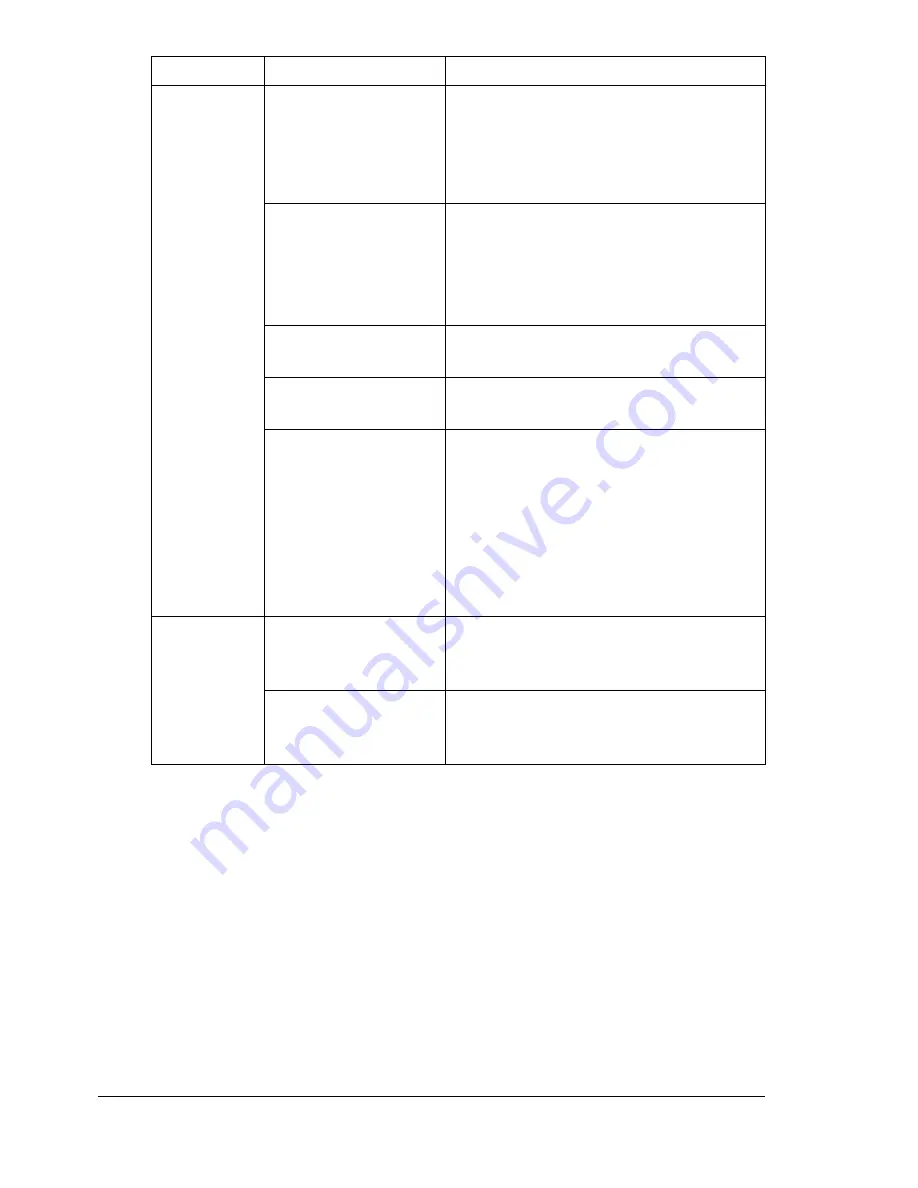
Printing
takes too
much time.
The printer is set to a
slow printing mode
(for example, thick
stock or transpar-
ency).
It takes more time to print on special
media. When using regular paper,
make sure that the media type is set
properly in the driver.
The printer is set to
Energy Saver mode.
It takes time for printing to start in
Energy Saver mode. If you do not want
to use this mode, disable it. (
SYS
DEFAULT MENU/ENERGY SAVER
menu)
The job is very com-
plex.
Wait. No action needed.
The printer memory is
insufficient.
Add more memory.
A toner cartridge for a
different region or an
unapproved genuine
toner cartridge is
installed (
INCOR-
RECT TONER X
is
displayed in the mes-
sage window).
Install a correct KONICA MINOLTA
toner cartridge approved for your spe-
cific printer.
Blank pages
come out
during print-
ing.
One or more of the
toner cartridges are
defective or empty.
Check the toner cartridges. The image
will not print if one or more cartridges
are empty.
The wrong media is
being used.
Check that the media type set in the
driver matches the media loaded in the
printer.
Symptom
Cause
Solution
Summary of Contents for bizhub C31P
Page 1: ...bizhub C31P User s Guide A0EA 9564 00A...
Page 8: ......
Page 14: ...Contents vi...
Page 15: ...Introduction...
Page 20: ...Getting Acquainted with Your Printer 6...
Page 21: ...About the Software...
Page 36: ...Using the Postscript and PCL Printer Driver 22...
Page 37: ...Using the Status Monitor Windows Only...
Page 40: ...Closing the Status Monitor 26...
Page 41: ...Printer Control Panel and Configuration Menu...
Page 113: ...Camera Direct...
Page 115: ...Memory Direct...
Page 117: ...Using Media...
Page 151: ...Replacing Consumables...
Page 182: ...Replacing Consumables 168 6 Install the stapling unit 7 Close the stapler cover...
Page 183: ...Maintaining the Printer...
Page 193: ...10 Troubleshooting...
Page 208: ...Clearing Media Misfeeds 194 4 Push down the levers 5 Close the right side cover...
Page 244: ...Status Error and Service Messages 230...
Page 245: ...11 Installing Accessories...
Page 268: ...Staple Finisher 254 10 Install the relay unit on the machine 11 Open the relay unit cover...
Page 275: ...Appendix...


