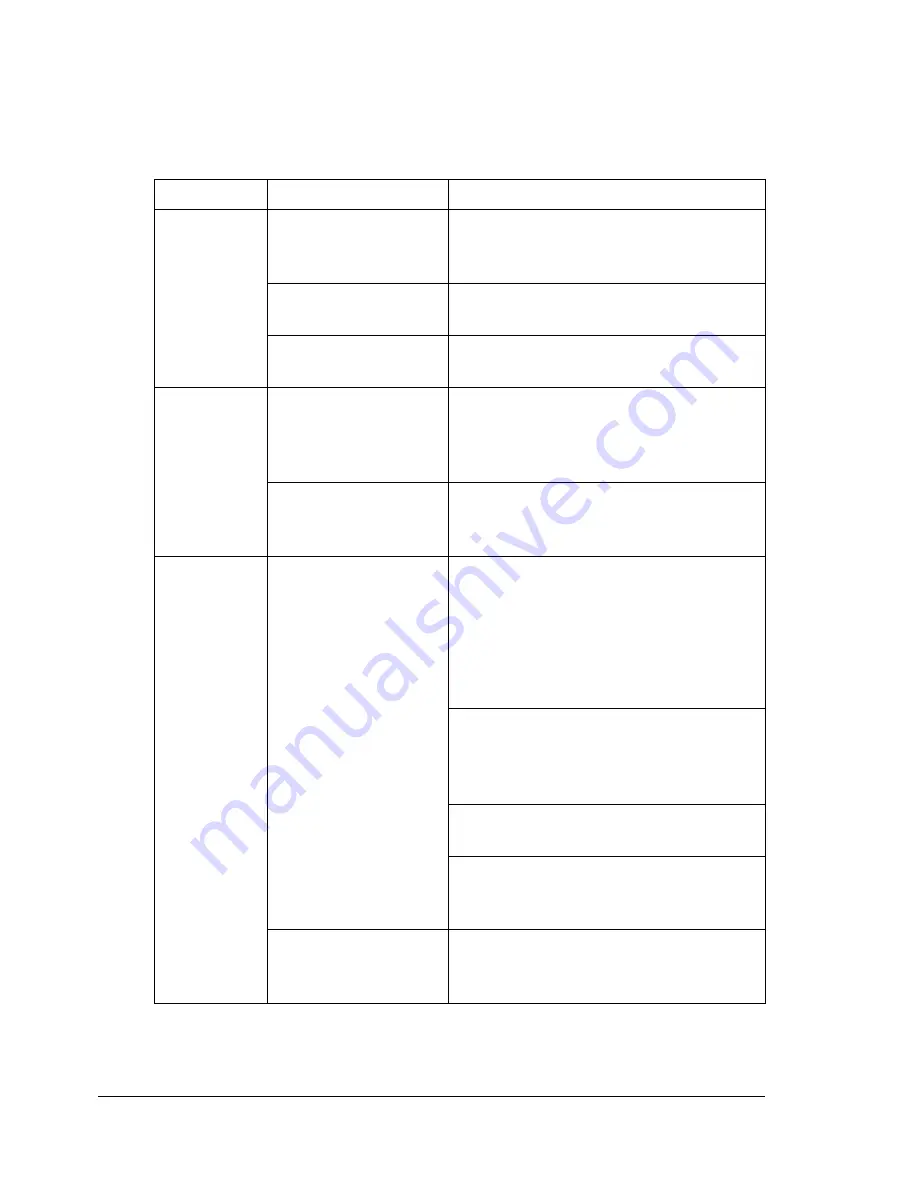
Solving Problems with Media Misfeeds
226
Solving Problems with Media Misfeeds
"
Frequent misfeeds in any area indicate that area should be checked,
repaired, or cleaned. Repeated misfeeds may also happen if you’re
using unsupported print media or original media.
Symptom
Cause
Solution
Several
sheets go
through the
machine
together.
The front edges of
the media are not
even.
Remove the media and even up the
front edges, then reload it.
The media is moist
from humidity.
Remove the moist media and replace it
with new, dry media.
Too much static elec-
tricity is present.
Do not fan transparencies.
Media mis-
feed mes-
sage stays
on.
Engine cover needs
to be opened and
closed again to reset
the machine.
Open and close the engine cover
again.
Some media remains
misfed in the
machine.
Check the media path again to make
sure that you have removed all of the
misfed media.
Duplex mis-
feeds.
Unsupported media
(wrong size, thick-
ness, type, etc.) is
being used.
Use KONICA MINOLTA-approved
media. See “Specifications” on page
66.
Also, refer to http://printer. konicami-
nolta.com for a complete list of cur-
rently approved media.
Plain paper, recycled paper can be
autoduplexed if the media type is set
properly in the driver. See “Specifica-
tions” on page 66.
Make sure that you have not mixed
media types in the tray.
Do not duplex, envelopes, labels, letter
head, postcards, thick stock, glossy
media, or transparencies.
Media is still being
misfed.
Check the media path inside the
duplex again to make sure that you
have removed all of the misfed media.
Summary of Contents for A0FD011
Page 1: ...magicolor 4690MF Printer Copier Scanner User s Guide A0FD 9561 00A 1800859 001A...
Page 13: ...1Introduction...
Page 23: ...2Control Panel and Configuration Menu...
Page 40: ...Configuration Menu Overview 28 REPORTING SCAN SETTING...
Page 46: ...Configuration Menu Overview 34 PAPER SETUP Menu PAPER SETUP TRAY1 PAPER TRAY2 PAPER...
Page 76: ...Configuration Menu Overview 64...
Page 77: ...3Media Handling...
Page 100: ...Loading Media 88 6 Close Tray 3...
Page 109: ...4Using the Printer Driver...
Page 118: ...Printer Driver Settings 106...
Page 119: ...5Using the Copier...
Page 133: ...6Using the Scanner...
Page 162: ...Scanning With the Machine 150...
Page 163: ...7Replacing Consumables...
Page 182: ...Replacing Consumables 170 3 Remove the transfer roller 4 Prepare a new transfer roller...
Page 198: ...Replacing Consumables 186...
Page 199: ...8Maintenance...
Page 211: ...9 9Troubleshooting...
Page 220: ...Clearing Media Misfeeds 208 3 Close the right side cover...
Page 263: ...10 10Installing Accessories...
Page 270: ...Tray 3 Lower Feeder Unit 258...
Page 271: ...AAppendix...
Page 282: ...Our Concern for Environmental Protection 270...


