


10-14
Style Record mode
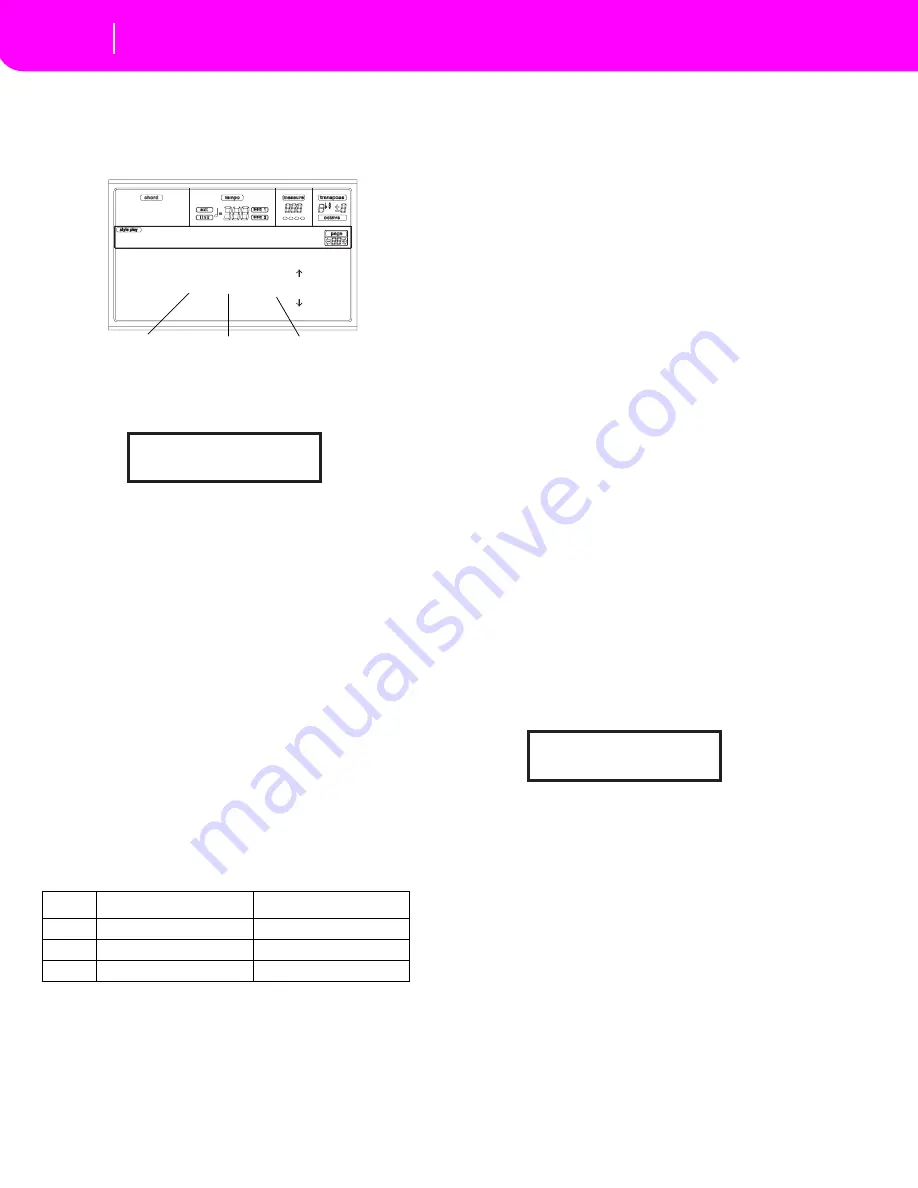
Page 4 - Event Edit
PAGE 4 - EVENT EDIT
The Event Edit page allows you to edit each event in a single
track. See “Event Edit procedure” on page 10-15 for more
information on the event editing procedure.
Trk (Track)
Track in edit. To select a different track, press one of the A
VOLUME/VALUE buttons to open the Go To Track window.
Use the TEMPO/VALUE controls to select a track, and press
ENTER to confirm, or EXIT to abort.
E/CV (Style Element/Chord Variation)
Selected Style Element and Chord Variation. This parameter
can’t be edited. To select a different Style Element and Chord
Variation, press EXIT to go back to the Main page of the Style
Record mode (see “Main page” on page 10-4).
Position
Position of the event shown in the display, expressed in the
form ‘aaa.bb.ccc’:
•
‘aaa’ is the measure
•
‘bb’ is the beat
•
‘ccc’ is the tick (each quarter beat = 384 ticks)
You can edit this parameter to move the event to a different
position.
Ev (Event)
Type and values of the event shown in the display. Depending
on the selected event, the value may change. This parameter
also shows the (non-editable) “End Loop” marking, when the
end of a track is reached.
To change the event type, use the C VOLUME/VALUE but-
tons to select the Event line, then use the same buttons or the
TEMPO/VALUE controls to select a different event type.
To select and edit the event’s value, use the F3 and F4 func-
tion keys, and use the G/VOLUME/VALUE buttons or the
TEMPO/VALUE controls.
Length
Length of the selected Note event. The value format is the
same as the Position value.
Note:
If you change a length of “000.00.000” to a different
value, you can’t go back to the original value. This rather
uncommon zero-length value may be found in some drum or
percussion tracks.
Transport, navigation and editing controls
E/F and H VOLUME/VALUE buttons
These buttons are the “Scroll to previous event” (E/F) and
“Scroll to next event” (H) controls. They corresponds to the
scrolling arrows shown on the screen.
G VOLUME/VALUE buttons
Use these buttons to select the corresponding parameter
value area.
F3 and F4 buttons
After selecting the parameter value area with the G VOL-
UME/VALUE buttons, use these buttons to select, respec-
tively, the first and second value of the event in edit.
START/STOP button
Press START/STOP and play some chords on the keyboard to
test the pattern in edit. Press START/STOP again to stop the
pattern running.
SHIFT + << or >>
Keep the SHIFT button pressed and press the << or >> but-
ton to open the Go to Measure window.
Use the TEMPO/VALUE controls to select a measure, then
press ENTER to confirm, or EXIT to abort.
INSERT
Press the INSERT button to insert a new event at the current
shown Position. The default values are Type = Note, Pitch =
C4, Velocity = 100, Length = 192.
After inserting an event, use the C VOLUME/VALUE buttons
to select the Event line, and the same buttons or the TEMPO/
VALUE controls to select a different event type.
DELETE
Press the DELETE button to delete the event shown in the
display.
Event
First value
Second value
Note
Note name
Velocity
Ctrl
Control Change number
Control Change value
Bend
Bending value
–
Trk: DRUM E:V1 CV:CV1
Position: 001.01.000 |
Ev: Note F#2 72
Lenght:000.00.000 |
Event Edit
Event Type
First value
Second value
Go to Track: DRUM
Enter=Ok Exit=Cancel
Go to Measure: 1
Enter=Ok Exit=Cancel
Summary of Contents for KD-150
Page 1: ......
Page 5: ......
Page 11: ...TOC 6 ...
Page 12: ...INTRODUCTION ...
Page 13: ......
Page 29: ...4 4 Display and User Interface Grayed out non available parameters ...
Page 32: ...BASIC GUIDE ...
Page 33: ......
Page 39: ...6 6 Basic operations Shortcut to see the original bank for a Style Performance or Program ...
Page 47: ...7 8 Tutorial 5 Editing a Song ...
Page 53: ...8 6 MIDI Playing another instrument with the KD ...
Page 54: ...REFERENCE GUIDE ...
Page 55: ......
Page 103: ...11 14 Song Play operating mode Saving a list of Songs ...
Page 111: ...12 8 Backing Sequence operating mode How to delete a whole Song ...
Page 133: ...13 22 Song operating mode Event Edit procedure ...
Page 189: ...16 20 Disk edit environment Page 11 Card Restore ...
Page 190: ...APPENDIX ...
Page 191: ......
Page 225: ...17 34 Factory Data MIDI Setup ...
Page 283: ...18 58 Effects Mono Mono Chain ...
Page 287: ...19 4 Assignable parameters Scales ...
Page 303: ...24 2 Technical specifications ...
Page 307: ...25 4 Alphabetical Index ...


