


13-5
Song operating mode
Step Record procedure
selected, a 1- or 2-bars countdown may play before the
recording actually begins. When it begins, play freely.
• If you selected the Auto Punch recording mode, the
recording will begin only when reaching the Start point.
• If you selected the Pedal Punch recording mode, press
the pedal when you want to start recording. Press it
again to stop recording.
Note:
The Punch functions will not work on an empty
Song. At least one track must be already recorded.
10.
When finished recording, press PLAY/STOP to stop the
sequencer. Select a different track, and go on recording
the whole Song.
11.
When finished recording the new Song, press RECORD
to exit the Record mode. The Song will be saved in
memory.
Warning:
Save the Song on a disk, to avoid loosing it when
turning the instrument off.
Note:
When exiting the Record mode, the Octave Trans-
pose is automatically reset to “0”.
12.
Edit the new Song; press the MENU page, and select the
various edit pages.
STEP RECORD PROCEDURE
The Step Record allows you to create a new Song by entering
the single notes or chords in each track. This is very useful
when transcribing an existing score, or a higher grade of
detail needed. It is particularly suitable to create drum and
percussion tracks.
1.
While in the Main screen of the Song mode, press
RECORD to enter the Song Record mode. The Main
page of the Song Record mode will appear.
2.
Use the A VOLUME/VALUE buttons to select the “Rec”
(Recording Mode) parameter. Use these buttons, or the
TEMPO/VALUE controls, to select the “Step Dub” (Step
Overdub) or the “StepOwr” (Step Overwrite) recording
mode.
• The Step Overdub mode lets you add events to the
existing events.
• The Step Overwrite mode will overwrite all existing
events.
3.
Press SEQ1 PLAY/STOP to turn its LED on, and enter
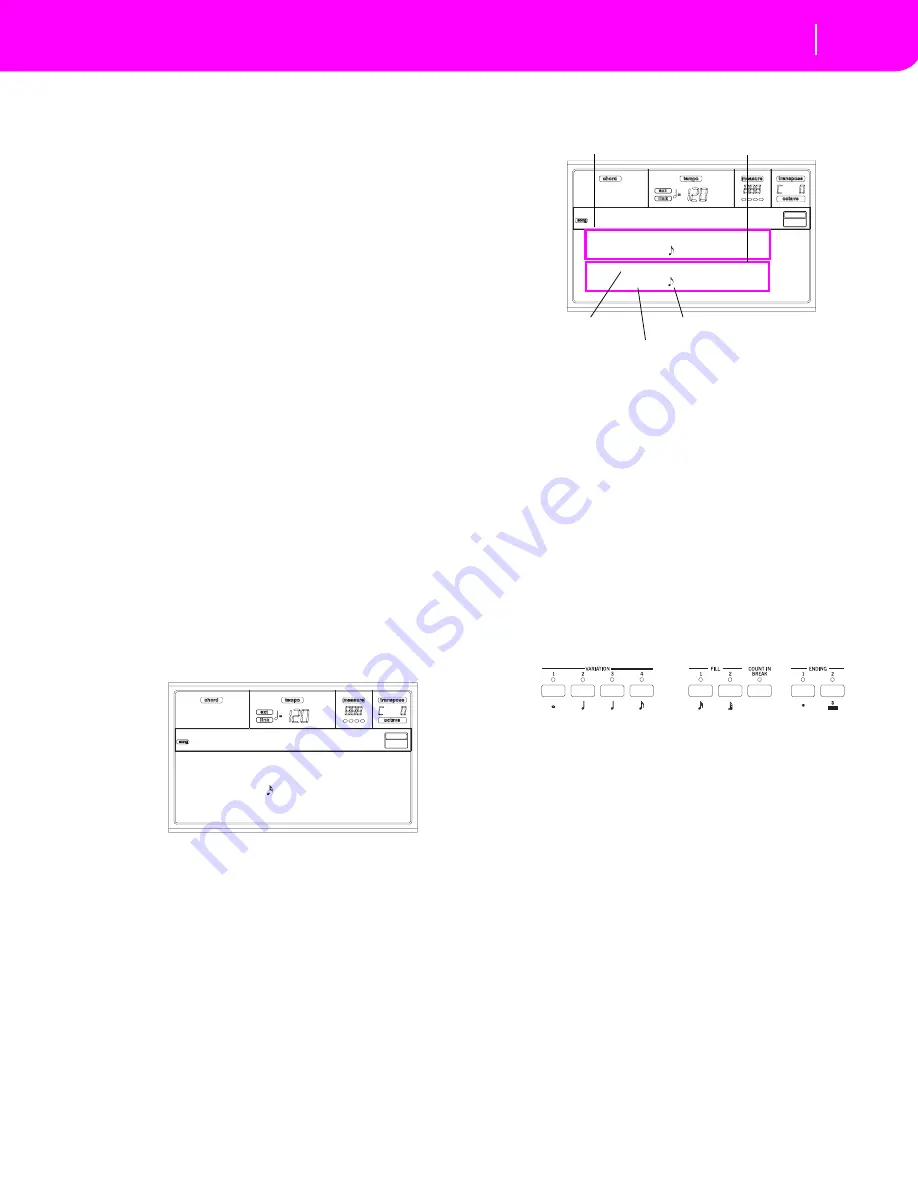
the Step Record page. (See “Step Record page” on
page 13-7 for more information on each parameter of
this page).
The first two lines (a) are the latest inserted events. The
second two lines (b) are the events currently in edit,
ready to be inserted.
There are “Empty” event marks at the beginning of the
Song, when there are no events inserted. It is automati-
cally inserted when entering the Record mode. It will be
removed when an event is inserted.
4.
The “Maaa.bb.ccc” parameter in (b) is the current posi-
tion. This is the place where the note in edit will be
inserted.
• If you don’t want to insert a note at this position,
insert a rest instead, as shown in step 6.
• To jump to the next measure, filling the remaining
beats with rests, press the >> button.
5.
To change the step value, use the NOTE VALUE buttons,
on the lower left area of the control panel.
6.
Insert a note, rest or chord at the current position.
• To insert a single note, just play it on the keyboard. The
inserted note length will match the step length. You may
change the velocity and relative duration of the note, by
editing the V (Velocity) and D (Duration) parameters.
See “V (Velocity)” and “D (Duration)” on page 13-8.
• To insert a rest, just press the REST button. Its length
will match the step value.
• To tie the note to be inserted to the previous one, press
the TIE button. A note will be inserted, tied to the previ-
ous one, with exactly the same name. You don’t need to
play it on the keyboard again.
• To insert a chord or a second voice, see “Chords and
second voices” below.
7.
After inserting a new event, you may go back by pressing
the < button. This will delete the previously inserted
event, and set the step in edit again.
Rec:Overdub Trk:1 98%
S: E: Metro:On1
Resol: Meter:4/4
Sel.Tempo Tempo:Auto
Rec:NewSong
Step Owr
M---.--.--- Empty
--
M001.01.000 Meter: 4/4
key? V:64 D:85%
(a)
(b)
Previous event
Event to be inserted
Current position
Waiting for a keystroke…
Step value
Summary of Contents for KD-150
Page 1: ......
Page 5: ......
Page 11: ...TOC 6 ...
Page 12: ...INTRODUCTION ...
Page 13: ......
Page 29: ...4 4 Display and User Interface Grayed out non available parameters ...
Page 32: ...BASIC GUIDE ...
Page 33: ......
Page 39: ...6 6 Basic operations Shortcut to see the original bank for a Style Performance or Program ...
Page 47: ...7 8 Tutorial 5 Editing a Song ...
Page 53: ...8 6 MIDI Playing another instrument with the KD ...
Page 54: ...REFERENCE GUIDE ...
Page 55: ......
Page 103: ...11 14 Song Play operating mode Saving a list of Songs ...
Page 111: ...12 8 Backing Sequence operating mode How to delete a whole Song ...
Page 133: ...13 22 Song operating mode Event Edit procedure ...
Page 189: ...16 20 Disk edit environment Page 11 Card Restore ...
Page 190: ...APPENDIX ...
Page 191: ......
Page 225: ...17 34 Factory Data MIDI Setup ...
Page 283: ...18 58 Effects Mono Mono Chain ...
Page 287: ...19 4 Assignable parameters Scales ...
Page 303: ...24 2 Technical specifications ...
Page 307: ...25 4 Alphabetical Index ...


