


KINOVA
®
Gen3 Ultra lightweight robot
User Guide
36
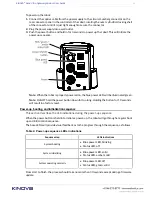
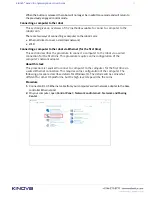
Changing the robot wired connection IP address
This section describes how to change the robot's wired connection IP address.
Before you begin
You need to have already
connected the computer to a wired network connection
to
configure the robot for a wired connection (you will need information about the available
IP addresses on your local area network).
About this task
This procedure is used to configure the robot so that you can connect a computer to the
robot remotely over your local area network.
Note:
For security reasons, we do not recommend connecting the robot to a WAN. The network
should be a simple local area network with low traffic.
Procedure
1.
Open the Web application and go to the Networks page. Open the Ethernet tab.
2.
Modify the IPv4 address, IPv4 subnet mask, and IPv4 gateway to match an available IP
address with the IP address range of your network.
Note:
Once you modify the robot network parameters, your client computer will lose
connection with the robotic arm.
3.
Physically disconnect the robot from your computer and connect it via Ethernet cable to
your local network at a network switch.
4.
Restore appropriate local network settings on your computer and connect your computer to
your network.
5.
From your computer, ping the robot at the newly configured robot IP address.
What to do next
From your computer web browser, enter the new robot IP address to access the Web
App.
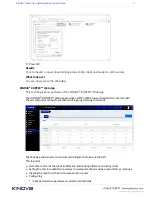
Connecting a computer to the robot via Wi-Fi
This section describes the procedure to connect a computer to the robot via Wi-Fi .
Before you begin
You will need to have a
wired connection between the computer and robot
to carry out this
procedure.


