


KINOVA
®
Gen3 Ultra lightweight robot
User Guide
19
The first step to getting started with the arm after unboxing is to physically mount the arm in a
stable manner so that the arm can be connected and used.
The most basic mounting option uses the mounting plate clamped to a tabletop, but it is possible
to mount the arm in different ways, depending on the needs of your particular application.
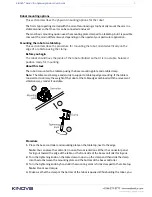
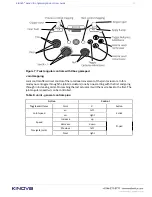
Mounting the robot on a tabletop
This section describes the procedure for mounting the robot oriented vertically on the
edge of a tabletop using the clamp.
Before you begin
The robot should have the joints of the robot unfolded so that it is in a stable, balanced
position ready for mounting.
About this task
The robot is mounted to a tabletop using the base mounting plate and a table clamp.
Note:
The table must be large and sturdy to support a tabletop edge mounting. If the table is
too small or too flimsy, the weight of the robot at the table edge combined with the movement
vibrations may render it unstable.
Procedure
1.
Place the base controller and mounting plate on the tabletop, next to the edge.
Note:
You can place the controller in one of two orientations. Either the connector panel
facing out toward the edge of the table, or the front side of the base controller facing out.
2.
Turn the tightening knob on the table clamp to open up the clamp and then slide the clamp
into the slot between the mounting plate and the bottom of the base controller.
3.
Turn the tightening knob by hand until the mounting plant is firmly clamped to the table top.
Note:
Do not overtorque.
4.
Make sure that the clamp at the bottom of the robot is opened. While holding the robot, you
Robot mounting options
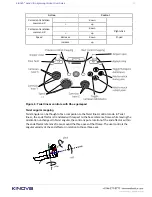
This section describes the physical mounting options for the robot.


