


-
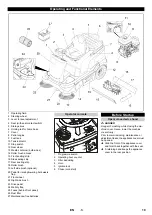
9
CAUTION
Risk of injury! Do not remove the spark plug
connector manually.
1 Vacuum line
2 Ignition plug
3 Casing
Pull the vacuum line out of the casing.
Remove the spark plug connector using
suitable tools/tongs.
Unscrew and clean spark plug.
Screw in cleaned or new spark plug.
Push on spark-plug connector.
Reinsert the vacuum pipe into the cas-
ing.
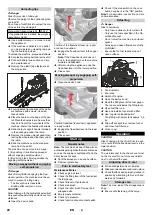
DANGER
Risk of burns on account of hot surfaces!
CAUTION
This inspection may only be carried out
when the engine is warm
Open the device hood.
1 Equalising container
2 MAX oil level
3 MIN oil level
Check oil level in the equalisation con-
tainer.
The filling level should be between the
"Max" and "Min" marking.
If hydraulic oil is missing:
Remove the lid of the equalising reser-
voir and refill hydraulic oil.
For oil type refer to Chapter "Technical
specifications".
Close the lid.
Check tyre pressure.
The side-brushes lift up.
Drive sweeper on to a smooth, even
surface covered with a visible layer of
dust or chalk.
Lower side-brushes and allow them to
briefly rotate.
The side-brushes lift up.
Drive machine backwards.
Park the sweeper on an even surface.
Check sweeping mirror.
The width of the sweeping track should
lie between 40-50 mm.
Note:
The side brush floating mounting ad-
justs the sweeping track as the bristles
wear down. The side brush must be re-
placed if it becomes too worn.
Park the sweeper on an even surface.
Set programme switch to step 1 (driv-
ing). Side brushes lift up.
Turn main key to "0" and remove it.
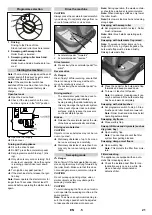
1 Side brushes
2 Wing screw (attachment)
Unscrew the wing screw on the underside
and remove the side brush downwards.
If necessary, clean the mount.
Attach new side brush (note fixings)
and fasten with wing screw.
Park the sweeper on an even surface.
Set programme switch to step 1 (driv-
ing). Roller brush is raised.
Turn ignition key to "0" and remove it.
Secure the machine with wheel
chock(s) to prevent it from rolling away.
Remove belts or cords from roller brush.
Note:
The side brush floating mounting of
the roller brush adjusts the sweeping track
as the bristles wear down. The roller brush
must be replaced if it becomes too worn.
Set programme switch to step 1 (driv-
ing). The side brush and roller brush are
raised.
Drive sweeper on to a smooth, even
surface covered with a visible layer of
dust or chalk.
Lower roller brush and allow it to briefly
rotate.
Raise roller brush.
Press pedal which raises bulk waste
flap and keep pressed.
Drive machine backwards.
Check sweeping mirror.
The sweeping track should have an
even rectangular shape which is be-
tween 50 and 70 mm wide.
Replacement is due if a visible deteriora-
tion in sweeping performance caused by
bristle wear is evident.
Park the sweeper on an even surface.
Set programme switch to step 1 (driv-
ing). Roller brush is raised.
Turn ignition key to "0" and remove it.
Secure the machine with wheel
chock(s) to prevent it from rolling away.
Raise slightly the waste container on
the left side and pull it out.
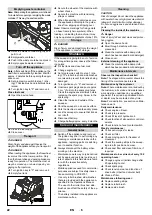
1 Screw
2 Side panels
Loosen the fastening screw on the left
side-panel.
Remove side panel.
Clean or replace the spark plug
Check hydraulic oil level and refill hy-
draulic oil
Checking the sweeping mirror of the
side-brushes
Replacing side brush
Checking roller brush
Check the sweeping mirror of the
sweeping roller
Replacing roller brush
25
EN
Summary of Contents for 1.047-310.0
Page 2: ...2...
Page 167: ...2 18 18 3 4 166 EL...
Page 168: ...3 3 4 5 2 1 167 EL...
Page 170: ...5 2 1 2 1 2 3 265 kg 169 EL...
Page 171: ...6 5 20 kg 1 2 3 0 1 1 10 10 1 2 5 cm 5 cm 2 2 1 170 EL...
Page 172: ...7 50 mm 3 1 2 1 0 0 18 1 0 3 cm3 2 2 1 171 EL...
Page 173: ...8 VDE 0701 K rcher 100 20 K rcher 20 100 200 300 3 4 0 1 2 2 6 172 EL...
Page 174: ...9 1 2 91 157 173 EL...
Page 175: ...10 1 1 2 3 4 1 2 3 1 2 5 1 2 MIN MAX MIN MAX 6 491 538 5 1 5 1 2 3 1 2 3 Z Nm 56 Nm 174 EL...
Page 176: ...11 1 2 MAX 3 MIN Max Min 40 50 mm 1 0 1 2 1 0 1 50 70 mm 1 0 1 2 1 175 EL...
Page 177: ...12 1 2 3 1 2 1 0 1 10 15 mm 2 5 10 mm 3 1 3 mm 0 176 EL...
Page 178: ...13 0 3 4 1 2 1 2 3 3 4 4 5 5 6 7 6 177 EL...
Page 179: ...14 K rcher K rcher K rcher 3 K rcher K rcher K rcher T K rcher 2 3 K rcher 0 178 EL...
Page 197: ...2 18 18 196 RU...
Page 198: ...3 3 4 3 4 5 2 1 197 RU...
Page 199: ...4 1 2 3 4 5 6 7 8 9 10 11 12 13 14 15 16 17 18 19 20 21 22 23 24 25 26 27 1 2 3 4 5 6 198 RU...
Page 200: ...5 1 2 ON 1 2 3 265 kg 199 RU...
Page 201: ...6 Normal 92 5 20 1 2 3 0 ON 1 1 10 10 1 2 5 5 2 2 1 200 RU...
Page 202: ...7 50 3 1 2 1 0 0 18 1 0 3 3 2 1 201 RU...
Page 203: ...8 VDE 0701 K rcher 100 20 K rcher 20 100 200 300 3 4 0 1 2 2 6 202 RU...
Page 204: ...9 1 2 91 157 EWG 1 203 RU...
Page 205: ...10 1 2 3 4 1 2 3 1 2 5 1 2 MIN MAX MIN MAX 6 491 538 5 1 5 1 2 3 1 2 3 56 Nm 204 RU...
Page 206: ...11 1 2 3 40 50 1 0 1 2 1 0 1 50 70 1 0 1 2 1 205 RU...
Page 207: ...12 1 2 3 1 2 1 0 1 10 15 2 5 10 3 1 3 0 206 RU...
Page 208: ...13 0 3 4 1 2 1 2 3 3 4 4 5 5 6 7 6 207 RU...
Page 209: ...14 ON K rcher K rcher K rcher 3 K rcher K rcher K rcher K rcher 2 3 K rcher 0 208 RU...
Page 328: ...2 e 18 18 3 4 327 BG...
Page 329: ...3 3 4 5 2 1 328 BG...
Page 331: ...5 1 2 ON 1 2 3 265 kg 330 BG...
Page 332: ...6 5 20 1 2 3 0 ON 1 Choke Choke 1 10 10 1 2 5 c 5 c 2 2 1 331 BG...
Page 333: ...7 50 mm 3 1 2 1 0 0 18 1 0 3 3 2 2 1 332 BG...
Page 334: ...8 VDE 0701 K rcher 100 20 Karcher 20 100 200 300 3 4 0 1 2 2 6 1 2 333 BG...
Page 335: ...9 91 157 1 1 2 3 4 334 BG...
Page 336: ...10 1 2 3 1 2 5 1 2 MA 6 491 538 5 1 5 1 2 3 1 2 3 1 2 MAX 3 MIN Max Min Nm 56 Nm 335 BG...
Page 337: ...11 40 50 1 0 1 2 1 0 1 50 70 mm 1 0 1 2 1 1 2 3 1 2 336 BG...
Page 338: ...12 1 0 1 10 15 2 5 10 3 1 3 0 0 3 4 1 2 1 2 337 BG...
Page 339: ...13 3 3 4 4 5 5 6 7 6 338 BG...
Page 340: ...14 ON K rcher K rcher K rcher 3 K rcher K rcher K rcher K rcher 2 3 K rcher 0 339 BG...
Page 386: ...2 385 UK...
Page 387: ...3 18 18 3 4 3 4 2 1 386 UK...
Page 388: ...4 1 2 3 4 5 6 7 8 9 10 11 12 13 14 15 16 17 18 19 20 21 22 23 24 25 26 27 1 2 3 4 5 6 387 UK...
Page 389: ...5 1 2 ON 1 2 3 265 kg 388 UK...
Page 390: ...6 Normal 92 5 20 1 2 3 0 ON i 1 1 10 10 1 2 5 5 2 1 389 UK...
Page 391: ...7 i 2 50 i 3 1 2 i 1 0 0 18 i 1 0 3 3 2 1 390 UK...
Page 392: ...8 VDE 0701 K rcher 100 20 K rcher 20 100 200 300 3 4 0 1 2 2 6 391 UK...
Page 393: ...9 1 2 91 157 EWG 1 392 UK...
Page 394: ...10 1 2 3 4 1 2 3 1 2 5 1 2 M N MAX M N MAX 6 491 538 5 1 5 1 2 3 1 2 3 56 Nm 393 UK...
Page 395: ...11 1 2 3 40 50 i 1 0 1 2 i 1 0 i 1 50 70 i 1 0 1 2 1 394 UK...
Page 396: ...12 1 2 3 1 2 i 1 0 1 10 15 2 5 10 3 1 3 0 395 UK...
Page 397: ...13 0 3 4 1 2 1 2 3 3 4 4 5 5 6 7 6 396 UK...
Page 398: ...14 ON Karcher Karcher Karcher 3 Karcher Karcher Karcher Karcher 2 3 Karcher 0 397 UK...
Page 401: ......


