70
System List
ᴾ
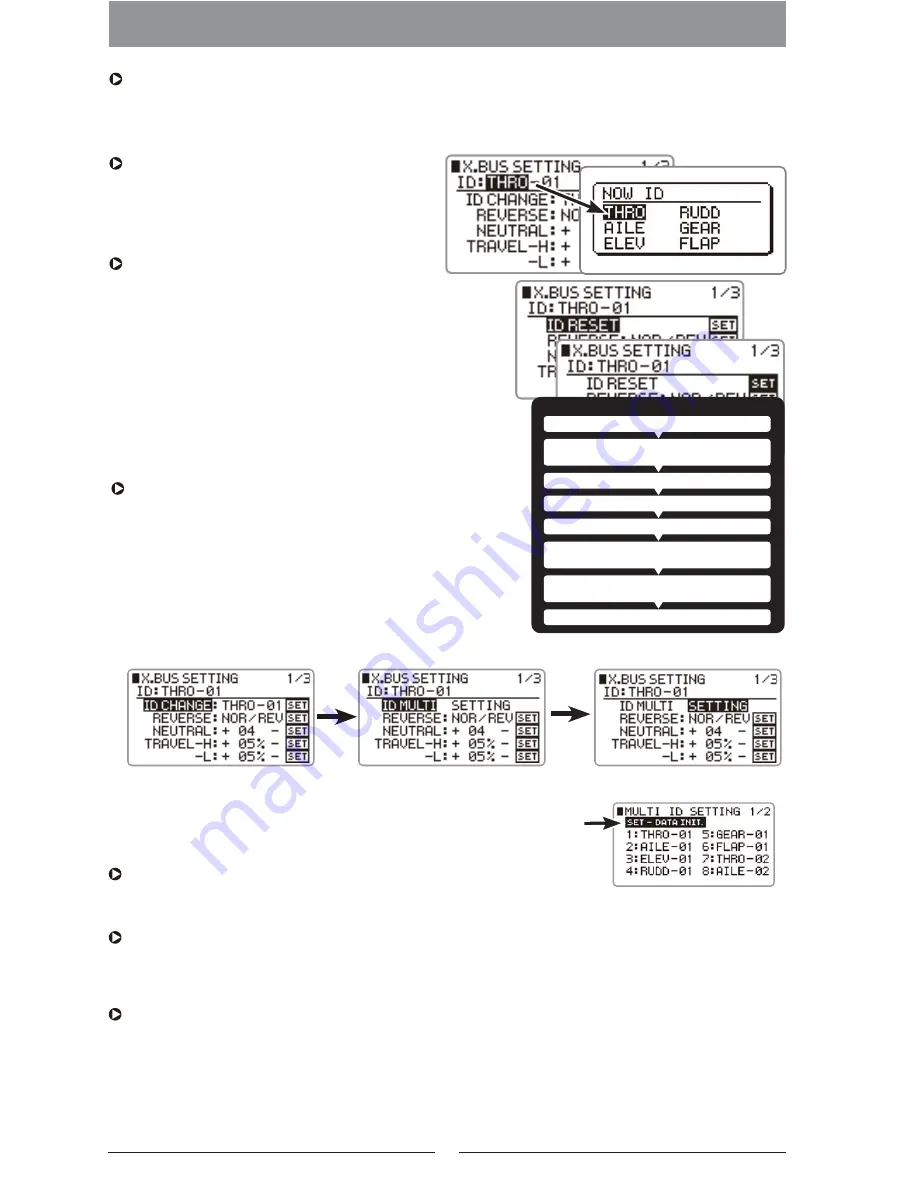
XBus IDʼs
ID Reset (ID RESET)
Collective ID set function(ID MULTI-SETTING)
There are two ID's - the main ID and the sub ID. The main ID configures channel numbers, and the sub ID
configures up to 4 individual servos, which can be adjusted individually.
It is recommended to mark the ID number on each individual XBus servo itself to avoid confusion.
※The channel name will vary depending on the wing type or swash type being used.
ID Change ( ID CHANGE)
It is possible to reset an XBus device to default settings using the
transmitter. Set the cursor to “ID CHANGE” and press the dial to
finalize. Place the cursor on “SET” and press the dial to finalize
the ID RESET.
This function is used to carry out channel ID mapping for the XPort Duo
receiver (XB1-14DRS). Move the cursor to ID CHANGE and press the dial to
select "ID MULTI".
Move the cursor to "SETTING" (to the right of "ID MULTI") and press the
dial to enter the collective setting. Set the main ID and sub ID on this
screen. It is essential to press the dial selecting "SET DATA - INIT." to store
the settings to the XPort Duo. All the data is always over written.
Note: Reverse, centering and travel limit are all initialized (reset) after
executing "SET DATA - INIT.".
It is possible to adjust XBus devices through the
transmitter. Input the current main + sub ID's for the
XBUS device and the new desired ID's.
Place the cursor on “SET” and press the dial to
finalize the setting.
Select the function as shown below.
Reverse (REVERSE)
Neutral (NEUTRAL)
Travel(TRAVEL)
※
These setting must be performed after the transmitter and receiver are bound (paired), and the XBus devices
must be connected and powered on.
Note: Be sure to remove the bind plug from the receiver bind port, other wise setting cannot be accomplished.
※ The ID reset function will reset all connected converters or XBus
servos to their default ID such as (THRO(01)-01). Be sure to remove all
servo horns or linkages before performing a rest as the servo may move
beyond the linkage limitation and damage the linkage or the servo itself.
Additionally, if a control surface employs two or more servos, you must
be careful to disconnect the servo linkages and servo horns when
resetting XBus servos. The high stress of binding the servo may damage
the servos, receiver or relative devices by high current consumption and
a fire may occur.
▋Set the main ID and sub ID on the following screen.
※All the properties of the ID will be initialized (reverse, centering and
travel limit).
※The maximum number of channels displayed is 6 when using a C.O.L.T..
Disconnect all XBus related servo linkages or remove servo horns.
Disconnect all the XBus converters or related
XBus devices which DO NOT require resetting.
Turn on the transmitter.
Turn on the receiver.
Execute ID reset.
Change the converterʼs output port or XBus servo ID's as required.
We recommend you make a note of the ID numbers.
After completion of the ID settings, confirm correct servo movement
and check all program mixing and flight mode settings.
Connect the linkages or the servo horns and complete a final check.
Reset of ID on XBus servos or XBus converters
It is possible to reverse the servo. Set the particular servoʼs main ID and sub ID,
set either normal or reverse, and press the dial. Place the cursor on “SET” and press the dial to finalize.
It is possible to set the servo neutral. Set the particular servoʼs main ID and sub ID, set the cursor on
“+” or “-” to change the neutral value, place the cursor on “SET” and press the dial to finalize the setting.
It is possible to adjust the servo travel. Set the particular servoʼs main ID and sub ID, set the cursor on “+” or “-”
and press the dial to change the travel value, place the cursor on “SET” and press the dial to finalize the setting.
Execute collective ID mapping by
pressing the dial to "SET DATA - INIT."
Summary of Contents for C.O.L.T.
Page 1: ...Classic Old Looking Transmitter...
Page 82: ...http www jrpropo co jp...


