


58
GEN04
Service Manual
6
Scroll to page 2.
7
Record the ‘Current Setpoint’ value:
_______________mA
8
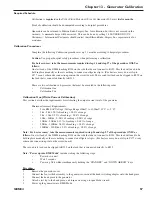
By specification, 75% of the value recorded in step 7 is the Anticipated Level 3 current. Calculate and record
this value by
multiplying
the step 7 value above, by
0.75.
_______________mA
9
Scroll to page 17.
10
Turn the volume knob fully to the left (counter-clockwise).
11
Press the “TEST” key repeatedly until “Value Not Accepted” is flashed on the display.
Fail_____ Pass_____
The unit is now intentionally uncalibrated. This can be verified by scrolling to page 21 and inspecting the
“Current Write Cal:” The value should be 5060.
Fail_____ Pass_____
12
Put the generator into BME Ready state by pressing the ‘STANDBY’ Key.
13
Ensure the test tip is prepared to activate in air and is not in contact with anything during activation.
14
Activate at level 3 by pressing the MIN footswitch or hand switching adapter buttons.
15
After the pre-run test is complete, continue activating at level 3, and measure the VAC RMS across the series
combination of R233 and R234, using the Digital Multimeter (DMM). Record the value to four digits of
precision.
_______________mA
16
Deactivate the hand piece by releasing the foot switch or hand switch button.
17
Put the generator into BME Standby State by pressing the ‘STANDBY’ Key.
18
Scroll to page 17.
19
By turning the volume knob, dial in the value read on the DMM in step 16. (a number is displayed on the
LCD, which changes as the knob is turned).
20
Press the “TEST” key one time (only one time).
“Value Accepted” should flash.
Fail_____ Pass_____
21
Power off the unit for at least 5 seconds.
22
Power up the generator into BME Mode.
23
Put the generator into BME Ready State by pressing the ‘STANDBY’ Key.
24
Ensure the test tip is prepared to activate in air and is not in contact with anything during activation.
25
Activate at level 3 by pressing the MIN footswitch or hand switching adapter buttons.
26
After the pre-run test is complete, continue activating at level 3, and measure the measure the VAC RMS
across the series combination of R233 and R234, using the DMM as in step 16 above. Record the value to
four digits of precision:
_______________mA
27
Verify the current in step 26 is within 1% of the value calculated in step 8. If not, carefully re-execute this test
procedure again (up to three times.)
Fail_____ Pass_____
28
Power OFF the generator for at least 5 seconds and continue to the CALIBRATION TWO procedure.
GEN04 Serial Number:_______________________________________
Technician Signature:_________________________________________Date: ______________________________
Summary of Contents for ETHICON ENDO-SURGERY HARMONIC 300
Page 1: ...HARMONIC Generator 300 System Service Manual ...
Page 2: ...GEN04 ...
Page 6: ...4 GEN04 Service Manual ...
Page 10: ...8 GEN04 Service Manual ...
Page 16: ...14 GEN04 Service Manual ...
Page 24: ...22 GEN04 Service Manual ...
Page 26: ...24 GEN04 Service Manual ...
Page 28: ...26 GEN04 Service Manual ...
Page 44: ...42 GEN04 Service Manual ...
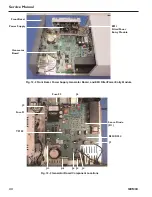
Page 50: ...48 GEN04 Service Manual Power Supply Fig 12 5 Power Supply Troubleshooting Flowchart ...
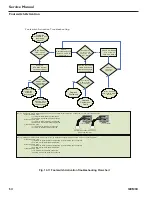
Page 52: ...50 GEN04 Service Manual Front Bezel Fig 12 7 Front Bezel Troubleshooting Flowchart ...
Page 58: ...56 GEN04 Service Manual ...
Page 62: ...60 GEN04 Service Manual ...
Page 66: ...64 GEN04 Service Manual ...
Page 68: ...66 GEN04 Service Manual ...
Page 72: ...70 GEN04 Service Manual ...
Page 76: ...74 GEN04 Service Manual ...
Page 77: ...75 GEN04 Appendix B GEN04 Main Assembly Drawing ...
Page 79: ...77 GEN04 Appendix C GEN04 Top Level Diagram Hand Piece ID Hand Piece Transducer ...


