RAC Geo II User’s Manual
1-2
Quick Start
Step 1
Install your RAC Geo by mounting it on or near your dash and
plugging in the Geo's auto adapter power supply into your vehicle's 12V
outlet. Screw the GPS antenna into the top of the unit and mount the antenna
on the roof of your vehicle.
Note that the antenna is not required, but is
recommended for best accuracy and quickest GPS lock.
Step 2
Perform a test measurement with your vehicle. Once your RAC
has been installed, you should perform a test measurement over a known
distance. This will ensure that the instrument is working correctly. To do
a test measurement, drive to your starting point and stop. Turn on the Geo
and wait for it to acquire a GPS signal, as described below.
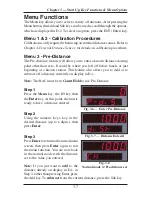
When first powered on, the Geo will display
GPS FO
in the upper display
and begin to look for GPS satellites. This will switch to
GPS F1
in about
60 seconds.
A
0
will then be shown in the upper display while
CH
is shown on the lower
display. Next, press the CH (count hold) button to release the instrument
from count hold and then drive the distance to be measured. Stop and/or
press the CH button once you reach the end of the distance to be measured.
Step 3
Familiarize yourself with the features and options of the RAC
Geo II. Refer to Chapter 3 for more detailed instructions on the functions
and procedures of the unit. We recommend that you practice using the RAC
Geo before attempting to use the instrument on a job to be sure you are
comfortable with how to operate it.
Summary of Contents for RAC Geo II
Page 5: ...Chapter 1 Introduction 1 1 Chapter 1 Quick Start Guide Introduction to the RAC Geo II...
Page 8: ...RAC Geo II User s Manual 1 4...
Page 9: ...Chapter 2 Installation 2 1 Chapter 2 Installation...
Page 38: ...RAC Geo II User s Manual 3 26...
Page 39: ...Chapter 4 External Sensor Mode 4 1 Chapter 4 External Sensor Mode...
Page 51: ...Chapter 5 Troubleshooting 5 1 Chapter 5 Troubleshooting...
Page 55: ...Appendix A 1 Appendix...


