


RAC Geo II User’s Manual
3-10
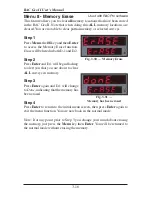
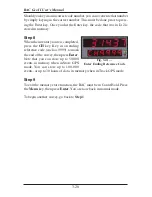
Fig. 3.13 — DPO Distance Entered
Fig. 3.14 — Enter DPO Duration
Fig. 3.15 — DPO Tone On
Fig. 3.16 — DPO Activated
Step 2
Using the numeric keys, enter the
interval distance that you want the
DPO signal generated, based on your
selected unit of measurement (feet,
mile, meter).
Step 3
Press the
Enter
key and you will be
prompted to enter how long the DPO
signal should last. You can key in a
desired signal duration from 10 milli-
seconds (key in 1) to 2.55 seconds (key
in 255). Keep in mind that if you select
a long output duration your signals may
run together at high speeds. A 10 millisecond pulse duration is usually
adequate for sending pulses to a laptop computer and will not overlap at
normal highway speeds.
Step 4
Press
Enter
and you will be prompted
to select whether or not you want an
audible tone to sound when the DPO
signal is triggered. The 1 in D-1 signifies
that the tone is
on
. If you want a tone
with each output pulse, leave 1 in D-1.
If you
do not
want a tone, enter zero (0) or press the Clear key.
Step 5
Once you have selected whether you
want a tone or not, press
Enter
. D-2
will then indicate that the DPO signal
has been activated.
Step 6
Press
Enter
to return to the initial menu screen, then press
Enter
again
to exit the menu function. You are now back in the normal mode with the
DPO signal set.
Summary of Contents for RAC Geo II
Page 5: ...Chapter 1 Introduction 1 1 Chapter 1 Quick Start Guide Introduction to the RAC Geo II...
Page 8: ...RAC Geo II User s Manual 1 4...
Page 9: ...Chapter 2 Installation 2 1 Chapter 2 Installation...
Page 38: ...RAC Geo II User s Manual 3 26...
Page 39: ...Chapter 4 External Sensor Mode 4 1 Chapter 4 External Sensor Mode...
Page 51: ...Chapter 5 Troubleshooting 5 1 Chapter 5 Troubleshooting...
Page 55: ...Appendix A 1 Appendix...