


Chapter 3 — Start Up, Key Functions & Menu Options
3-23
North/South and East/West are determined by a '-' before the first three GPS
digits. If the latitude is North, just the coordinates are shown. If it is South,
the coordinates are preceded by '-'. Likewise, if the longitude is East, just
the coordinates are shown. If it is West, the coordinates are preceded by '-'.
Note that there are three different formats for showing the GPS coordinates,
represented by a '0', '1' or '2' shown at the far left of D-1 when viewing either
latitude or longitude. The formats are
:
0 – Degrees, Decimal Minutes (40
o
12.9474’)
1 – Degrees, Minutes, Seconds (40
o
12’ 56.844”)
2 – Decimal Degrees (40.215790
o
)
Setting the format is done with Menu 12, described later in this chapter.
Press
#9
again and you will be returned to the distance screen.
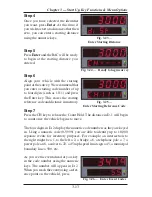
Step 4
Once you have checked your GPS ac-
curacy, and noted any initial recordings,
you are ready to collect data. Release the
Count Hold and begin driving. When
you reach an event you want to mark,
press the
Display Hold
key (DH). The
display will freeze and a
calculated GPS
position
(see side box) will be recorded
and available for viewing using the #9
keys as described earlier.
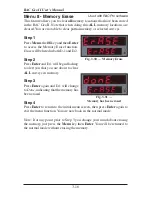
Once the GPS and distance information has been recorded, press
DH
to
release display hold. You can then record subsequent events using the same
procedures described above.
Note that if you want to monitor the status of the incoming GPS informa-
tion as you drive, you can do so by pressing the #7 key. This will show the
GPS accuracy information and GPS coordinates as they are coming in on
a second by second basis from the GPS receiver.
Calculated GPS Positions
The GPS receiver transmits position
information to the RAC every second.
When you record an event with DH,
it is possible it could occur between
two seconds. To allow for this, the
RAC uses two separate GPS positions
(one before the event and one after) to
determine the
calculated GPS position
that gets recorded for review, provid-
ing greater accuracy in your GPS data.
Summary of Contents for RAC Geo II
Page 5: ...Chapter 1 Introduction 1 1 Chapter 1 Quick Start Guide Introduction to the RAC Geo II...
Page 8: ...RAC Geo II User s Manual 1 4...
Page 9: ...Chapter 2 Installation 2 1 Chapter 2 Installation...
Page 38: ...RAC Geo II User s Manual 3 26...
Page 39: ...Chapter 4 External Sensor Mode 4 1 Chapter 4 External Sensor Mode...
Page 51: ...Chapter 5 Troubleshooting 5 1 Chapter 5 Troubleshooting...
Page 55: ...Appendix A 1 Appendix...