RAC Geo II User’s Manual
3-18
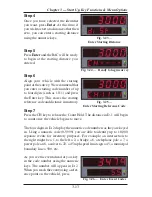
Once the RAC Geo has reached an F1 lock the Geo will go to the Date screen.
D-1 will display the last date that was
used in the Store or Track function.
Note: There is no check to ensure that
a valid date is entered or correct. If
you want to enter a new date, press
the
CLR
(clear) key, then, using the
numeric keys, enter the date you wish
to use (mm.dd.yy).
Step 3
Once you have keyed in a date, press
Enter
. D-2 will then display 'Other'. At
this point, you have the option of enter-
ing a number, up to six digits, that can
be associated with the stored data. This
could be the inventory route number, an
operator identifier number, etc. It is not mandatory to key in a number. If
you do not want one, leave the value set to zero.
Step 4
Once you have selected the identifier
you want, press
Enter
. At this time, if
you wish to start at a distance other then
zero, you can enter a starting distance
using the numeric keys.
Fig. 3.36 — Optional Identifier
Fig. 3.37 — Starting Distance
Fig. 3.35 — Enter Date
Summary of Contents for RAC Geo II
Page 5: ...Chapter 1 Introduction 1 1 Chapter 1 Quick Start Guide Introduction to the RAC Geo II...
Page 8: ...RAC Geo II User s Manual 1 4...
Page 9: ...Chapter 2 Installation 2 1 Chapter 2 Installation...
Page 38: ...RAC Geo II User s Manual 3 26...
Page 39: ...Chapter 4 External Sensor Mode 4 1 Chapter 4 External Sensor Mode...
Page 51: ...Chapter 5 Troubleshooting 5 1 Chapter 5 Troubleshooting...
Page 55: ...Appendix A 1 Appendix...


