


RAC Geo II User’s Manual
4-12
Step 3
Press the
Enter
key and the current cali-
bration number for the vehicle selected
will be displayed. Press the Clear key
(CLR) to clear the current number.
Step 4
Using the numeric keys, key in the de-
sired calibration number for the vehicle
selected.
Step 5
Press
Enter
to return to the initial menu
screen, then press
Enter
again to exit
the menu function. The new vehicle number and/or calibration number is
stored in memory and the RAC is back to normal measuring mode.
Once your RAC is properly installed and calibrated, you are ready to
begin accurately measuring distance.
Fig. 4.12
Calibration Number Cleared
Fig. 4.13
New Calibration Number Entered
Summary of Contents for RAC Geo II
Page 5: ...Chapter 1 Introduction 1 1 Chapter 1 Quick Start Guide Introduction to the RAC Geo II...
Page 8: ...RAC Geo II User s Manual 1 4...
Page 9: ...Chapter 2 Installation 2 1 Chapter 2 Installation...
Page 38: ...RAC Geo II User s Manual 3 26...
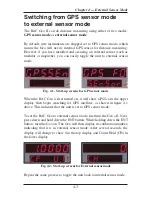
Page 39: ...Chapter 4 External Sensor Mode 4 1 Chapter 4 External Sensor Mode...
Page 51: ...Chapter 5 Troubleshooting 5 1 Chapter 5 Troubleshooting...
Page 55: ...Appendix A 1 Appendix...