background image

EN

31

2.1.2.1.   ALARM SETTING

While setting the alarm, if any detector is triggered (e.g. an open window) the system will react in 
one of the following ways (based on the system confi guration): 
:: Detectors will guard automatically after they switch to a standby mode (default setting).
:: The system will optically indicate triggered detectors with a segment fl ashing red for 

8 seconds and the system will set automatically once this period has expired.

:: Setting the section with triggered detectors is also possible by pressing the segment button 

on the right side repeatedly. This way a user confi rms an intention to set the section with 
a triggered detector (e.g. an opened window). Otherwise the section with the triggered detector 
will not be set.

:: A triggered detector will prevent the section from being set. This status is optically indicated by 

a fl ashing red segment button. The detector preventing setting will be shown in the menu 
on the keypad’s LCD display.

An unsuccessful setting is indicated by the indication button fl ashing yellow (“Unsuccessful setting” 
parameter must be enabled). 

Consult the installation with a service technician in order to program 

the desired behavior of the system.

2.1.2.2.   ALARM UNSETTING

Note

: If the “Unset section by authorization only during entrance delay” parameter is enabled, then 

mere authorization will unset such section where the entrance delay has been triggered.

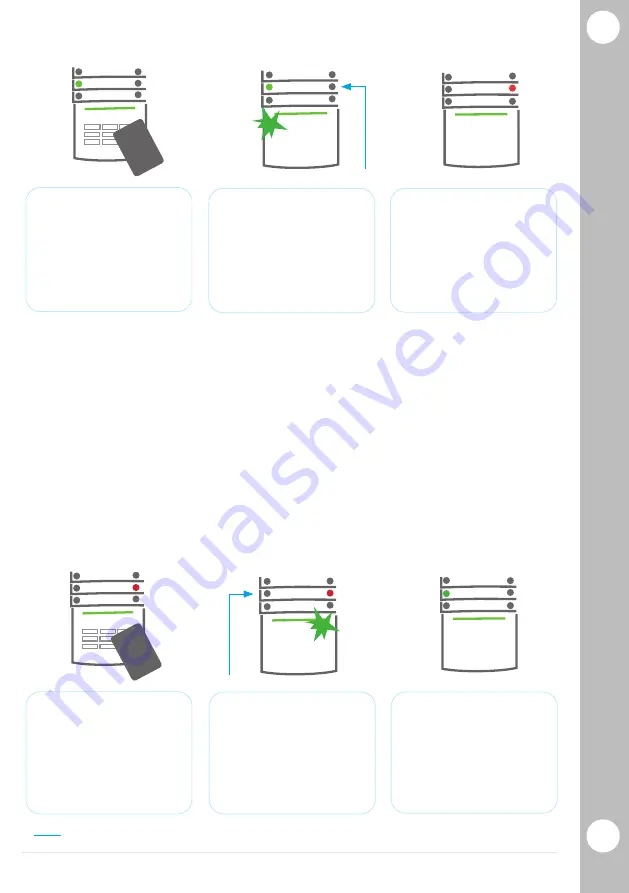
2.  Press the right button

(the one which isn’t lit up) to set 
a particular section. It is possible 
to set more sections subsequently. 
The delay between sections 
selection must not be longer than 
2 seconds. 

3. The command 

is executed

and the keypad acoustically 
indicates the exit delay. The section 
is set now, only the detectors with 
a “Delayed Zone” reaction provide 
time to leave the guarded area 
during the exit delay. The segment 
button of the set section turns red.

1. Authorize using 

the keypad.

Sections which can be controlled 
are lit up and the backlit indication 
button will start fl ashing green.

1.  When you enter the building

(triggering a detector with 
a “Delayed zone” reaction), the 
system starts indicating entrance 
delay with a continuous tone and 
segment button of the section in 
which the delayed entrance has 
been triggered fl ashing green.


Authorize yourself using 
the keypad

– the green indication light of the 
authorization panel starts fl ashing.

2.  Press the left segment  

button

of the section you want to unset. 

3.  The command is executed

and the segment buttons turn green 
to indicate unset sections

Summary of Contents for 100+

Page 1: ...irja ruikershandleiding Brukermanual Instrukcja u ytkownika Manual de Ut nv ndarmanual Manu l Brugermanual K ytt ohjekirja Haszn lati Utas Brukermanual Instrukcja u ytkownika Manual de Utilizador U va...

Page 2: ...JABLOTRON 100...

Page 3: ...WEB INTERFACE 39 2 2 3 OPERATING THE SYSTEM USING THE VOICE MENU 39 2 2 4 OPERATING THE SYSTEM USING SMS COMMANDS 39 2 2 5 OPERATING THE SYSTEM REMOTELY USING A COMPUTER J LINK 39 2 2 6 CONTROLLING TH...

Page 4: ...nce mode no alarms will be triggered in the selected sections including opening or removing the detectors from the installation The maintenance mode is indicated by the activation button ashing green...

Page 5: ...l and there is no code set by the factory defaults Service code Service This code can enter Service mode and configure the system s behavior It has access to all tabs with options including ARC commun...

Page 6: ...is level of authorization are not allowed to change their code and are not allowed to erase the alarm memory The number of PG only codes is limited only by remaining capacity of the control panel Ther...

Page 7: ...JABLOTRON smartphone application Computer via the MyJABLOTRON web interface Telephone using the voice menu Telephone via SMS Computer via the internet using the J Link software Dialling in from an aut...

Page 8: ...rol the system using segments and authorization using either a code the contactless method RFID card tag both code and card tag for higher security or by authorizing and using the options available on...

Page 9: ...code can consist of up to eleven digits a pre x one to three digits an asterisk which separates the pre x and main code and a 4 6 or 8 digit code depending on con guration for example 123 12345678 or...

Page 10: ...list of all detectors indicating system faults from sections to which the user has access rights Displays a list of all blocked detectors in sections to which a user has access rights Shows system st...

Page 11: ...he desired behavior of the system 2 1 2 2 ALARM UNSETTING Note If the Unset section by authorization only during entrance delay parameter is enabled then mere authorization will unset such section whe...

Page 12: ...1 to the last number in a valid code Example for a code with the pre x Valid code 2 9999 Code for unsetting under duress 2 9990 Example for a code without the pre x Valid code 9999 Code for unsetting...

Page 13: ...g indication Indication of a triggered tamper alarm can be terminated only by a Service technician or Administrator Note When using the EN 50131 1 grade 2 system pro le it is always necessary to rst a...

Page 14: ...de or RFID tag card CANCEL WARNING INDICATION SECTION CONTROL PG CONTROL EVENT MEMORY SETTING PREVENTED FAULTS IN SYSTEM BYPASSED DETECTORS SYSTEM STATUS SETTINGS DISPLAY SETTING MAINTENANCE MODE Allo...

Page 15: ...ter the exit delay has expired then the control panel will unset again Unsuccessful setting is indicated by a system indicator ashing yellow reported to the ARC and indicated by an external siren appl...

Page 16: ...tors will not trigger the alarm when somebody moves inside the section 1 When you enter the building triggering a detector with a De layed zone reaction the system starts indicating an entrance delay...

Page 17: ...he status indicator and the function button rapidly ashing red You need to authorize yourself using the keypad in order to terminate the alarm The section remains set a rapidly ashing red function but...

Page 18: ...a device is triggered It is necessary to con rm setting by pressing the lock button again A set section will be con rmed by a red LED light The keyfob buttons can be blocked to prevent accidental pres...

Page 19: ...commands can control individual sections and programmable outputs just like keypad segment buttons The form of text message to operate the system is CODE_COMMAND The actual commands are prede ned SET...

Page 20: ...G is shown by a PG number in a rectangle fi lled with black colour Press ESC to exit the menu 2 2 6 4 REMOTE CONTROL By pressing an assigned button of a remote control Bi directional remote controls c...

Page 21: ...Link software by clicking on the detector in the Settings Diagnostics Disabled column A blocked detector is marked with a yellow circle until it is turned back on using the same procedure A device can...

Page 22: ...change must be saved by selecting Save when the system prompts with Save Settings The system administrator and the service technician can add modify or delete a user phone number or change a user name...

Page 23: ...supply 110 230 V 50 60 Hz max 0 28 A with fuse F1 6 A 250 V Protection class II 110 230 V 50 60 Hz max 0 85 A with fuse F1 6 A 250 V Protection class II Back up battery 12 V 2 6 Ah lead gel 12 V 7 to...

Page 24: ...g date and time Power supply unit Type A according to EN 50131 6 T 031 note In case of a main power failure is the system backed up for 24 hours and at the same time is a failure report sent to the AR...

Page 25: ...SCAN ME...

Page 26: ...www jablotron com M ENJA100 USER...

Reviews: