background image

123

DVXNOTIFY PLUG-IN

The DVXNotify plug-in monitors a DVXi system for certain conditions or ac-
tions. If such a condition or action occurs, DVXNotify can send an email and/or
trigger the normally open alarm output. DVXNotify is installed on all DVXi sys-
tems.

The location of the output trigger depends on the DVXi model. On DVXi XM16
and DVXi XM32 systems, the output trigger is located on XMUX (refer to Figure
60), whereas on DVXi TBC and TS models the output trigger is located on the
trigger block on the rear panel (refer to Figure 61). The output provides a dry
contact closure and the circuit is normally open.

The plug-in runs via MCPlugin.exe, a program that starts automatically when
MasterControl is started.  When started, an MCPlugin icon is located in the system
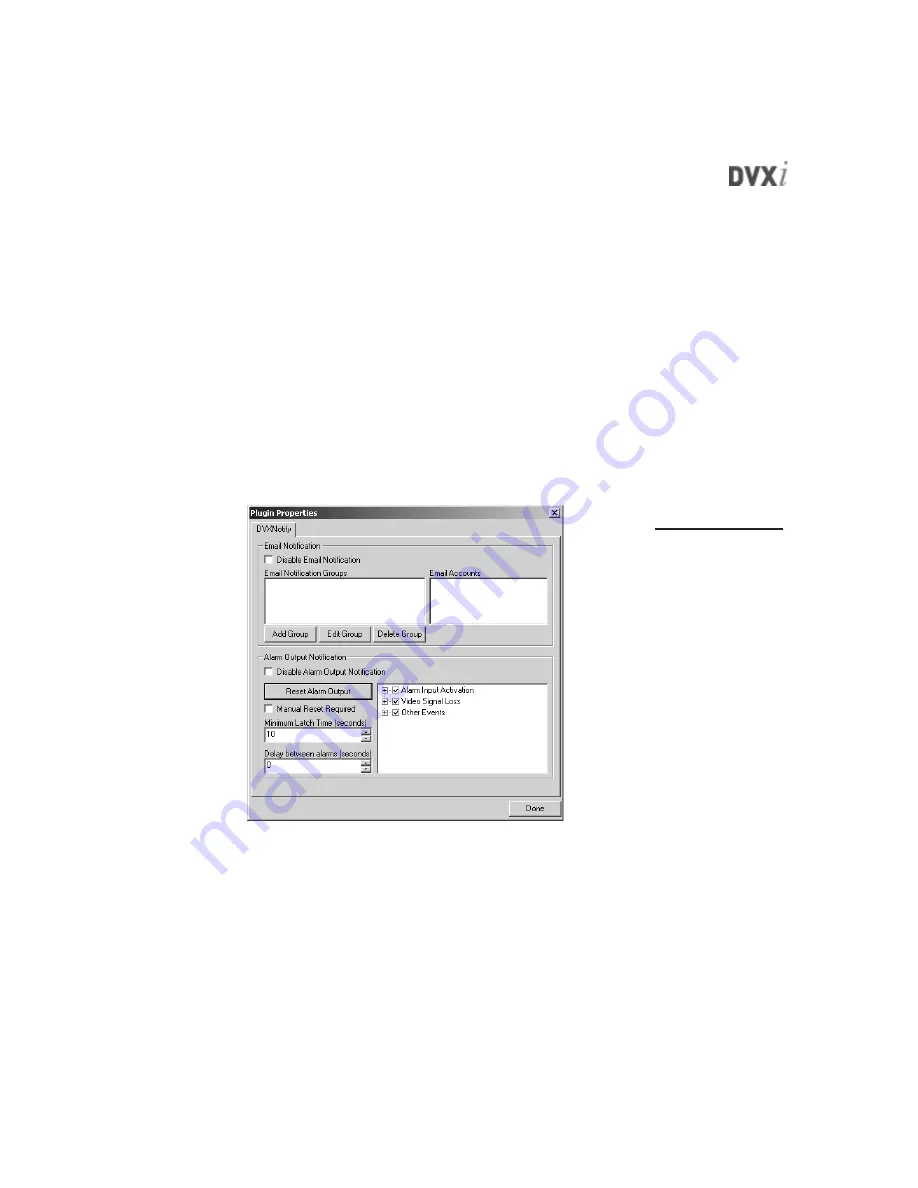
tray (refer to Figure 57). Double-click on the icon to reveal the Plugin Properties
window, and then select the DVXNotify tab (see Figure 63).

Figure 62

The DVXNotify tab
allows you to
configure DVXi to
send an email and/or
trigger the alarm
output when certain
conditions or actions
occur.

Summary of Contents for DVXi TBS4

Page 1: ...y proprietary interest in trademarks and trade names other than its own Integral Technologies makes no warranty of any kind with regard to this material including but not limited to the implied warran...

Page 2: ...he SQL Server Password 18 Getting Familiar with MasterControl 19 Overview of the MasterControl Screen 20 The Function Buttons 21 The Status Bar 22 MasterControl Configuration 23 About the Setup Page 2...

Page 3: ...nfiguring a Dial up Connection 90 Running the RemoteView Software 93 Important Information About Passwords 94 Overview of the RemoteView Screen 95 The Servers Page 96 The Monitor Page 98 The Search Pa...

Page 4: ...our security needs This chapter introduces you to your DVXi system and the structure of this manual Included in this chapter are the following A description of the main parts of your DVXi system An ou...

Page 5: ...lp you set up MasterControl for unattended recording for extended periods Installed with XMUX included with DVXi XM16 and DVXi XM32 the DVXi system expands to as many as 32 video inputs RemoteViewTM i...

Page 6: ...el MasterControl Operation explains the primary functions of MasterControl From viewing and capturing video to learning the impor tant scheduling feature this chapter shows you how to actually operate...

Page 7: ...replaced Replace only with the same or equivalent type recommended by the manufacturer Dispose of used batteries according to the manufacturer s instructions Caution RISK OF ELECTRIC SHOCK DO NOT OPEN...

Page 8: ...structions for the following Installing DVXi TS4 and DVXi TBC4 Installing DVXi TS9 D and DVXi TBC9 D Installing DVXi TS9 RM TS 16 and DVXi TBC9 RM TBC16 Installing DVXi XM16 and DVXi XM32 Installing X...

Page 9: ...bottom are board inputs 1 8 an output and three grounds On the MasterControl Alarms tab the inputs are named Board Alarm 1 Board Alarm 2 and so on Connect only to voltages below 42V DC external device...

Page 10: ...stallation Figure 1 The rear panel of DVXi 4 camera systems The placement of system components may vary depending on which options are installed K A B C E G D REAR PAN EL O F DV Xi TS4 and DVXi TBC4 H...

Page 11: ...rm 1 Board Alarm 2 and so on Connect only to voltages below 42V DC external devices connected to the DVXi system should be in a SELV non energy hazardous circuit 7 Connect up to five cameras to the fi...

Page 12: ...Figure 2 The rear panel of DVXi 9 camera systems desktop chassis The placement of system components may vary depending on which options are installed B C E H D F REAR PANEL OF D VXi TS9 D and DVXi TBC...

Page 13: ...UTPUT 7 Optional Wire the alarms to the green trigger block G From top to bottom are board inputs 1 16 an output and a ground On the MasterControl Alarms tab the inputs are named Board Alarm 1 Board A...

Page 14: ...lled REAR PANEL OF DVXi TS9 RM and DVXi TBC9 RM A B C E J D K F INPU T 1 INPU T 2 INPU T 3 INPU T 4 INPU T 5 INPU T 6 INPU T 7 INPU T 8 INPU T 9 OUTPUT G H REAR PANEL O F DVXi TS16 and DVXi TBC16 A B...

Page 15: ...ctor D or a phone line to the optional modem G 5 Plug the monitor into the monitor connector E and electrical outlet 6 Plug the XMUX Cable into the DB 25 connector F 7 Optional Connect your PTZ camera...

Page 16: ...mount of air flow required for safe operation of the equipment is not compromised Mechanical Loading Mounting of the equipment in the rack should be such that a hazard ous condition is not achieved du...

Page 17: ...meras to the video input connectors A 3 DVXi XM16 systems only Connect the camera loop through outputs B to television monitors VCRs or other analog devices if desired Output 1 loops video from input...

Page 18: ...uts N 0 C N C G N D Outputs Aux4 Aux1 1 5 4 3 2 6 7 8 9 10 11 12 13 14 15 16 Out 1 2 3 4 5 6 7 8 9 10 11 12 13 14 15 16 C B I O Port A REAR PANEL OF XMUX 32 In 1 9 7 5 3 11 13 15 17 19 21 23 25 27 29...

Page 19: ...n Tip Be sure to change your DVXi user ID and password immediately See the Defining MasterControl Users section of the MasterControl Configuration chapter for information on how to do this The de faul...

Page 20: ...ogged on to Windows with Administrator permissions 1 From the C Program Files Integral MasterControl directory run ManageMCDB EXE 2 Click Next twice to view the Administrator tab see Figure 7 3 Under...

Page 21: ...he sa account password for any reason com plete the following steps while logged on to Windows with Administrator permis sions 1 From the C Program Files Integral MasterControl directory run ManageMCD...

Page 22: ...mation about the fol lowing aspects of the user interface The function buttons The operation area The status bar Also in this chapter are brief descriptions of the areas of MasterControl that the func...

Page 23: ...ra inputs The middle section of the MasterControl screen is reserved for the opera tion of the function selected from the top row of buttons This section can include view screens camera buttons list b...

Page 24: ...l how and when video is recorded from each camera input Cameras can easily be set individually or in groups The Search page allows you to search for and view re corded video Just enter a time period a...

Page 25: ...MasterControl Operation chapter for an explanation of re cording modes and their associated colors The amount of disk space that is full see the Viewing Disk Usage section of the MasterControl Operati...

Page 26: ...his chapter the following topics are discussed Configuring hardware and disk usage Defining users Security features Configuring motion detection Assigning cameras to alarms Also included is informatio...

Page 27: ...ge is also unavailable if a RemoteView user is connected to the DVXi system with Administrator permission The Setup page is unavailable if an Administrator is logged on to the DVXi system remotely How...

Page 28: ...isplayed video go to the Setup page and choose the Display tab see Figure 10 First select a camera input button from the bottom of the screen and then adjust the slider bar for each setting You can re...

Page 29: ...storage require ments Frame Rate DVXi can record at its maximum potential rate see Note or a wide range of rates depending on your hardware Prealarm and postalarm Select the amount of prealarm and pos...

Page 30: ...es territories use the NTSC standard coun tries in the Eastern Hemisphere including those in Europe Africa Australia and much of Asia generally use the PAL standard Notable exceptions are Japan South...

Page 31: ...can When you disconnect a camera you can either click Rescan or manually deselect the camera input from the Camera Detection window To have MasterControl recognize a specific camera input combination...

Page 32: ...d click Apply Name see Figure 13 By default cameras are named Camera1 Camera2 Camera3 and so on with the number referring to the input that the camera is hooked up to The camera s name is limited to 3...

Page 33: ...lected drives are indicated in the bar graph MasterControl runs in circular record mode in which it saves video to disks up to a capacity specified by the user and then it begins writing over the olde...

Page 34: ...available Administrator has full access to DVXi features Supervisor has full access to DVXi features except for user adminis tration remote administration and RemoteView Server User can access only th...

Page 35: ...s ID from the User Name drop down list make the change and click the Update button Tip MasterControl allows you to log in as a different user without having to exit To do this click the Integral Techn...

Page 36: ...ser can search for and view recorded video from PTZ selects cameras for which the user can control PTZ functions Select a user from the User Name drop down list and then one of the tabs see Figure 16...

Page 37: ...t lets you choose to have your system continue in Win dows shut down or restart when you exit MasterControl If you choose Continue in Windows users can access other parts of the system after MasterCon...

Page 38: ...disables the abil ity to open pop up menus on icons or the Windows Desktop Hide Taskbar hides the Windows Taskbar applicable only while MasterControl is running Disable Right Click on Taskbar disable...

Page 39: ...Taskbar Start Menu option from the Settings menu on the Start menu and disables the ability to open the Taskbar Proper ties window Hide Documents Menu removes the list of recently opened documents fr...

Page 40: ...cally Run This Schedule On Startup selected on the Schedule page see the MasterControl Operation chapter With this level of security only a user logged in with Administrator permissions can access oth...

Page 41: ...ata All motion detection is done using this smaller image REFERENCE FRAME When recording begins from a camera with motion detection active the first image of video captured becomes the camera s refere...

Page 42: ...in the image to change from the reference frame for motion to be detected Setting the Percentage Area smaller than 30 would require zero blocks to change for motion to be detected which means motion w...

Page 43: ...a motion mask as large or as small as you want and in a virtually unlimited pattern To create a motion mask complete the following steps 1 On the Setup page select the Motion tab see Figure 17 Inform...

Page 44: ...egin re cording Sensitivity the pixel value change required for MasterControl to rec ognize motion For example suppose you set a high Sensitivity level If each pixel of video changes only a little bit...

Page 45: ...en trigger events occur To name an alarm input select it from the Alarm drop down list By default alarm input names are based on the alarm input number After you select the alarm input click on its na...

Page 46: ...t is broken choose Normally Closed Otherwise leave this option unchecked 5 Set the maximum duration that the selected cameras should record video after an alarm trigger To do this use the up and down...

Page 47: ...g that can occur during that time pe riod for that camera This is an appropriate method for those who do not need to record continuous video or motion events during such time periods Alarms tab When y...

Page 48: ...the camera with the highest priority is displayed until the alarm is cleared Then the camera with the next highest priority that is capturing an alarm event is displayed on the output Motion displays...

Page 49: ...opped automatically if you have selected Alarm Motion or Motion or Alarm for the output on the Outputs tab in which case the tour is replaced by alarm or motion video until the trigger or activity cea...

Page 50: ...multi camera configurations To create a multi camera view complete the following steps 1 Select one of the six multi camera configuration buttons This displays a model of the configuration that shows...

Page 51: ...he MasterControl Operation chapter for more information Note CONFIGURING ONSCREEN DISPLAY ON VIDEO OUTPUTS The OSD tab see Figure 21 allows you to control the text on an external monitor s onscreen di...

Page 52: ...lue and Time red 3 Click on the appropriate colored bar and drag it to the desired location on the screen Do not let any of the colored bars overlap 4 If you want all cameras to use this OSD setup cli...

Page 53: ...the time each day when video should be archived You can also format drives on the Archive tab The top half of the Archive tab contains the following configuration fields and buttons Drive Archive Nam...

Page 54: ...iving procedures Auto Archive automatically archives captured video at a preset time every day Manual Archive archives on demand all video captured during any specified period The following sections c...

Page 55: ...in the time field next to the Clear Log button 4 Select Enable Auto Archive Every Day All video captured after the time you enable auto archiving is automatically trans mitted to the selected drive a...

Page 56: ...the video to archive All records found will be archived to the selected drive Even records previously archived to a dif ferent drive will be archived to the currently selected drive however records al...

Page 57: ...from the Tools menu in Explorer to open the Map Network Drive window see Figure 23 Then select a drive letter and the network location of the logical drive and make sure Reconnect at Login is selecte...

Page 58: ...ving to a drive an archive directory named after the DVXi system is created on that drive When you format the drive only the data in the archive directory is erased Checkboxes next to a drive are used...

Page 59: ...Settings area Only supported PTZ camera types are listed Only one camera type can be selected per DVXi system 4 Select the COM port that the PTZ camera is connected to from the drop down list in the C...

Page 60: ...list on the right side using presets from the left side To add a preset to the tour list select the preset in the left list and click Add To remove a preset from the tour list select the preset in the...

Page 61: ...ure 25 The following RemoteView Server settings are available Enable Data Rate Throttling Selecting this activates the following two data rate throttling settings Throttling Time Currently unused with...

Page 62: ...Understanding recording modes Scheduling recording times Searching for and viewing recorded video Exporting images and video The primary focus of the chapter is the Schedule page MasterControl offers...

Page 63: ...out To display the name of the cameras in the video windows click OSD on the Main tab You can view live video in a single window in four windows configured 2 2 in nine windows configured 3 3 or in 16...

Page 64: ...om a specific camera input The window now has a white border 2 Click on the appropriate camera input button Video from that input ap pears in the selected window 3 Repeat these steps for each camera i...

Page 65: ...rding Modes section of this chapter for an explanation of recording modes and their associated colors Note VIDEO SIGNAL LOSS AND SCENE LOSS MasterControl detects video signal loss on any camera during...

Page 66: ...ayed on the external monitor If you then deselect the output button the button returns to its original Setup page configuration Motion Alarms Tour and so on Output 1 the top button can be toggled betw...

Page 67: ...PTZ tab see Figure 28 The tab allows you to control the pan tilt zoom functions of the camera by clicking and dragging arrows or the center joystick You can also control focus iris and zoom settings...

Page 68: ...number of presets available depends on the camera type To view the preset at any time select the camera preset number and click Call Presets 1 6 are also quickly viewable on the PTZ tab by selecting t...

Page 69: ...ly the most noticeable activity or any slight movements This sensitivity can be adjusted on the Setup page see the Configuring Motion Detection section of the MasterControl Configu ration chapter Free...

Page 70: ...ines with camera input 1 on top To view the schedule bars for addi tional cameras if available use the vertical scroll bar The timelines indicate the recording modes scheduled for each camera on the d...

Page 71: ...e box turns green indicating the Free recording mode 3 To adjust the starting and stopping times hover the cursor over the left or right wall of the schedule box you created When the cursor becomes a...

Page 72: ...ect Alarm all the bars turn red and so on Even when using the quick setup you can individually adjust the boxes after you create them by clicking and dragging their walls you can also change the recor...

Page 73: ...Figure 31 4 Click Apply All weekdays that haven t yet been scheduled or have been scheduled as an every day default should now have the schedule you just created Try clicking on an other weekday Unle...

Page 74: ...p down list see Figure 31 4 Click Apply All days that haven t yet been scheduled or have been scheduled as another de fault should now have the schedule you just created Try clicking on another day Un...

Page 75: ...ion choose Custom from the drop down list and click Apply Now setting a default elsewhere will not affect this sched ule If you want holidays to follow a default schedule you can copy and paste as de...

Page 76: ...ly This feature is useful if you want to copy a weekend or holiday schedule to an other holiday However if you copy a default schedule to a day it is still consid ered a custom schedule meaning that i...

Page 77: ...ay choose Current Day Only copy the appropri ate default schedule from another day and paste it to the newly cleared schedule Figure 32 The three options in the Clear Schedule list box allow you to cl...

Page 78: ...days To create this schedule you would perform the following steps PART I Setting the weekday default 1 Go to the Schedule page 2 If you have created any custom schedules that you no longer need go to...

Page 79: ...on in the Select Mode area and then click Set All Cameras This quickly sets all cameras to the Alarm mode for the entire day 3 In the Schedule Mode section choose Weekend Default from the drop down li...

Page 80: ...from the drop down list 5 Click Apply Repeat part III for all holidays Although it follows the weekend default the holiday is now a custom schedule If you later change the default weekend schedule th...

Page 81: ...ype in your entries or you can use the arrows provided to change the numbers incre mentally 4 Repeat steps 2 and 3 in the To area to enter the stopping date and time for your search period 5 Click the...

Page 82: ...e result for each camera Each result repre sents a video segment containing all video captured by an individual cam era input during the search period Events displays a single result for each one minu...

Page 83: ...ion Select the number of results displayed per page and then use the left and right arrows to view the different pages or select the double left or double right arrows to view the first or last page r...

Page 84: ...reen 3 In the view screen use the cursor to paint blocks over the areas in which motion events should be played back All other areas will be ig nored in the SmartSearch To remove a block click it once...

Page 85: ...inning of the segment After you find a valid motion event continue playing the video from that point or click Search again to jump to the next frame that meets the defined parameters SEARCHING FOR ARC...

Page 86: ...ew screen see Figure 36 2 Use the VCR controls to view the segment of the video that you want to see Below the view screen is a clock that indicates the time that the video was captured When viewing e...

Page 87: ...arrow next to the Export button This opens a pop up menu with the following options see Figure 37 Copy To Clipboard saves the displayed still image to the Windows clipboard You can then paste the imag...

Page 88: ...Go to the Setup page and click the Disk tab A bar graph refer to Figure 15 indicates how much of each disk is full You can also use the Disk tab to purge captured video At the bottom of the Disk tab a...

Page 89: ...tion of the action To view all actions performed by a specific user select the user from the User Name drop down list only those users with applicable log entries are listed You can also limit the num...

Page 90: ...and servers Downloading and viewing live video Searching for and viewing recorded video Setting passwords increasing download speed exporting video Remote administration RemoteView is a useful applica...

Page 91: ...from RemoteView with the RemoteView Server software already installed However to use the re mote access you must complete the following steps Connect the client You must obtain IP addresses for the cl...

Page 92: ...trol installation simply leave RemoteView Server running on the DVXi system at all times To install RemoteView on the remote client insert the RemoteView CD and choose the components you want to insta...

Page 93: ...o accept incoming connections complete the following steps on the DVXi system 1 Exit MasterControl 2 From the Start menu select Settings Network and Dial Up Connec tions and then Make New Connection 3...

Page 94: ...oteView user and deselect all other users and click Next 10 Select Internet Protocol TDP IP and click Properties 11 In the Incoming TCP IP Properties window deselect Allow Callers Access to My Local A...

Page 95: ...ctions Enter the phone number for the phone line connected to the DVXi system 3 After you create the connection right click the icon for that connection and select Properties 4 Select the Server Types...

Page 96: ...to view live video from multiple cameras on your remote client computer When you first run RemoteView you are asked if you would like to add a server If you click Yes you are asked to enter the follow...

Page 97: ...MasterControl if an Adminis trator is logged on remotely IP Address the TCP IP address of the DVXi system or its computer name on the network Username a user ID configured on the DVXi system Password...

Page 98: ...Servers a list of DVXi systems RemoteView is configured to connect to Monitor video windows for the viewing of live video Search a video search and playback utility Setup a set of tabs used to config...

Page 99: ...every time you try to connect to this server 3 Click OK to add the server to the Servers column The Default Scale setting is not applicable to DVXi systems Refer to the Run ning the RemoteView Softwar...

Page 100: ...click Search All DVXi systems detected in that IP range are then listed by address Select any system to view configuration and identification information about the system The Timeout setting indicates...

Page 101: ...lbar The Monitor page contains the following sections see Figure 46 A toolbar with a choice of 10 video window configurations A tree that lists all cameras on all servers you are currently connected t...

Page 102: ...able on each server 3 Click on a camera name and drag it into one of the video windows Re peat until the desired cameras are properly placed in each video window One camera can appear in multiple wind...

Page 103: ...electing it on the right and clicking Move Up or Move Down You can remove a view by selecting it on the right and clicking Remove 4 Enter a tour name 5 Select a time interval 6 Click OK To start a tou...

Page 104: ...bl Click Target on a large window and then double click a small window to show its camera on the larger window You can repeat this action on the large window until you deselect Dbl Click Target or sel...

Page 105: ...from the View menu on the Monitor page select a search result and then click Play see Figure 48 Any recorded video from all selected connected cameras is then played back in the selected window config...

Page 106: ...ll pan quickly when you click and drag an arrow or the joystick Five speeds are available Preposition You can create presets for RemoteView to pan to automatically To create a preset use the PTZ contr...

Page 107: ...ra tree select all the cameras whose video you want to search If all cameras are left blank RemoteView will search all of them 5 Select the Search Type Normal lists video captured in all recording mod...

Page 108: ...w screen is information about the image cur rently displayed including the name of the camera that captured it its size in bytes its number in the sequence of images and the date and time the image wa...

Page 109: ...ee Figure 51 is similar to SmartSearch in MasterControl For information on using SmartSearch see the Searching for Recorded Video section of the MasterControl Operation chapter The Search page also co...

Page 110: ...ed in the view screen 2 Play back the video segment until you locate the image you want to ex port 3 Click Export The Export Video window appears see Figure 52 4 Select an Export Size 5 Select either...

Page 111: ...rt The Export Video window appears 4 Select an Export Size 5 Select a video type XPress Video xpv AVI File avi or Self Extracting Executable exe in the Save As Type field Choose a lo cation type a fil...

Page 112: ...are applied immediately The changes are applied when a one minute file of recorded video is completed on the server which could occur anywhere from 1 to 60 seconds after the changes are implemented in...

Page 113: ...select a PTZ preset for a camera to pan to upon the occurrence of an alarm SERVER SETUP TAB The Server Setup tab contains four sections pertaining to system maintenance and monitoring see Figure 53 I...

Page 114: ...to the DVXi system along with the time and date of the connection Clicking Down load Log File allows you to save the file locally or elsewhere on the network Server Time a date and time configurator T...

Page 115: ...RTN returned to normal If you double click on an alarm event or highlight it and click Play the left video window displays the event video while the right video window displays live video from the sa...

Page 116: ...l to the Sched ule page in MasterControl The only difference in RemoteView is the lack of the Auto Run Schedule option For a complete description of this page see the MasterControl Operation chapter i...

Page 117: ...TINGS The Setup page in MasterControl on the DVXi system allows you to control sev eral RemoteView connection options See the RemoteView Server Settings sec tion of the MasterControl Configuration cha...

Page 118: ...Appendix A DVXi Plug ins...

Page 119: ...hat accompany DVXi systems ordered with this option MotionAlarm This standard plug in activates the DVXi output trigger when a motion event occurs within user defined parameters DVXNotify This standar...

Page 120: ...abled MasterControl fails RemoteView Server fails Images are not being sent from XMUX to the DVXi system DVXi XM16 and DVXi XM32 only There are several events that can cause the system to trigger the...

Page 121: ...n a selected event occurs The alarm is triggered for a longer amount of time only if the alarm event duration exceeds the minimum latch time Reset Alarm Output forces the trigger to its normal state c...

Page 122: ...disk has created an error in the Windows event log with Disk or NTFS as the source MasterControl is Dead The MasterControl application locked up This also causes a system restart RV Server is Dead The...

Page 123: ...rigger is located on the trigger block on the rear panel see Figure 61 The output provides a dry contact closure and the circuit is normally open Figure 59 On DVXi XM16 and DVXi XM32 systems the outpu...

Page 124: ...on to MasterControl with Administrator or Supervisor permissions 1 Open the Plugin Properties window by clicking the MCPlugin icon in the system tray and then select the MotionAlarm tab see Figure 62...

Page 125: ...he specified number of consecutive images the alarm output is triggered for the specified Minimum Latch Time or for the duration of the motion event whichever is longer The MotionAlarm plug in also of...

Page 126: ...VXi TBC and TS models the output trigger is located on the trigger block on the rear panel refer to Figure 61 The output provides a dry contact closure and the circuit is normally open The plug in run...

Page 127: ...tify tab deselect Disable Email Notification 2 Click Add Group Type the name of the group and click OK 3 Click Edit Group This opens the Edit Group window see Figure 64 4 Click SMTP Server Settings to...

Page 128: ...tionless seconds required to restart the count of motion images Other Events Select from several other events or actions for DVXNotify to monitor including MasterControl startup or exit sys tem restar...

Page 129: ...ntly Note 2 Select the Interval which is the days of the week that email messages can be sent to the address Options are Daily Monday Friday Monday Sat urday Weekends Sat and Sun and Never Disabled 3...

Page 130: ...vate the alarm output 4 Under Delay Between Alarms select the minimum amount of time in seconds between output trigger activations If a second alarm occurs before this amount of time has elapsed after...

Page 131: ...e termination of recording either Recording Stop or Recording Hard Stop If the Minimum Latch Time equals zero the termination of recording triggers the alarm output until recording is restarted 6 Sele...

Page 132: ...Appendix B Synchronizing DVXi Clocks...

Page 133: ...nu open Programs Accessories and Command Prompt 2 Type the following in Command Prompt pressing Enter at the end net time setsntp sourcecomputer where sourcecomputer is the IP address or computer name...

Page 134: ...Appendix C Technical Support and Warranty Information...

Page 135: ...lable The version number of MasterControl click the Integral Technologies logo in the application to see this number A complete description of the problem including error messages and instructions for...

Page 136: ...g the equipment off and on users are encouraged to try to correct the inter ference by one or more of the following measures Re orient the television or radio receiving antenna and or relocate the com...

Page 137: ...y will promptly repair or replace the defective unit and then return said unit to Original Purchaser postage and shipping prepaid The Company may use reconditioned or like new parts or units at its so...

Page 138: ...to you This warranty allocates risks of product failure between Original Purchaser and the Company The Company s hardware pricing reflects this allocation of risk and the limitations of liability con...

Reviews: