


99
CPS 220/64/SV
Montage- und Betriebsanleitung
CPS 220/64/SV
Mounting and Operating Instructions
Aktivieren Sie hierzu die Schaltfläche der IP Adresse,
es erscheint folgendes Menü:
Nach manueller Eingabe der IP Adresse ist dieses Menü
durch Betätigen des Button
zu verlassen.
Sofern Sie das Menü „Netzwerkeinstellungen“ verlassen,
erhalten Sie folgende Sicherheitsabfrage.
Durch Bestätigen der Sicherheitsabfrage mit „OK“ werden
diese Einstellungen gespeichert. Nach Übernahme der IP
Adresse wird die Checkbox DHCP automatisch
deaktiviert .
8.7.2.2. Konfiguration des PC für Windows 7
Wählen Sie im Menü „Systemsteuerung“ das Untermenü
„Netzwerk- und Freigabecenter“.
Sofern beide Komponenten mittels einem Netzwerk-
kabel verbunden sind, erscheint „LAN-Verbindung“ als
Menüauswahl.
Durch betätigen der Schaltfläche „LAN-Verbindung“
öffnet sich die Statusanzeige dieser Verbindung. Nach
Betätigen des Buttons „Eigenschaften“ werden Sie in das
Menü „Eigenschaften der LAN-Verbindung“ geführt.
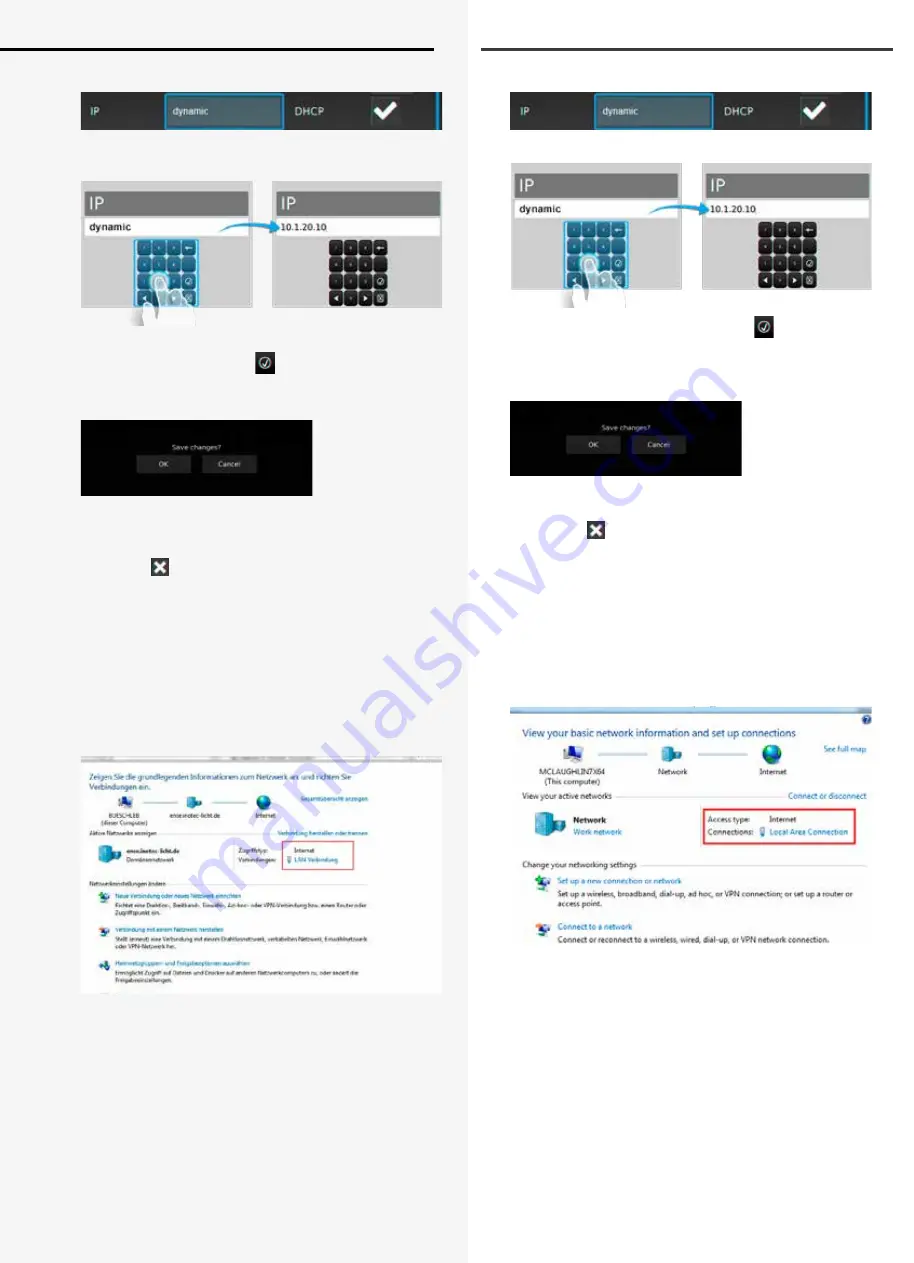
Activate the button of the IP address,
The following menu appears:
You can leave the menu by the button
after setting
up the correct IP address.
The following confirmation prompt appears when you
leave the network settings menu.
Pressing OK will close the confirmation prompt and save
the settings. The DHCP checkbox will be automatically
deactivated after saving the new IP address.
8.7.2.2. Configuration of PC at Windows 7
Open the submenu “Network and Sharing Center” at the
Windows Control Panel. Click on the button “LAN connec-
tion”.
The status display of this connection is shown after
clicking on “LAN connection”. Clicking on the button
“Properties” will guide you to the menu “Properties of LAN
connection”.
Summary of Contents for CPS 220/20/J-SV/J-SKU
Page 2: ......


