background image

15 

Chapter V Menu Programming 

All of the programming functions of V2923ACN can be accessed 
through the Main Selection menu. 


5.1 Main Selection Menu 

To access the Main Selection Menu: 

1.


Make sure that the programming monitor has been connected to 
the BNC connector labeled as "PROG MON" on the back panel 
of V2923ACN. 

2.


Place the key-switch in the MENU position. 

The programming monitor will display the Main Selection Menu 
shown below. 

MAIN SELECTION

1 SYSTEM

2 MONITOR

3 CAMERA

4 PORTS

5 SATELLITE

6 BACKUP

7 LANGUAGE


V2923ACN Main Selection Menu 

 
The Main Selection menu is displayed as above, indicating the 
menu programming functions are available. 


5.2 Menu Navigation and Operation 

Please refer to the following guidelines for menu navigation and operation: 
 

Function 

Instruction


Position the cursor 

The blinking line on the menu screen indicates the current cursor location. 
There are usually two ways to move the cursor: 
Press one of the following keys for the designated direction: 


NEAR (left), FAR (right), WIDE (up) and TELE (down); or 


Push the joystick in the direction in which you want to move the cursor. 

Scroll multiple pages 

Some menus may include multiple pages. 
To turn to another page, use the following keys: 


CLOSE (page up) and OPEN (page down) in the IRIS section;   


OFF (page backward) and ON (page forward) in the AUXILIARY section. 

Access a sub-menu 

There are two ways to access a sub-menu: 


Move the cursor to the desired sub-menu, and press the 

ACK

 key; 

or


Enter the number for the desired sub-menu, and press the 

ACK

 key. 

Return to the previous menu  Move the cursor to the bottom line, i.e., RETURN MAIN or PREVIOUS MENU, and 

press the 

ACK

 key. 

Select an entry value 

1)


Press the 

ACK

 key to toggle through the available values. If the cursor moves to 

the next entry, it indicates the value has been selected. Otherwise, continue with 
Step 2. 

2)


Press the 

NEXT

 key to accept the selected value and move to the next field. 

Enter an entry value 

1)


Enter the desired number (or code number) on the numeric keypad. 

2)


Press the 

ACK

 key to confirm. 

Exit menu programming 

Place the key-switch in the OPERATE or PROGRAM position. 


5.3 System Menu 

Access the SYSTEM menu from the MAIN SELECTION menu.  
System Time and Date, Tours, Salvos, Alarm Contacts, Event 
timers and Monitor Status are programmed in this menu. 

MAIN SELECTION

1 SYSTEM

2 MONITOR

3 CAMERA

4 PORTS

5 SATELLITE

6 BACKUP

7 LANGUAGE

RETURN MAIN

SYSTEM

1 SET TIME AND DATE
2 SET SYSTEM TOURS
3 SET SYSTEM SALVOS
4 SET EVENT TIMERS
5 SET ALARM
6 SET SOURCE GROUPS
7 SET PRIORITY AND USERS


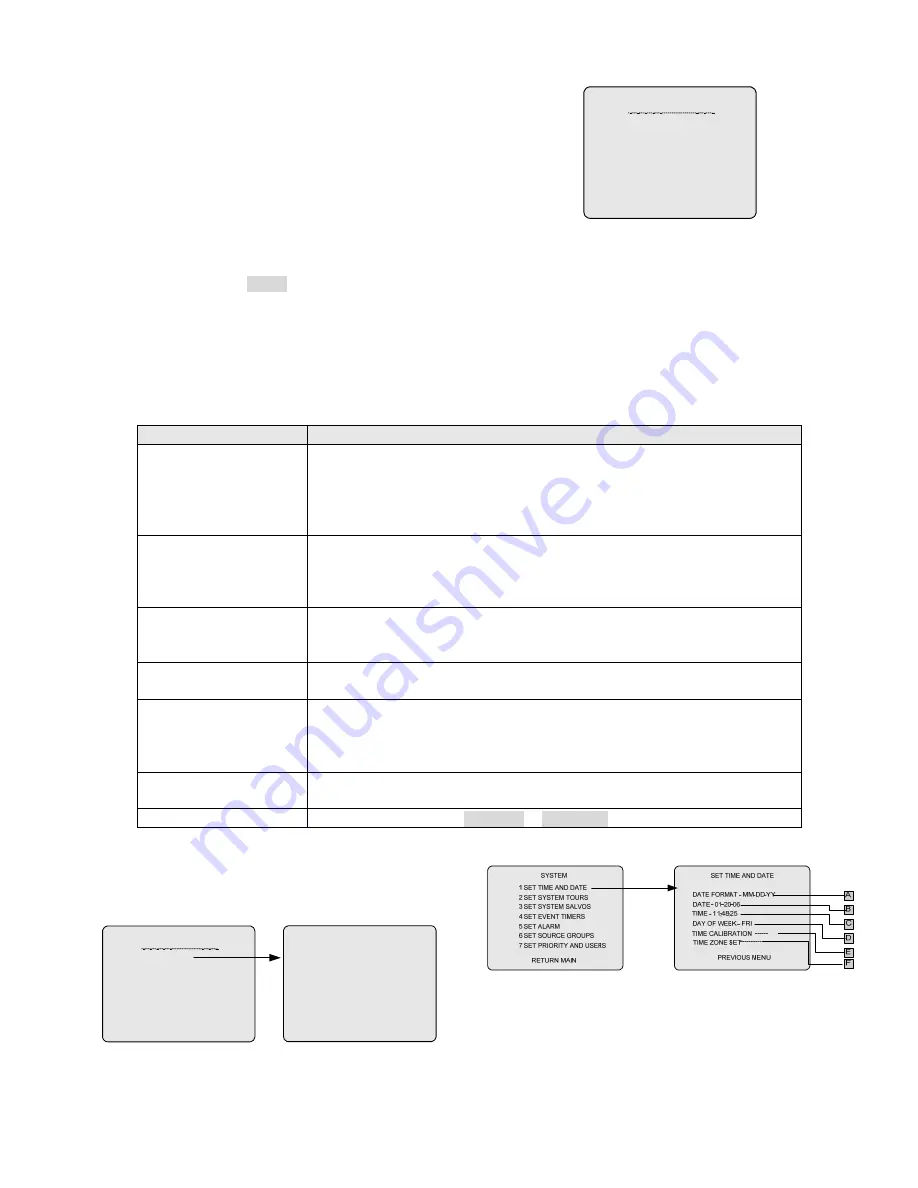
5.3.1 Setting Time and Date 


Use the SET TIME AND DATE menu to set the date format, date, 
time, day of the week for on-screen displays, and the site number 
for network time calibration. 


Summary of Contents for V2923ACN Series

Page 1: ...RM9 microprocessor and based on the LINUX operation system V2923ACN External CPU Module can provide automated electronic surveillance or it can allow even a single user to control an entire CCTV syste...

Page 2: ......

Page 3: ...rnal CPU Module complies with Part 15 of the FCC rules Operation is subject to the following two conditions This device may not cause harmful interference This device must accept any interference rece...

Page 4: ...d by manufacturer Position power source and related wires to assure they will be kept away from ground and access way Refer all service matters to qualified personnel Save product packaging to ensure...

Page 5: ...5 2 Menu Navigation and Operation 15 5 3 System Menu 15 5 3 1 Setting Time and Date 15 5 3 2 Setting System Tours 17 5 3 3 Set System Salvos 18 5 3 4 Set Event Timer 20 5 3 5 Set Alarm 21 5 3 5 1 Set...

Page 6: ......

Page 7: ...amera and keyboard With User Priority system administrators can define a maximum of 64 system users and assign each user a password and a priority level Each of the 99 priority levels can also be conf...

Page 8: ...high speed DATA LINE 5 System Priority System priority provides operators with the following detailed controls Keyboard to Monitor Set the keyboard group that can control the monitor Keyboard to Camer...

Page 9: ...o windows optional video card E maps control menus and icons password encryption and login Convenient arming disarming V29X3SW System Setup Software Windows based Uploads and downloads the system setu...

Page 10: ...menus 6 Power Switch and power inlet 2 2 Hardware Connection All internal switch settings on the modules should be made before system connections are started Ensure that all connections are properly...

Page 11: ...Infinov a R 1 2 3 4 5 6 7 8 9 0 C A M NE XT R U N HO LD O F F A R M A C K O F F CL OS E OP EN NE AR F A R WI DE TE LE SH OT M O N PR OG A UX IRI S FOC US ZO OM MONIT OR CAME RA LEN S ENTE R SWITCH ER...

Page 12: ...ge right key 30 SHOT Enter key 31 PATRN Exit key 32 Joystick LAST LOCK ACK NEXT RUN HOLD OFF ARM SALVO PATRN SHOT PROG 1 2 3 4 5 6 7 8 9 CAM 0 MON F1 CLEAR F2 CLOSE OPEN IRIS OFF ON AUXILIARY NEAR FAR...

Page 13: ...ase refer to Chapter V Menu Programming System Set Priority and User Menu for details on password programming When a password for a user is assigned successfully the user must log on to the system bef...

Page 14: ...le times each dwell time can be defined separately V2923ACN supports two tour kinds of tours System Tour and Monitor Tour System Tours are defined by Menu Programming see Chapter V Monitor Tours are d...

Page 15: ...also enter 30 F2 or 33 F2 on the keyboard at PROGRAM mode connected to host matrix to download setup to non host matrix switchers Host matrix will download setup information to non host matrix switche...

Page 16: ...The monitor used for channel application can be called up by keyboard and can be view video and contol cameras but it can not be used for switching 4 When any monitor is set as the monitor is disabled...

Page 17: ...f shifting title position with joystick 51 F2 Disable the function the command 50 F2 activates so as to resume function of joystick to control dome camera 70 F2 Displays main procedure s version numbe...

Page 18: ...day of the week 3 Place the key switch in OPERATE position 4 5 Setting Preset Infinova series receivers and Super Domes feature preset function programmable via the SHOT key on the keyboard Presets p...

Page 19: ...ors 1st 2nd 3rd 4th Assuming there is a sequence of 6 received alarmed videos 5th 1st 2nd 3rd 1st 2nd 4th 1st Monitor 2nd Monitor 3rd Monitor 1st Monitor 2nd Monitor 3rd Monitor The first 3 alarmed vi...

Page 20: ...Hold Manual Clear BHM First Monitor Arming Type Display Second Monitor Arming Type Display 13 Dual Hold and Sequence Instant Clear DHI DSI 14 Dual Hold and Sequence Auto Clear DHA DSA 15 Dual Hold an...

Page 21: ...IRIS section OFF page backward and ON page forward in the AUXILIARY section Access a sub menu There are two ways to access a sub menu Move the cursor to the desired sub menu and press the ACK key or...

Page 22: ...e V2923ACN displays time in a 24 hour format HH MM SS hour minute second Example To set the time to 11 48 25 1 Enter 11 on the keypad and press the ACK key 2 Enter 48 on the keypad and press the ACK k...

Page 23: ...menu to define system tours V2923ACN provides 128 system tours each including 128 cameras with programmable Dwell Times DWL Presets PRE and Auxiliary Relays AUX A single screen page permits setup oper...

Page 24: ...wn above indicate that each time the tour cycle processes to ENT 003 Salvo 3 will be called up for 5 seconds The monitor that runs the tour will become the first monitor for the called salvo T tour to...

Page 25: ...salvo Item Function C CAM Refers to the camera number associated with each position monitor To select a camera 1 Enter the camera number 1 1024 for Real number or 1 9999 for Pseudo number 2 Press the...

Page 26: ...rst event timer in the system The menu items are described below SYSTEM RETURN MAIN A 1 SET TIME AND DATE 2 SET SYSTEM TOURS 3 SET SYSTEM SALVOS 4 SET EVENT TIMERS 5 SET ALARM 6 SET SOURCE GROUPS 7 SE...

Page 27: ...RM TITLE PREVIOUS MENU SET MONITOR ARM TYPES MON ARM TYPE ACK 0001 DIS N 0002 DIS N 0003 DIS N 0004 DIS N 0005 DIS N 0006 DIS N 0007 DIS N 0008 DIS N Among them MON selects the monitor to arm ARM TYPE...

Page 28: ...tions discussed in Item F Item Function C DWL Defines the Dwell Time for the CAM entry To set the Dwell Time for the camera 1 Enter the Dwell Time 1 60 in seconds or enter 61 to hold the camera 2 Pres...

Page 29: ...fine a wired group the last CN entry of the group must be set to N or S while all the previous CN entries are set as W ACN CAM DWL PRE AUX CN 0005 0005 02 01 1 ON W 0006 0006 02 01 0 W 0007 0007 02 01...

Page 30: ...tomatically responding to the alarm contact Example To allow alarmed videos triggered by Alarm Contact 9 to be automatically switched to Monitor 5 1 Press the ON key in the AUXILIARY section to displa...

Page 31: ...SET SOURCE GROUPS 1 SET KEYBOARD GROUPS 2 SET CAMERA GROUPS PREVIOUS MENU Of which KEYBOARD GROUPS to set the serial number for keyboard group Up to 99 keyboard groups can be set NUM serial number fo...

Page 32: ...GE PARAMETERS Y PREVIOUS MENU A B C D E F G SET PRIORITY AND USER 1 SET PRIORITY 2 SET USER PREVIOUS MENU The SET PRIORITY menu shown above is used to configure each of the 99 priority levels Upon ini...

Page 33: ...USER ID 00 ENABLE PRIORITY 8 PASSCODE XXXXXX C PREVIOUS MENU The SET USER menu can be used to assign a password protected user number and a priority level for each of up to 64 users Note the menu is n...

Page 34: ...on this monitor Item Function C KEYBOARD GROUP Set the keyboard group that can control the monitor The default setting is ALL which indicates that all keyboards can control the monitor To program the...

Page 35: ...Note the menu is not available for non host matrix switcher SET FUNCTION ENT MON USE KEYG CAMG 001 001 001 MON ALL ALL A B C D E Item Function A ENT Sequence number B MON The number of the monitor und...

Page 36: ...sent N no video sync signal loss occurred Sample Menu MON SITE CAM ST TOUR V S 001 0015 R 001 Y Y 002 0021 H 002 Y Y MONITOR STATUS The sample menu indicates that Monitor 1 is displaying Camera 15 and...

Page 37: ...firm Note If Camera A s Real number is chosen as the Pseudo number for Camera B Camera B s real number will then be automatically assigned as the Pseudo number for Camera A To locate a Pseudo camera n...

Page 38: ...he current active field and the other indicating the alphanumeric characters to be selected The NEXT key is used to move the field positioning cursor and the joystick is used to move the cursor within...

Page 39: ...ber of pseudo camera start number of second pseudo camera start number of real camera number start number of REFLAC number and press SAVE then the camera number pseudo camera second pseudo camera REFL...

Page 40: ...l appear 5 5 6 Video Loss RETURN MAIN CAMERA PREVIOUS MENU CAMERA 0001 VIDEO LOSS OFF CONTACT ALARM 0001 A B C 1 PSEUDO 2 TITLE 3 CAMERA KEYBOARD 4 BATCH PSEUDO 5 CLEAR SETTING 6 VIDEO LOSS The VIDEO...

Page 41: ...ilable to set this option on the main CPU of dual CPU The baud rate here is 115200 fixed 5 7 Non host matrix Configuration The V2923ACN network system is constructed in Host networking way In the netw...

Page 42: ...e the cursor to the first entry of the item 2 Enter the first three digits of the 12 digit IP address and press the ACK key Note The first three digits various in the range of 001 223 and 127 is unava...

Page 43: ...er Options The setting ranges from 1 to 999 seconds Item Function H V2060NET RETRANSFER During networking among V2060 matrix switcher if Y is set the switching commands sent from V400 will retransfer...

Page 44: ...68 000 003 03 0004 192 168 000 004 03 0005 192 168 000 005 03 0006 192 168 000 006 03 0007 192 168 000 007 03 0008 192 168 000 008 03 1 LOCAL SITE NUMBER 2 VIDEO TRUNK ASSIGNMENT 3 REMOTE SITE IP ADDR...

Page 45: ...ion of DOWNLOAD 5 8 System Backup The BACKUP menu enable user to backup all the program data in the system and to restore the backup program data or to restore the factory set Details as shown below I...

Page 46: ...nguage English or Chinese Item Function SELECTION Selects menu language Options and code 0 English 1 Chinese To select language Enter LANGUAGE menu and the cursor will locate at the language selection...

Page 47: ...sponding to the desired alarm contact ACN 2 Enter the desired Camera Number 1 1024 or Pseudo Number 1 9999 on the keypad 3 Press the ACK key to confirm The entered Camera Number will be displayed in t...

Page 48: ...ost matrix switcher and SITE2 is set to be satellite matrix switcher The menu setting is shown below VIDEO TRUNK ASSIGNMENT PREVIOUS MENU OUT IN ENT SITE MON SITE CAM 0001 001 001 002 2001 0002 002 00...

Page 49: ...igh speed data line 2 BNC connectors External sync input output BNC connectors Programming monitor BNC connector Power Supply Input Voltage 100 240VAC Power Requirements 5W Mechanical CPU Dimensions H...

Page 50: ...44 Appendix V Typical System Application...

Page 51: ...meter shall be 0 8000mm A lower diameter value tends to cause voltage loss and even system instability 0 8000 1 000 1 250 2 000 10 283 86 451 137 716 218 1811 551 20 141 42 225 68 358 109 905 275 30 9...

Page 52: ...e Use shielded cables or thread the cables through metal tubes for burial thus to ensure the electric connection to the metal tube In case it s difficult to thread the cable through the tube all the w...

Page 53: ......

Page 54: ......

Page 55: ......

Page 56: ...Infinova 51 Stouts Lane Monmouth Junction NJ 08852 U S A Tel 1 888 685 2002 USA only 1 732 355 9100 Fax 1 732 355 9101 sales infinova com V1 3 1611...

Reviews: