


Accessing the SmartWare Command Line Interface
43
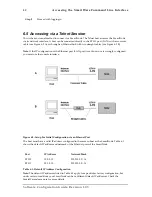
6.5.1 Telnet Procedure
Before you begin to use the CLI to input configuration commands, carry out these six steps:
Step 1
Set up the SmartNode as described in the
Hardware Installation Guide
.
Step 2
Connect the host (PC) or hub to the ETH 1 (LAN) port of your SmartNode with
crossover or straight cables, according to Appendix A of the
Hardware Installation Guide
.
Step 3
Power on your SmartNode and wait until the ’Run’ LED lights.
Step 4
Be sure that the IP address and subnet mask of your host are in the same address range
as the ETH 1 (LAN) port of your SmartNode.
Step 5
Open a Telnet session to the ETH 1 (LAN) port with the IP address 10.1.0.10 of your
SmartNode.
Step 6
Proceed with logging in.
6.6 Log On to SmartWare
Accessing your SmartNode via the local console port or via a Telnet session will open a login screen.
The following description of the login process is based on a Telnet session scenario but is identical
when accessing via the local console port.
The opening Telnet screen is depicted in Figure 6-3. The window header bar shows the IP address of
the target SmartNode.
At the very beginning a factory preset administrator account with name
administrator
and an empty
password exists in SmartWare. For that reason use the name
administrator
after the login prompt and
simply press the Enter key after the password prompt.
Figure 6-3: Login Display
When you have successfully logged in you are in the operator execution mode, indicated by the “>”
as command line prompt. Now you may begin to enter system commands.
Note:
Details on screen in Figure 6-3, such as the IP address in the system prompt and window
header bar, may be different on your SmartNodes
Software Configuration Guide, Revision 1.03
Summary of Contents for SmartWare R2.00
Page 2: ......