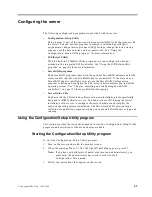
Configuring the server
47
Attention:
You must use the menu selections to save custom settings for the
PCI Slot/Device Information choice. The save, restore and load default
settings choices on the main menu of the Configuration/Setup Utility do not
save the PCI Slot/Device Information settings.
After making changes, select:
–
Save and exit the PCI Utility
to save the changes and return to the
Advanced Setup choice.
–
Exit the PCI Utility without saving changes
to ignore the changes,
restore the previous settings, and return to the Advanced Setup choice.
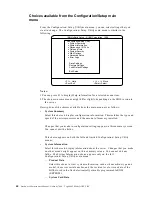
PCI Device Control
allows you to enable or disable the integrated SCSI,
video, and Ethernet controllers. You can also enable or disable PCI slots from
this menu.
–
The default setting is Enable for all the controllers and PCI slots. If you
select Disable, the system will not configure the disabled device and the
operating system will not see the device. (This is equivalent to
unplugging the device.)
–
If the on-board SCSI controller is disabled and no other controller and
mass storage device are installed, operating system startup cannot occur.
–
If the video controller is disabled and no video adapter is installed, the
server will have no video capability. However, turning the server off and
on three times without completing POST results in a default startup that
enables video again.
•
Memory Settings
Select this choice to manually disable or enable a bank of memory.
If a memory error is detected during POST or memory configuration, the server
can automatically disable the failing memory bank and continue operating with
reduced memory capacity. If this occurs, you must manually enable the memory
bank after the problem is corrected. Select Memory Settings from the Advanced
Setup menu, use the arrow keys to highlight the bank that you want to enable;
then, use the arrow keys to select Enable.
•
System Service Processor Settings
Select this choice to enable or disable power supply redundancy monitoring.
•
Event/Error Logs
Select this choice to view or clear error logs.
— Select Clear error logs to clear the error or event log.
— Select POST Error Log to view the three most recent error codes and
messages that the system generated during POST.
— Select System Event/Error Log to view the system event/error log. The
system event/error log contains all the system error and warning messages
that the system has generated. You can use the arrow keys to move between
pages in the system event/error log.
•
Save Settings
Select this choice to save the customized settings.
•
Restore Settings
Summary of Contents for 86655RY - Netfinity 7600 - 8665
Page 1: ...IBM Hardware Maintenance Manual Netfinity 7600 Type 8665 Models 1RY 2RY ...
Page 2: ......
Page 3: ...IBM Hardware Maintenance Manual Netfinity 7600 Type 8665 Models 1RY 2RY ...
Page 10: ...viii Hardware Maintenance Manual Netfinity 7600 Type 8665 Models 1RY 2RY ...
Page 52: ...42 Hardware Maintenance Manual Netfinity 7600 Type 8665 Models 1RY 2RY ...
Page 104: ...94 Hardware Maintenance Manual Netfinity 7600 Type 8665 Models 1RY 2RY ...
Page 148: ...138 Hardware Maintenance Manual Netfinity 7600 Type 8665 Models 1RY 2RY ...
Page 252: ...242 Hardware Maintenance Manual Netfinity 7600 Type 8665 Models 1RY 2RY ...
Page 270: ...260 Hardware Maintenance Manual Netfinity 7600 Type 8665 Models 1RY 2RY ...
Page 271: ...Related service information 261 ...
Page 272: ...262 Hardware Maintenance Manual Netfinity 7600 Type 8665 Models 1RY 2RY ...
Page 273: ...Related service information 263 ...
Page 274: ...264 Hardware Maintenance Manual Netfinity 7600 Type 8665 Models 1RY 2RY ...
Page 284: ...274 Hardware Maintenance Manual Netfinity 7600 Type 8665 Models 1RY 2RY ...
Page 285: ...Related service information 275 ...
Page 292: ...282 Hardware Maintenance Manual Netfinity 7600 Type 8665 Models 1RY 2RY ...
Page 293: ......


