


TROUBLESHOOTING SCENARIOS AND SOLUTIONS
127
Chapter 5
Solving Power Supply Problems
Before replacing the power supply, use the Built-In Self-Test (BIST) feature to learn if the power supply
still works.
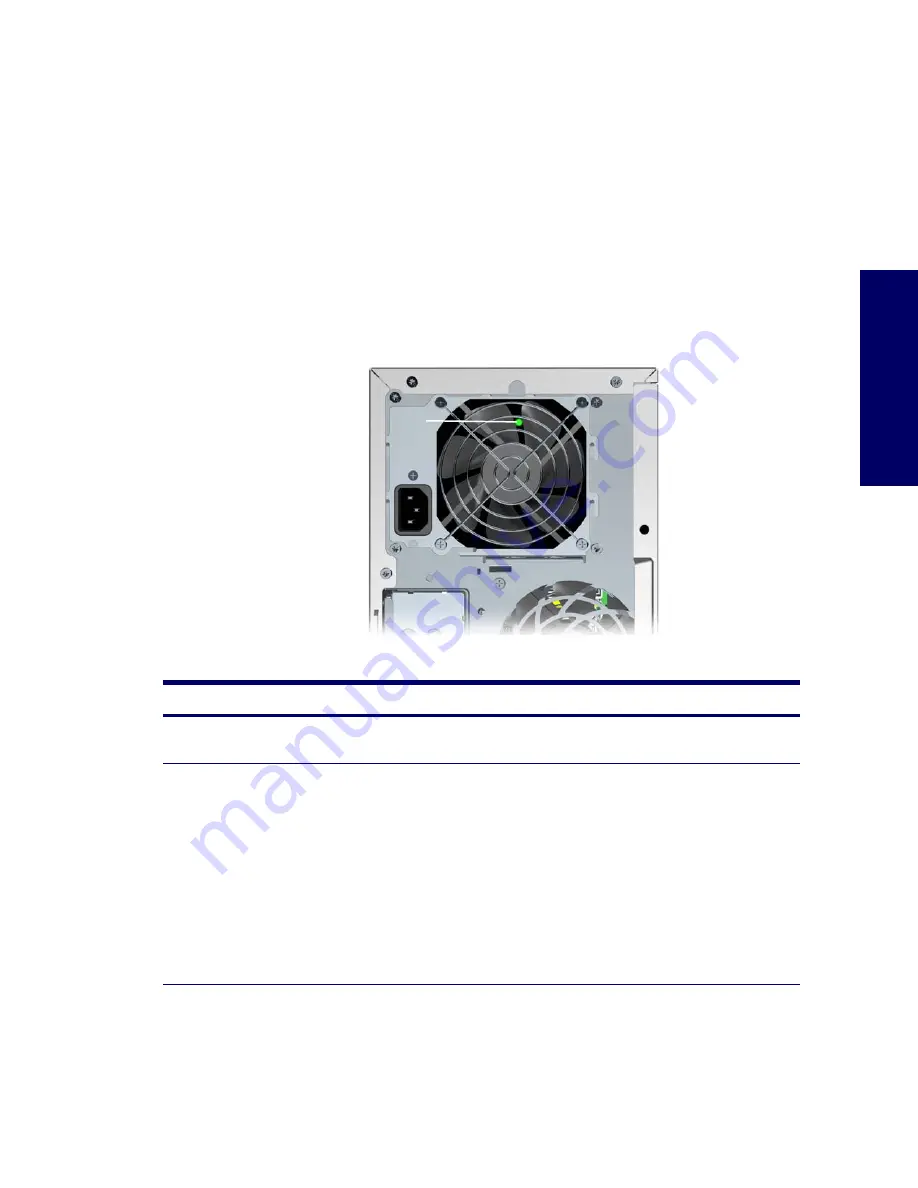
To test the power supply:
1
Disconnect the AC power cord from the workstation.
2
Disconnect all internal power supply cables.
3
Plug in the AC power cord.
If the green BIST LED
1
on the rear of the workstation is lit AND the fan is spinning, the power
supply is functional.
If the green BIST LED is not lit OR the fan is not spinning, replace the power supply.
Table 5-4
Solving Power Supply Problems
Problem
Cause
Solution
Power supply shuts down
intermittently.
Power supply fault.
Replace the power supply.
Workstation powered off
automatically and the Power LED
flashes Red two times, once every
second, followed by a two-second
pause.
Processor thermal protection
activated:
A fan might be blocked or not
turning.
OR
The heatsink/fan assembly is
not properly attached to the
processor.
1
Ensure that the workstation air vents are not
blocked and the cooling fan is running.
2
Open hood, press the power button, and see
if the processor fan spins. If the processor
fan is not spinning, make sure the fan’s
cable is plugged onto the system board
header. Ensure the fan is fully/properly
seated or installed.
3
Replace the processor fan.
4
Reseat processor heatsink and verify that
the fan assembly is properly attached.
1
Summary of Contents for Xw4200 - Workstation - 1 GB RAM
Page 1: ...HP Workstation xw4200 Service and Technical Reference Guide ...
Page 12: ...XII PREFACE ...
Page 26: ...26 PRODUCT OVERVIEW ...
Page 66: ...66 SYSTEM MANAGEMENT ...
Page 110: ...110 REMOVAL AND REPLACEMENT 4 Install the SATA drive as shown in the following illustration ...
Page 152: ...152 SYSTEM DIAGNOSTICS AND TROUBLESHOOTING ...
Page 174: ...174 POWER CORD SET REQUIREMENTS ...
Page 178: ...178 ROUTINE CARE ...
Page 184: ...184 QUICK TROUBLESHOOTING FLOWS Initial Troubleshooting ...
Page 185: ...NO POWER 185 Appendix I No Power ...
Page 186: ...186 QUICK TROUBLESHOOTING FLOWS ...
Page 187: ...NO POWER 187 Appendix I ...
Page 188: ...188 QUICK TROUBLESHOOTING FLOWS No Video ...
Page 189: ...NO VIDEO 189 Appendix I ...
Page 190: ...190 QUICK TROUBLESHOOTING FLOWS ...
Page 191: ...ERROR MESSAGES 191 Appendix I Error Messages ...
Page 192: ...192 QUICK TROUBLESHOOTING FLOWS ...
Page 193: ...ERROR MESSAGES 193 Appendix I ...
Page 194: ...194 QUICK TROUBLESHOOTING FLOWS No OS Loading ...
Page 195: ...NO OS LOADING FROM HARD DRIVE 195 Appendix I No OS Loading from Hard Drive ...
Page 196: ...196 QUICK TROUBLESHOOTING FLOWS ...
Page 197: ...NO OS LOADING FROM HARD DRIVE 197 Appendix I ...
Page 198: ...198 QUICK TROUBLESHOOTING FLOWS No OS Loading from Diskette Drive ...
Page 199: ...NO OS LOADING FROM CD ROM DRIVE 199 Appendix I No OS Loading from CD ROM Drive ...
Page 200: ...200 QUICK TROUBLESHOOTING FLOWS No OS Loading from Network ...
Page 201: ...NON FUNCTIONING DEVICE 201 Appendix I Non Functioning Device ...
Page 202: ...202 QUICK TROUBLESHOOTING FLOWS ...
Page 206: ...206 ...


