


Removal and Replacement
123
Re
m
ova
l a
nd
R
epl
a
ce
m
ent
Power Supply
Replace a power supply as soon as possible when troubleshooting indicates a
power supply failure (see “Isolating Causes” in Chapter 4). If a power supply
fails, the remaining power supply provides proper voltage to the disk system.
However, if the remaining power supply fails before the first power supply is
replaced, the disk system will turn off.
The power supply fan may continue to operate even when a power supply fails.
You do not need to turn off the disk system to replace a power supply.
Follow ESD procedures whenever possible.
Tools
ESD wrist strap (no hand tools are required to perform this procedure).
Whenever possible, follow ESD procedures.
Procedure
Caution
Do not remove a power supply from an operating product
until you have the replacement and are ready to install it.
An empty slot will cause uneven cooling and eventual
overheating.
The power supply may be hot to touch.
1
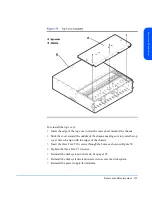
Disconnect the power cord from the power supply.
2
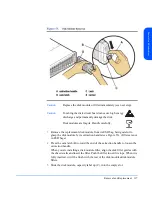
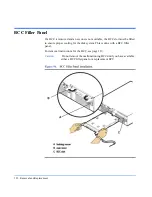
Loosen the thumbscrews on the power supply handles (A and B in Figure 57).
3
Rotate the handles out to disengage the power supply from the midplane.
4
Pull the power supply out of the chassis. Support the far end of the supply
with your free hand as it clears the chassis.
Replace the power supply immediately if the product is in use (see next step).
Summary of Contents for StorageWorks 2300 - Disk System
Page 1: ...hp StorageWorks disk system 2300 Edition E0902 user s guide ...
Page 10: ...10 ...
Page 14: ...14 Product Description ...
Page 35: ...Installation 35 Installation 2 ...
Page 40: ...40 Installation ...
Page 41: ...Installation 41 Installation ...
Page 48: ...48 Installation ...
Page 58: ...58 Installation ...
Page 59: ...Installation 59 Installation 4 Install clipnuts as shown in Figure 28 ...
Page 76: ...76 Installation ...
Page 77: ...Installation 77 Installation ...
Page 83: ...Configuration 83 Configuration 3 ...
Page 86: ...86 Configuration ...
Page 94: ...94 Configuration ...
Page 95: ...Troubleshooting 95 Troubleshooting 4 ...
Page 108: ...108 Removal and Replacement ...
Page 132: ......
Page 134: ......
Page 140: ......
Page 150: ...150 Reference E VCCI Statement Japan Harmonics Conformance Japan F BCIQ EMC Statement Taiwan ...
Page 151: ...Reference 151 Reference G Declaration of Conformity ...
Page 158: ...158 ...