background image

28 Additional features

Answer/receive mode

Answer/receive mode

How the product receives faxes depends on the answer/receive mode you chose when 

you set up the product. You can send faxes in any answer/receive mode. The answer/

receive mode setting determines how the device answers the incoming call.

S

When no document is loaded, press the 

Rcv.Mode/Contrast

 button until the desired 

option displays.

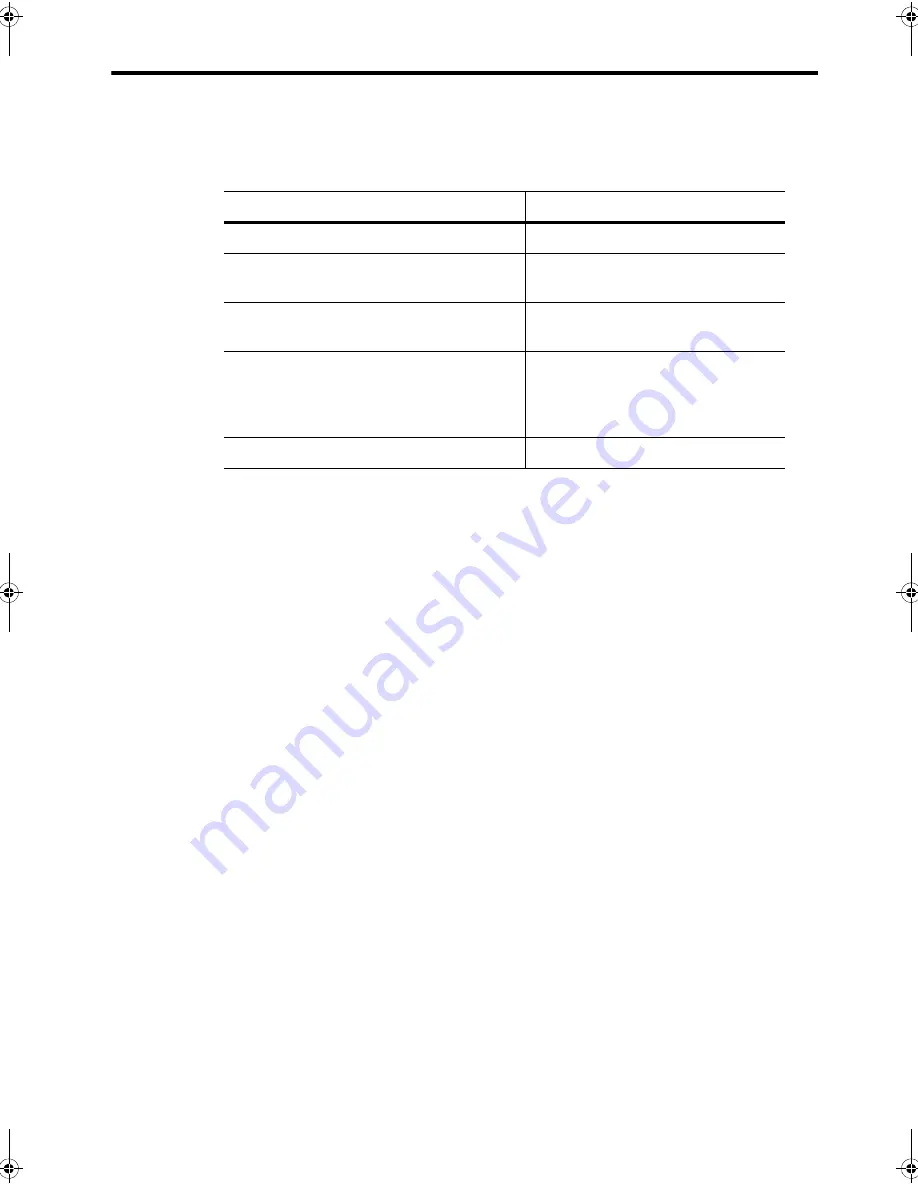
How are you going to use your HP Fax?

Read about...

Fax machine with few or no voice calls.

FAX mode

Telephone and fax machine without an 

external answering machine connected.

AUTO mode

As a fax machine with an external 

answering machine.

TAM mode

Using Distinctive Ring (DRPD) service to 

set up a separate telephone number for 

your fax on the same physical line as 

your other numbers.

See 

Distinctive ring (DRPD) 

on 

page 27.

Telephone with few or no fax calls.

TEL mode

FAX 

mode

In Ready mode,

 FAX 

appears in the right hand corner of the 

display.

When you get a call, the machine answers and receives the fax 

automatically. When reception is complete, the machine returns to 

Ready mode.

If you want to change the number of rings before it answers, 

see 

Set rings to answer 

 on page 23.

AUTO 

mode

In Ready mode,

 AUTO 

appears in the right hand corner of the 

display.

When a call comes in, the machine answers it. If a fax is being 

sent, the device receives the fax. If the machine does not sense a 

fax signal, it will ring 5 times in a different tone to tell you it may be 

a regular telephone call. If you do not pick up the handset it will try 

again to receive a fax after several more rings.

If you want to change the number of rings before it answers, 

see 

Set rings to answer 

 on page 23.

CB782-90001_UG_EN.book  Page 28  Friday, June 29, 2007  4:13 PM

Summary of Contents for 640 Fax series

Page 1: ...HP 640 Fax series User Guide Part number CB782 90001 Second edition 05 2007 ...

Page 2: ...es Paper currency traveler s checks or money orders Certificates of deposit Copyrighted works Safety information WARNING To prevent fire or shock hazard do not expose this product to rain or any type of moisture Always follow basic safety precautions when using this product to reduce risk of injury from fire or electric shock WARNING Potential shock hazard Read and understand all instructions in t...

Page 3: ...telephone numbers 15 Most text fields 15 Fax header telephone number 16 Speed dialing 17 Store a number in the phone book 17 Print the phone book 18 Dial from the phone book 18 One touch dialing 18 Phone book dialing 18 Paper types and sizes 19 Document types and sizes 20 Set document resolution and contrast for a single copy 21 Adjust volume 22 Ringer volume 22 Speaker volume 22 Automatic fax red...

Page 4: ...orward faxes 35 5 Feature reference 37 Set the date and time 37 Turn on and off sounds 37 WakeUp sounds 37 Alarm sounds 38 Key sounds 38 Silent mode 38 Set the fax header information 38 Print reports 39 Automatic reports 39 Reports you can print 39 Reprinting faxes 40 Clearing memory 41 Loudspeaker 41 Redial a number in memory 42 6 Care and maintenance 43 Print cartridge information 43 View ink le...

Page 5: ...shooting 54 Fax problems 54 Print quality problems 56 Paper feeding problems 56 7 Specifications and regulatory information 57 Paper types and sizes 57 Document types and sizes 57 Acceptable documents 57 Print cartridge 58 Product specifications 58 A sample of ITU 1 test chart reduced to 60 5 60 Environmental product stewardship program 61 Regulatory notices 62 Declaration of conformity 64 Use Hew...

Page 6: ...iv Contents ...

Page 7: ...e information see Paper Size on page 11 The HP Fax is designed to work with a variety of plain papers cotton bond 75 90 g m2 20 24 lb in A4 Letter and Legal sizes TIP Some papers have a side that s been conditioned for printing The print side is indicated on the paper s packaging Always load with the print side facing you 1 The arrow buttons located at the left and right of OK button on the contro...

Page 8: ...sten as you dial then pressing Start Enter Pressing and holding a One Touch button For more information see One touch dialing on page 18 Pressing the Speed Dial button when Search Dial appears in the display press OK and search for the number When the correct number appears press Start Enter For more information see Phone book dialing on page 18 NOTE One touch and speed dial locations must have be...

Page 9: ...ually receive faxes 1 Answer the telephone 2 If you hear fax tones press the Start Enter button 3 Once you hear fax tones from both machines this may take several seconds you should hang up the telephone Make a copy You can make multiple copies of a 10 page document Single copy default settings 1 Turn the page face down and insert it into the document feeder 2 Press Copy twice Multiple copies or c...

Page 10: ...ch number This turns on the speaker When you are connected pick up the handset For more information see One touch dialing on page 18 Press the Speed Dial button when Search Dial appears in the display press OK and search for the number When the correct number appears press Start Enter This turns on the speaker When you are connected pick up the handset For more information see Phone book dialing o...

Page 11: ...25 50 speed dialing locations including10 One Touch speed dials see page 17 Distinctive Ring DRPD capability Multiple numbers on the same phone line that are differentiated by ring pattern see page 27 Broadcasting Send the same document to multiple destinations see page 31 Fax forwarding Forward documents to another fax machine see page 35 Delayed fax Send the document at a later time see page 32 ...

Page 12: ...HP 640 Fax Parts of the HP Fax Figure 2 1 Front view Figure 2 2 Rear view 1 Document support 2 Paper tray 3 Paper tray cover 4 Document guide 5 Document feeder 6 Handset 7 Paper guide 8 Paper support 4 3 2 1 8 7 6 5 1 Power cord socket 1 ...

Page 13: ...BASICS HP F AX BASICS HP F AX BASICS HP F AX BASICS HP Fax basics 7 The HP 640 Fax Figure 2 3 Bottom view 1 Connect handset to the HANDSET port 2 Connect telephone line to the LINE port 3 Connect answering machine or extension phone to the EXT port 3 2 1 ...

Page 14: ...ently faxed and send them to selected fax numbers without the originals Press Favorites repeatedly to save delete send or print the documents 5 Number keypad Dials telephone and fax numbers and enters letters and symbols in text fields The phone key pad is also used for one touch dialing 6 Symbols The 0 key Used to enter special characters when entering a name in a text field 7 Speed Dial Stores a...

Page 15: ...er volume If the handset is off hook adjusts the handset volume When Loudspeaker has been pressed adjusts the speaker volume 13 OK Accepts the selection shown in the display 14 Back Allows you to return to the previous menu level 15 Copy Press twice to copy a document with the default copy settings Press once then set options Press OK between options Press Copy to copy the document 16 Start Enter ...

Page 16: ...stem Data Caller ID Junk Fax Print Fax REPORTS ADVANCED FAX Set Broadcasting Set Delayed Fax Set Polling Send Cancel Schedule MEMORY CLEAR Factory Default Fax Header Dial Schedule Journal SET UP SOUND Alarm Sound Key Sound WakeUp Sound Silent Mode Language Sending Confirm Paper Size Auto Reduction Discard Size Rings to Answer Man Fax Rcv Code ECM Mode Send From Memory Caller ID Set Junk Fax No Aut...

Page 17: ...report You can print one manually see Print reports on page 39 ERROR prints only when an error occurs Note that this report can include the Image TCR see Image TCR on page 26 Paper Size A4 Letter and Legal are the paper sizes you can use to receive faxes and copy Auto Reduction When receiving a document as long as or longer than the paper loaded the machine can automatically reduce the data to fit...

Page 18: ...emoved The settings are Add and Delete Auto Journal The Auto Journal shows the specific information concerning transmission or reception activities the time and date of most recent 40 transmissions or receptions The settings are On and Off Distinctive Ring Distinctive ring DRPD distinctive ring pattern detection is a service provided by some telephone companies that assigns two phone numbers to on...

Page 19: ...ed and everybody can listen to the conversation While you are using Loudspeaker do not place the handset beside the speaker as this may result in noise interference Option Settings Set Broadcasting Allows you to send a fax to several fax numbers at once Set Delayed Fax Allows you to set up a fax to be sent at any time in the next 24 hours Set Polling Send Allows you to set up a fax to be polled by...

Page 20: ... to Fine you would take the following steps 1 Press the Menu button repeatedly until BASIC FAX displays 2 Press OK Silent Mode will display 3 Use the to scroll until Resolution displays 4 Press OK Standard will display 5 Use the to scroll until Fine displays 6 Press OK 7 Press Cancel to return to Ready mode 1 Press the Menu button to access the menu system 2 Use the buttons to scroll through the o...

Page 21: ...e to the one you want to change To enter a pause in a telephone number press Redial Pause A P will appear in the display Press the button multiple times for a longer pause When entering text press the phone pad button repeatedly to scroll through the characters Use the following table for reference Most text fields The letters and numbers scroll as shown next to each button for text fields such as...

Page 22: ...nts on all your faxes see Set the fax header information on page 38 you can enter some punctuation in the number To punctuate the telephone number in the fax header use these keys Press Result r o ooo tt uu pp JACQUE will display n Enters a space mmmmmmmmm will display n Enters a space oo o r o BAJA will display mmm will display qqq ss ooo INC will display mmmm will display Table 2 2 Keys to punct...

Page 23: ...through the Speed Dial button 1 Press Speed Dial button repeatedly until New Edit appears and press OK The display shows Speed 00 49 2 Enter a two digit number and press OK Numbers from 00 to 09 will be used for One Touch dialing 3 Enter the telephone fax number you want to store up to 40 digits and press OK If you want a pause between numbers for example when entering an access code where you nee...

Page 24: ...t the phone book on page 18 Phone book dialing You can search the entire phone book to find the number you want to dial Search sequentially through the phone book 1 Press Speed Dial button once and when Search Dial appears press OK 2 Press to move upward or downward through the directory until you find the number you want 3 When the number you want appears in the display press Start Enter to dial ...

Page 25: ...aper Since the quality of plain paper varies widely test the print quality before buying large quantities of paper Your machine uses a variety of papers including Copier paper Bond paper Dual purpose paper Because all paper varies in physical characteristics you can receive mixed results from different packages of paper even though the packages contain the same type of paper If you encounter undes...

Page 26: ...size and paper type If you are loading pages that are unusually thick or thin feed one sheet at a time If the document does not feed correctly open the control panel remove the document and try loading it again For more information on what kind of paper you can use for documents see Acceptable documents on page 57 DO NOT try to send documents that are wet covered with wet ink or paste wrinkled cur...

Page 27: ...or more information on the types of paper you can use for documents see Document types and sizes on page 20 NOTE You must set the resolution and contrast before dialing the number 1 Turn the page face down and insert it into the document feeder For more information see Load documents to fax or copy on page 2 2 Press Resolution repeatedly to select the option you want STANDARD works well for printe...

Page 28: ... Automatic fax redial When you send a fax if the number you have dialed is busy or there is no answer the machine will automatically redial the number every three minutes up to two times If you wish to manually redial the number immediately press Start Enter after the display shows To redial now press Start Enter Or press Cancel to stop redialing and the machine returns to Ready mode Receiving via...

Page 29: ...onds to incoming calls Set rings to answer You can select the number of rings that will occur before the fax answers an incoming call NOTE If you are using your machine as both a telephone and a fax machine we suggest you set the ring count to at least 4 to give you time to answer 1 Press Menu repeatedly until BASIC FAX displays and press OK 2 Press until Rings to Answer displays and press OK 3 En...

Page 30: ... 1 Hold Redial Pause for about two seconds 2 Press until Caller ID displays and press OK 3 Scroll through the numbers by pressing Print a list of Caller ID numbers 1 Press Menu repeatedly until REPORTS displays and press OK 2 Press until Caller ID displays and press OK Block junk fax numbers If you subscribe to Caller ID through your local phone company you can block future faxes from numbers on t...

Page 31: ...ent 1 Load the documents face down in the document feeder 2 Press Favorites repeatedly until SAVE appears and press OK 3 Enter the document ID name up to 15 characters by using the number keypad 4 Press OK The document will be scanned into memory Exceeded Job Memory message appears when you try to save more than three Favorites Delete a document 1 Press Favorites repeatedly until DELETE appears an...

Page 32: ...age of the first page of the fax on it See the following example To use image TCR you must set these Menu options to On Image TCR and Sending Confirm Follow these instructions to set the menu options 1 Press the Menu button repeatedly until BASIC FAX displays and press OK 2 Use the buttons to scroll to Sending Confirm and press OK 3 Use the buttons to select On and press OK 4 Use the buttons to sc...

Page 33: ...or fax machine 1 Be ready to call the fax machine 2 Press Menu repeatedly until ADVANCED FAX displays and press OK 3 Use to scroll through the options until Distinctive Ring displays and press OK Call this fax from another fax machine Waiting Ring will display 4 Call the HP Fax DRPD OK will display when the pattern has been learned and the HP Fax will return to Ready mode Step 2 Set up distinctive...

Page 34: ...n the same physical line as your other numbers See Distinctive ring DRPD on page 27 Telephone with few or no fax calls TEL mode FAX mode In Ready mode FAX appears in the right hand corner of the display When you get a call the machine answers and receives the fax automatically When reception is complete the machine returns to Ready mode If you want to change the number of rings before it answers s...

Page 35: ...ur answering machine is switched off or the answering machine is not connected directly to your fax machine the machine will automatically attempt to receive a fax after several rings If your answering machine allows you to set the number of rings before it answers the telephone set the answering machine to answer an incoming call in less than 4 rings When your answering machine answers an incomin...

Page 36: ...30 Additional features Answer receive mode ...

Page 37: ...he machine 2 Press Menu repeated until ADVANCED FAX displays and press OK 3 Select Set Broadcasting by pressing and press OK 4 Enter the fax number TIP One touch buttons do not work with this Broadcasting function You can enter 5 fax numbers into one job 5 Press OK when the correct number appears in the display If you have more destinations select Y by using and press OK when asked Another Y N and...

Page 38: ...and press OK 4 Enter the fax number TIP One touch buttons do not work with Delayed Fax You can enter 5 fax numbers into one job 5 Press OK when the number appears in the display If you have more destinations select Y by using and press OK when asked Another Y N and repeat steps from 4 If you have finished entering all the numbers answer N and press OK 6 Enter the name if you want to name the trans...

Page 39: ...n and feed it into the machine 2 Press Menu repeatedly until ADVANCED FAX appears and press OK 3 Select Set Polling Send by pressing and press OK Poll Code 0000 will display 4 Enter the poll code you want to use for this document and press OK The poll code is preset to 0000 which means that the receiver does not need to enter a poll code to receive the document The poll code is not static You ente...

Page 40: ...ll Code to retrieve the document and press OK NOTE If the other fax machine does not have a poll code enter 0000 The HP Fax receives and prints the polled document NOTE Not all fax machines have polling capability and polling incompatibility sometimes occurs between fax machines made by different manufacturers To cancel the scheduled job All scheduled jobs remain in memory after they have been set...

Page 41: ... OK 2 Select Set Fax Forward by pressing and press OK 3 Use to select the option you want and press OK Off disables fax forwarding Forward forwards a fax to your new location Forward Print prints a fax and also forwards it to your new location 4 If you selected Forward or Forward Print Tel will display a Enter the fax number and press OK Start Date Time will display b Press OK The current date and...

Page 42: ...36 Advanced faxing Forward faxes ...

Page 43: ... shows Date Format 4 Press to select either Europe day month year or USA month day year and press OK 5 Press OK when the display shows Date Time 6 Use the keypad to enter the date and time You can move the cursor by pressing Enter the hour in 24 hour format 7 Press OK Turn on and off sounds You can turn on and off the sounds the HP Fax makes WakeUp sounds WakeUp sound will ring at a specific time ...

Page 44: ...een 8 pm and 8 am 1 Press Menu repeatedly until BASIC FAX appears and press OK 2 Silent Mode will display Press OK 3 Select On Daily and press OK From 00h To 23h will display 4 Enter a start time and an end time and press OK Set the fax header information This information is required by law in many countries The fax header prints your name and fax number on the top of every fax you send 1 Press Me...

Page 45: ...OK when the desired report is displayed 4 The selected report will be printed The available reports are shown below Report name Content Multi Communication This report prints automatically if you have faxed documents to more than one location by using Broadcasting Power Fail Report If you have a scheduled job such as delayed fax and send poll and there is a power failure this report is printed aut...

Page 46: ... the machine will go to step 3 Sending Confirm This report shows the fax number the number of pages elapsed time of the operation the communication mode and the communication results To set up your machine to automatically print see Sending Confirm under the BASIC FAX menu on page 11 Schedule Inform This report shows the document currently stored for Delayed FAX and Send Polling along with the fax...

Page 47: ... to pick up the handset to make a phone call When dialing just press the Loudspeaker button and enter the numbers When your party answers pick up the handset to talk to them This feature is especially useful for checking voicemail messages NOTE Your HP Fax does not have speakerphone capabilities The loudspeaker enables you to hear calls but you must speak using the handset TIP If you want to share...

Page 48: ...one of the last 10 numbers called that is in memory 1 Hold Redial Pause for about two seconds 2 Press until Recent Numbers displays and press OK 3 Press to find the number you want to dial 4 Press Start Enter when the correct number appears If a document is loaded the machine automatically begins to send ...

Page 49: ... but are not using it store it in an airtight plastic bag DO NOT leave it exposed for an extended period DO NOT refill the cartridge The warranty will not cover damage caused by using refilled cartridges View ink level When using the 17ml print cartridge your machine allows you to check the amount of ink remaining To view the current ink level 1 Press Menu repeatedly until TOOLS appears and press ...

Page 50: ...of the machine Replace the print cartridge When you notice that the print becomes light or ink low or when install new ink cartridge appears in the display replace the print cartridge The part number for replacement cartridges is HP 701 1 Take out a cartridge from its packaging and carefully remove the tape covering the printhead Hold the cartridge by the colored top or black areas only Do not tou...

Page 51: ...el and cartridge compartment cover it will click and remain open 4 Push the cartridge down and remove it 5 To load the cartridge insert the cartridge as shown below When the cartridge is pushed to the back of the cartridge carrier push the top of the cartridge until it clicks into place If the cartridge moves loosely in the carrier it has not clicked into place Repeat this step 1 Control panel 2 C...

Page 52: ...cument jams during transmission or copying Remove jammed document appears in the display DO NOT pull the document out of the slot Doing so could harm your machine To clear document jam 1 Open the control panel 2 Carefully remove the jammed document 3 Close the control panel firmly until it clicks into place Paper jams during printing If the fax paper jams while you are receiving or printing Remove...

Page 53: ... Menu repeatedly until TOOLS appears and press OK 2 Scroll to Clean Cartridge by pressing and press OK 3 Examine the printed test pattern If print quality does not improve reinstall the cartridge and repeat these steps If the line is still broken wipe the nozzles and contacts For more information see Wipe the print nozzles and contacts on page 47 Wipe the print nozzles and contacts If cleaning the...

Page 54: ...there should be no scheduled job such as delayed fax send polling or faxes received into memory CAUTION Once you have unplugged the power cord from the machine all data in memory will be lost 1 Press Access Cartridge 2 Open the control panel and cartridge compartment cover and remove the cartridge See Replace the print cartridge on page 44 3 Remove the print cartridge 4 Unplug the power cord from ...

Page 55: ...re dirty documents sent to another fax machine will not be clear CAUTION When you turn the power off to clean the scanner documents stored in memory will be lost 1 Open the control panel 2 Remove the white roller a At the right hand end of the white roller there is a bushing that is secured with a small tab b Push the tab slightly inward then rotate towards you Then pull up the right hand end of t...

Page 56: ...ntrol panel 5 Carefully wipe the scanning glass with a soft dry lint free cloth If the glass is very dirty first wipe it with a slightly dampened cloth then with a dry one Be careful not to scratch the glass surface 6 Replace the roller in reverse order and then close the control panel firmly until it clicks into place ...

Page 57: ... this problem as described in Adjust the scanner on page 51 Check white paper document and try again You must use plain white paper when adjusting the scanner See Adjust the scanner on page 51 Clean white roller glass and try again For more information see Clean the document scanner area on page 49 Duplicated with Speed No xx The same number has already been registered into another speed dial loca...

Page 58: ...in when memory becomes available or split the new document into smaller parts See Clearing memory on page 41 Memory Received Ink Low Install new ink cartridge The machine has data stored in memory Replace the print cartridge with new one in order to print the faxes Memory Received Load paper and press OK Load paper and press OK There might be a jam Clear the jam as described in Paper jams during p...

Page 59: ...receiving a fax Remove jammed document The document you are sending has jammed in the document feeder To clear the document jam see Document jams during transmission on page 46 You tried to copy or fax a document which is longer than 390 mm 15 4 in Remove jammed paper and press Cancel The paper has jammed during printing To clear the paper jam see Paper jams during printing on page 46 Send Error T...

Page 60: ...busy signal even though the fax is not busy This may rarely occur if the answer mode is set to AUTO a voice call comes in and is hung up without being answered and another call is immediately received In AUTO mode the machine goes back to fax receive mode if the voice call is not answered The line will appear busy until the machine resets The numbers stored in memory do not dial correctly Make sur...

Page 61: ...you received appear stretched The machine sending to you had a temporary document jam Your machine does not make copies Make sure your document is loaded face down There are lines on copies or documents you send Check your scan glass for marks and clean it see Clean the document scanner area on page 49 The machine dials a number but fails to make a connection with a remote fax machine The remote f...

Page 62: ...the print cartridge on page 47 Improperly formed or misaligned characters Clean the print cartridge see Clean the print cartridge nozzles on page 47 Abnormal black horizontal lines Clean the cartridge carrier see Clean the cartridge carrier contacts on page 48 Problem Solution Paper is jammed during printing Clear paper jam as described in Paper jams during printing on page 46 Paper sticks togethe...

Page 63: ...sizes and weight can be used with your machine Document types and sizes You can insert a document that is up to 10 pages long in the document feeder Acceptable documents Paper size Dimensions Paper weight A4 210mm x 297mm 8 3in x 11 7in 75 90g m2 20 24lbs Letter 216mm x 279mm 8 5in x 11 0in Legal 216mm x 356mm 8 5in x 14 0in Single sheet 2 or more sheets Document size Max 216mm W x 356mm L a 8 5in...

Page 64: ...Compatibility ITU Group3 Compression scheme MH MR MMR Modem speed 14400 12000 9600 7200 4800 2400bps Scanning method CIS Contact Image Sensor Input document size 8 5 inches 216 mm Effective scanning width 8 27 inches 210 mm Effective recording width 8 inches 203 mm Power consumption Standby 4 9Wh Printing Mode Maximum 15 Wh Voltage 100 127 Frequency 50 60 Hz Current 500 mA Temperature range 50 F t...

Page 65: ...ons and regulatory information 59 Product specifications Weight 3 0 Kg 6 6 lb including handset Power source See Rating Label attached on the back of the machine Resolution Copy Standard Fine 300 x 300 dpi Super Fine Photo 600 x 300 dpi Faxing Standard 100 x 200 dpi Fine 200 x 200 dpi Super Fine 400 x 200 dpi Speed dials 50 ECM mode YES Grey scale 64 levels User memory capacity 640 Kbyte capable o...

Page 66: ...60 Specifications and regulatory information A sample of ITU 1 test chart reduced to 60 5 A sample of ITU 1 test chart reduced to 60 5 ...

Page 67: ...ite at http www hp com go msds Customers without Internet access should contact their local HP Customer Care Center Recycling program HP offers an increasing number of product return and recycling programs in many countries as well as partnering with some of the largest electronic recycling centers throughout the world HP also conserves resources by refurbishing and reselling some of its most popu...

Page 68: ...ance notice so you will have the opportunity to maintain uninterrupted service If you experience trouble with this equipment please contact the manufacturer or look elsewhere in this manual for warranty or repair information Your telephone company may ask you to disconnect this equipment from the network until the problem has been corrected or until you are sure that the equipment is not malfuncti...

Page 69: ...Industrie Canada ont été respectées Néanmoins cette abréviation ne signifie en aucun cas que l appareil a été validé par Industrie Canada Pour leur propre sécurité les utilisateurs doivent s assurer que les prises électriques reliées à la terre de la source d alimentation des lignes téléphoniques et du circuit métallique d alimentation en eau sont le cas échéant branchées les unes aux autres Cette...

Page 70: ... networks Declaration of conformity DECLARATION OF CONFORMITY according to ISO IEC Guide 22 and EN 45014 ______________________________________________________________________ conforms to the following Product Specifications Safety rd UL1950 CSA22 2 No 950 3 Ed 1995 NOM 019 SCFI 1998 EMC FCC Part 15 Class B ICES 003 Issue 2 Telecom NOM 151 SCT1 1999 Manufacturer s Name Hewlett Packard Company decl...

Page 71: ...P Customer Support Representative Have your serial number ready Print a Self Test Report Be prepared to discuss your problem in detail 4 Be near your unit when you call Prepare your unit for shipment If you are requested to send in your unit for service do the following Remove the print cartridge and place it in an airtight bag so it will not dry out Do not send the print cartridge with the unit u...

Page 72: ...reasonable time after being notified of the defect refund the purchase price for the Product HP shall have no obligation to repair replace or refund until the customer returns the defective product to HP Any replacement product may be either new or like new provided that it has functionality at least equal to that of the Product being replaced HP products may contain remanufactured parts component...

Page 73: ...ocal law this Warranty Statement shall be deemed modified to be consistent with such local law Under such local law certain disclaimers and limitations of this Statement may not apply to the customer For example some states in the United States as well as some governments outside the United States including provinces in Canada may Preclude the disclaimers and limitations in this Warranty Statement...

Page 74: ...68 Specifications and regulatory information Hewlett Packard LIMITED WARRANTY STATEMENT ...

Page 75: ... 24 list 24 report 40 turning on 24 Caller ID menu 12 Cancel button 9 cancel schedule menu 13 cancelling a scheduled job 34 cartridge cleaning 47 maintenance 43 part number 59 replacing 44 changing language 11 clean cartridge menu 13 cleaning the fax 49 clearing jams document 46 clearing memory 41 clearing paper jams 46 contrast 21 default 12 menu 12 control panel buttons 8 copies collate 3 making...

Page 76: ... faxes 13 35 front panel 8 front view 6 G getting help 65 H HANDSET port 7 help 65 help list 39 HP Fax parts of 6 HP support 65 I image TCR 26 menu 12 ink cartridge maintenance 47 part number 43 58 replacing 44 ink level 13 cartridge 43 ITU 1 chart 60 J jams clearing paper 46 document 46 paper 46 journal 12 junk fax blocking 24 report 40 junk faxes 12 K key sounds 38 L language 11 menu 11 LINE por...

Page 77: ... ready mode 14 rear view 6 received journal 39 receiving faxes 28 redial pause button 8 redialing automatic fax redial 22 redial a number in memory 42 regulatory information 62 regulatory notices Canadian statement 63 notice to users in Canada 63 reports 39 Caller ID 40 junk fax 40 phone book 39 printing faxes 40 received journal 39 schedule inform 40 sending confirm 40 sent journal 39 system data...

Page 78: ... 38 on and off 37 WakeUp 37 speaker volume 22 speed dial button 8 programming 17 using 17 speed dials number of 5 start enter button 9 supplies print cartridge 43 symbols button 8 system data 40 T TAM mode 29 TEL mode 29 telephone dialing 4 telephone numbers entering 15 text entering 15 time setting 37 troubleshooting fax problems 54 messages 51 paper feeding 56 print quality 56 U unwanted faxes 1...

Reviews: