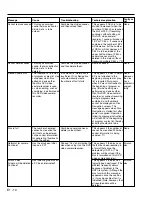
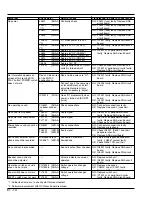


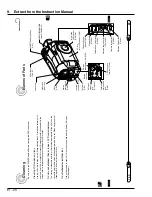


E1 - 24
52
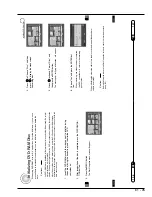
Setting Date and
Time
Set
the curr
ent date
and
time
corr
ectly
so
that
the date
and
time
you
mak
e
a
recor
d-
ing can
be
recor
ded
corr
ectly.
Setting the
corr
ect
date
and
time
will allo
w
you
to
stor
e
the
corr
ect
inf
o
rm
ation
on
recor
ding.
(The f
o
llo
wing
pr
ocedur
e
can
also
be
used
to
corr
ect
the
date
and
time
you
ha
ve
alr
eady set.)
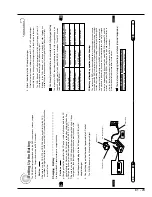
1.
T
u
rn
the
D
VD
camcor
der
on.
While
holding
do
wn
the b
u
tton
at
the center
of
PO
WER s
w
itch,
push
the
sw
itch
do
wn.
When the
D
VD
camcor
der
is
first
tur
ned
on,
the
date will
be
"12:00AM
1/1/2000".
2.
Pr
ess
the MENU
b
utton
in
the r
ecor
ding
pause
mode to
displa
y
the
men
u
scr
een.
3.
Use the
Select
dial
to
choose
"D
A
TE/
TIME " and then "D
A
TE SET".
"BA
CK" is
being
highlighted.
4.
T
u
rn
the
Select
dial
to choose
"SET"
and
then pr
ess
the Select
dial.
The date
and
time
will
appear
, and
"12"
will
be
highlighted and
b
linking.
(The digit
that b
links
first
depends
on
the
date
dis-
pla
y
f
o
rm
at.
The digit
on
the left
end
of
the time
will b
link.)
PO
WER
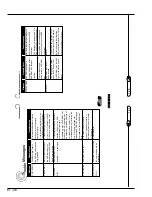
53
Setting Date
and
Time
5.
If the
displa
y
is
corr
ect,
press
the
Select
dial.
T
o
corr
ect
the min
u
tes
,
tur
n
the Select
dial
to
change them
and
then
pr
ess the
Select dial.
Blinking will
mo
ve
to
the
AM/PM
digit.
(The mo
ve
ment
of
b
linking
depends
on the
date
displa
y
f
o
rm
at.
Blinking
will
mo
ve
fr
om the
digit
on
the left
end
of
the time
in
sequence
.)
6.
P
erf
or
m the
same
procedur
e
to
corr
ect
the AM/PM,
month,
da
y
and
year
.
After
setting
the last
digit,
pr
ess
the Select
dial:
"OK?" will
b
link.
Tip:
7.
Pr
ess the Select dial to again enter the date/time
, and then press
the MENU
b
utton.
The men
u
scr
een will tur
n
off
.
T
o
set the time to match the time signal
Set
the min
u
tes
slightly
ahead
of
the curr
ent
min
u
te
,
and
mak
e
"OK?"
b
link.
While
chec
king the
time
signal
on
TV
or
telephone
,
pr
ess
the Select dial
at the moment the
set time
is
reached.
Caution
Char
ging the
b
uilt-in
batter
y:
This D
VD
camcor
der
incor
por
ates
a
batter
y
to
bac
k
up
the
date
and
time
.
Connect
the A
C
adapter/charger
or
charged
batter
y
to
the D
VD
camcor
der once
e
ver
y tw
o
months
, and
lea
ve
the
connection
status
fo
r
at
least
24
hours
with
camcorder
po
w
e
r tur
ned of
f:
The b
u
ilt-in batter
y will be charged.
If y
ou mak
e a mistak
e dur
ing the setting,tur
n
the Select
dial to change to "SET" while "OK?" is b
linking and then press the Select dial:
Y
ou can star
t
o
ver from the beginning.
You can change the displa
y f
o
rm
at of date and time:
See "Changing Displa
y F
o
rm
at of Date
and
Time " on page 132.


