14
Subject to change without notice
F a m i l i a r i z e y o u r s e l f w i t h y o u r n e w H M O
At the second page of the basic menu you find the menu for
firmware and help update, which is explained in detail in the next
chapter. The last menu item is the PROBE ADJUST. Pressing
the soft key leads you to the menu where you can set whether
the probe adjust output generates a rectangular signal with
1 kHz or 1 MHz frequency. There is a setting AUTOMATIC which
means, that for
time base settings up to and including 50 µs/
DIV the probe adjust output is 1 MHz, from 100 µs/DIV on it is
switched to 1 kHz.
The integrated help function can be activated by pressing the
key HELP in the GENERAL area of the control panel. A window
will open and the text inside is dynamically updated depending
on the key (including softmenu key’s) you are pushing or the
knob you are turning. If you do not need the
help anymore, you
can switch off the help window by pushing the
HELP-key. The
backlight of the key and the text window will be switched off.
2.8 Bus Signal Source
The HMO series features 4 contacts left of the channel 1 which
provide the following signals according to the respective settings:
– Square wave signal for probe compensation (standard set
-
ting),
frequency 1 kHz or 1 MHz.
– SPI signal, data rates 100 kbits/s, 250 kbits/s or 1 Mbits/s
– I
2
C signal, data rates 100 kbits/s, 400 kbits/s or 1 Mbits/s
– UART signal, data rates 9600 bits/s, 115.2 kbits/s or 1 Mbits/s
– parallel stochastic bit pattern,
frequency 1 kHz or 1 MHz
– parallel counter signal,
frequency 1 kHz or 1 MHz
The contact at the top left is always ground, the signal levels are
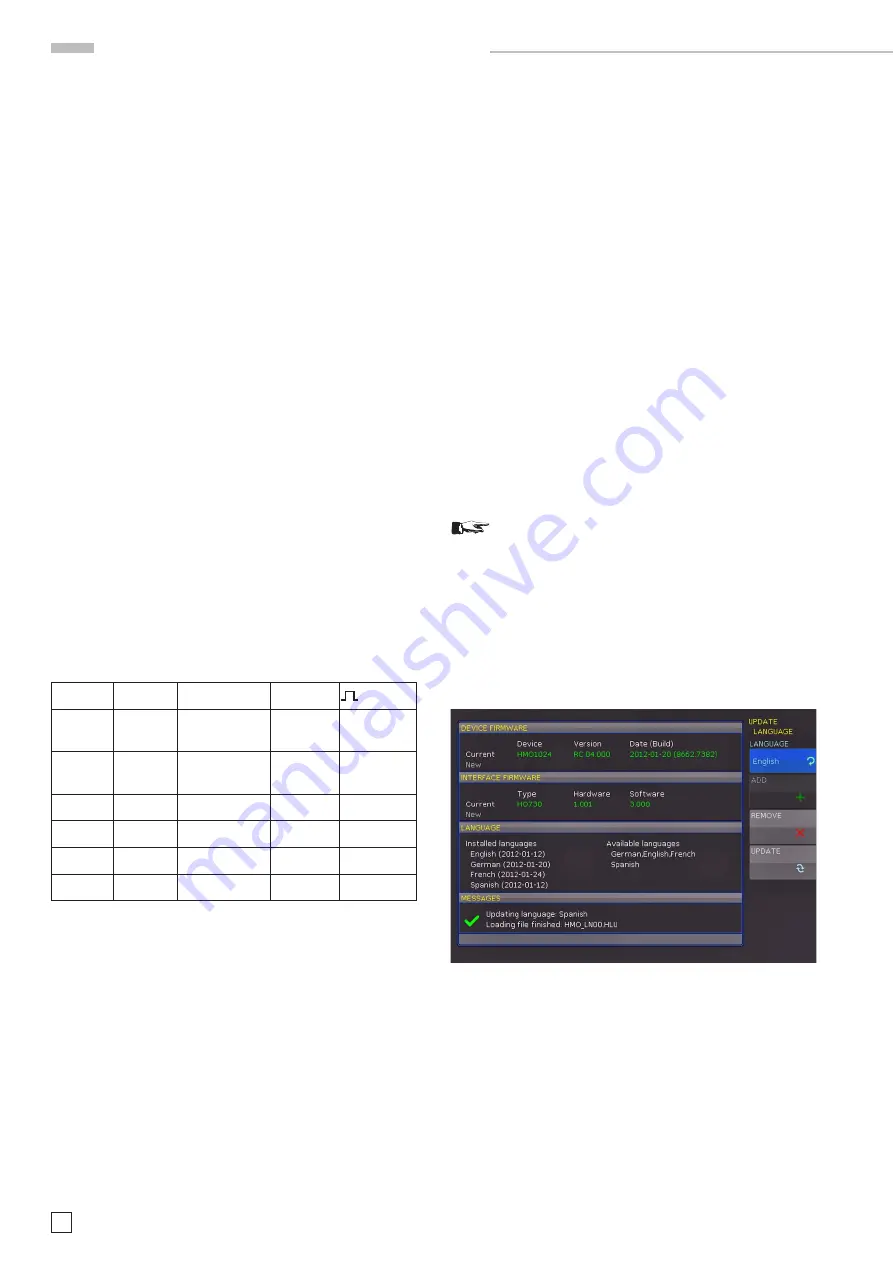
around 1 V. The following table shows the use of the 4 outputs
S1, S2, S3 and (square wave) corresponding to the signal.
Signal
S1
S2
S3
Square
wave
no signal
no signal
no signal
Square wave
SPI
Chip select
low active
clock,
rising edge
data,
high active
no signal
I
2
C
no signal
clock SCL
data SDA
no signal
UART
no signal
no signal
data
no signal
Pattern
bit 0
bit 1
bit 2
bit 3
Counter
bit 0
bit 1
bit 2
bit 3
Press the key SETUP in the general area of the front panel for
entry into the bus signal
source menu, select the page 2 and
press the soft menu key next to PROBE COMP. Now you can
select the operational mode for the bus signal source. For each
mode a picture with the corresponding pattern of signals on
the contacts is displayed. Pressing a soft menu key will open a
submenu for choosing the speed of the mode selected.
The square wave signal for probe compensation is available with
1 kHz for the low frequency compensation and with 1 MHz for
the high
frequency compensation, also AUTOMATIC (standard
setting) may be selected. In the automatic mode, the output will
provide 1 kHz at sweep speeds from 100 µs/div, at faster sweep
speeds 1 MHz will be available.
These signals allow to learn and check the settings for the
parallel and optional serial bus analysis.
2.9 Updates for the firmware, the help functions and
languages
The HMO series is being improved continuously. You are invited
to download the most recent firmware under www.hameg.com.
Firmware and help are packed into one ZIP data packet. After
downloading the ZIP data unpack it into an USB stick’s basic
directory. Thereupon insert the stick into the USB port of the
oscilloscope and push the key SETUP in the GENERAL area of
the front panel. Choose page 2 in the menu, if this has not been
opened already. Here you shall find the menu item UPDATE.
After selecting this menu item a window will open which displays
the actual firmware version indicating the version number, the
date and build information.
Now choose which to update: the instrument firmware or the
language. After you selected firmware updating by pushing the
appropriate key the respective date will be searched on the stick,
the information of the firmware to be updated from the stick
will be displayed below the line NEW. In case the new firmware
should be identical to the existing one, the number of the version
will be shown in red, otherwise it will be shown in green; only
then should you activate the updating by pushing the soft key
EXECUTE. If you intend to update the language (including the
help) or add a language choose Language in the updating menu.
Only 4 languages can be installed on the HMO. If
four language places are assigned and you wish
to install another one, you first need to delete one
language. „
The information window will now display the languages instal
-
led, the date, and the information about the languages available
on the stick. With the soft menu, languages may be added,
removed or updated. Please note the format of the date:YYYY-
MM-DD according to the multi
language norm of ISO 8601.
Fig: 2.13: Updating menu and information window
2.10 Upgrade with software options
The HMO may be upgraded with options which will become
accessible after inputting a
licence key. At this time, the op-
tions HOO10/HOO11/HOO12 are available. The HOO10 allows
triggering and decoding of up to two of the serial buses I
2
C,
SPI, UART/RS-232 on the digital channels (with option HO3508)
and or the analog channel. The HOO11 can only use the analog
channel. The HOO12 allows triggering and decoding of up to
two of the serial buses CAN, LIN on the digital channels (with
option HO3508) and or the analog channel.


