


33
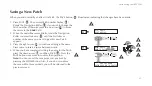
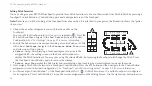
Exploring Your GTC Sound Innovations REVPAD
Item Name
Function
B
Control Button 2
See “Touchpad Control Button Assignment” on page 65 for more
C
Control Button 3
See “Touchpad Control Button Assignment” on page 65 for more
D
Touchpad Area
The Touchpad area for controlling the Touchpad functions.
E
On/Off Switch
Use this switch to turn the Touchpad on and off. (Top view)
F
Mini USB port
For charging the battery and updating firmware. This port can also be used for USB communication
with the base unit, thus bypassing the antenna. Wait for
PAD CONNECTED
to appear in the base unit
display area before using the Touchpad. If this is the first time you are using the Touchpad the mes-
sage will say
PAD WAS SUCCESFLLY ASSIGNED
.
G
/
H
Hook/loop fastener
area (Back view)
See “Attaching the Touchpad” on page 12 for more information.
I
Battery Housing
Cover (Back view)
Remove this cover to replace the battery.
See “Battery Replacement Instructions” on page 6 for
J
Battery Power LED Indicates the power level of the Touchpad battery.
■
Green: Full power
■
Red: Recharge battery
The functions of the Control Buttons can be customized in the System (SYS) screen.
Summary of Contents for REVPAD
Page 1: ...SAVE SYS X Y X Y X Y X Y X Y B C BYPASS GTC Sound Innovations REVPAD Manual ...
Page 2: ...II REVPAD Firmware version 1 0 Last manual update 2017 02 10 ...
Page 16: ...GTC Sound Innovations REVPAD Manual 10 ...
Page 66: ...GTC Sound Innovations REVPAD Manual 60 ...
Page 76: ...GTC Sound Innovations REVPAD Manual 70 ...