Part No. 2460-4164
7.0
I
NSTALLING
T
HE
S
EALS
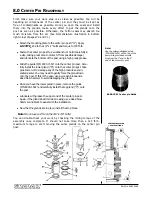
CENTER PIN PACKING
SEAL POSITIONS
Note!
When using a wire buffer wheel
and/or air hose to clean compo-
nents, always wear eye protec-
tion; safety glasses, goggles, etc.
After you have taken the center pin assembly apart, clean and inspect
everything. Installing the seals is the first part of the center pin rebuild
process. Lay everything out on a clean, neat workbench. Make sure all
the correct parts are there. Make sure everything is in good shape;
that nothing was damaged in transit. (See Nomenclature illustration in
bottom right corner of pages 7.0 and 7.1.)
Note!
The center pin rebuild kit seals are made from Teflon, which starts absorbing
moisture from the air immediately upon exposure. Once opened, if not immedi-
ately installed, place seals in hydraulic oil.
T
OP
G
LAND
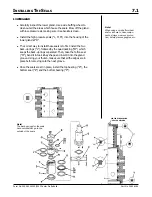
Carefully inspect the top gland (“C”.) Use a wire buffing wheel
to clean out all the areas which house the seals. Blow off the
gland with low-pressure air, making sure it is absolutely clean.
Install the low pressure seals (“G, H, I”) into the housing of the
top gland at “C”. Note! The correct way to install these seals is
to first install the two back-up rings (“G”), followed by the quad
packing (“I”) which keeps the back-up rings separated. Then,
take the Teflon seal (“H”), bend it into a kidney shape and insert
it into the gland groove. Using your thumb, make sure that all
the edges are in place before moving onto the next groove.
Repeat this procedure for the remaining five sets in the top
gland.
Install the top seals (“J”) in their appointed grooves, making
sure that the O-ring (“Q”) doesn’t come out of the quad
packing.
Install the top gland bearings (“R”) so that they won’t get
damaged.
Set the top gland safely off to the side.
l
l
l
l
l
l
Note!
The back-up rings for the seals
have notches that go to the
outside of the seals.
Summary of Contents for XL4000
Page 2: ......
Page 73: ......
Page 76: ... 5MP ...
Page 145: ......
Page 146: ......
Page 160: ......
Page 161: ......
Page 162: ......
Page 175: ......
Page 176: ......
Page 177: ......
Page 178: ......
Page 192: ......
Page 193: ......
Page 194: ......
Page 207: ......
Page 208: ......
Page 210: ...500P ...
Page 229: ......
Page 230: ......
Page 245: ......
Page 246: ......
Page 247: ......
Page 248: ......
Page 265: ......
Page 266: ......
Page 267: ......
Page 268: ......
Page 280: ......
Page 281: ......
Page 282: ......
Page 297: ......
Page 298: ......
Page 299: ......
Page 300: ......
Page 301: ......
Page 302: ......
Page 303: ......
Page 304: ......


