69
EXAMPLE 2: SETTING THE DLM MODE AND RELATIVE OPERATING PARAMETERS
• Touch the symbol
to open the menu;
• Move the slider
clockwise or anticlockwise to scroll the menu until reaching OPERATING MODE;
• Once it is positioned to OPERATING MODE, touch the symbol
to confirm;
• Move the slider
to display the 2 options. Stop at DLM;
• Press the symbol
to confirm;
• The system requests to confirm the selection, follow the instructions shown on the central display;
• Move the slider
to scroll the options. Stop at YES;
• Press the symbol
to confirm;
• The display will confirm that the setting was saved temporarily with the text SAVED and the slider
will light
up 3 times intermittently. Then the main menu item will be displayed again;
• Once the DLM MODE is selected, the following menu items can be used to configure the relative parameters,
which are essential for the correct operation of the charging station;
• Move the slider
until reaching DLM SETTINGS;
• Press the symbol
to confirm;
• Select each of the items in the menu (SYSTEM POWER AND EXTERNAL METER TYPE) and set the relative values;
• Press the symbol
to confirm;
• After all the items are set, exit the menu by selecting EXIT and press the symbol
to confirm;
• To confirm the settings made, it is necessary to exit the menu voluntarily by selecting EXIT.
• Exiting the menu fully confirms that the settings are made. The message *WAIT* appears on the main display
whereas the slider
lights up with a dedicated light effect.
• If the parameter setting operation was successful, the station will display the standard message to guide the
customer through the charging process.
10.1 INTERNAL MENU
The premium I-CON charging stations have a contextual menu that appears when pressing the symbol
.
The menu structure differs depending on the type of charging station and the operating mode.
All menu items are displayed for charging stations with the DLM AUTOSTART operating mode, considering the
private use of the station. For the other operating modes, such as RFID and CLOUD OCPP, considering that the
menu can be accessed by everyone, only some items are visible. The remaining "hidden" items can be accessed
using the MASTER card in order to limit access to sensitive settings only for authorised personnel.
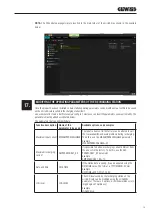
NB:
The changes made to the settings are saved by the charging station, but will become valid only when
exiting voluntarily from the menu. If the menu is exited due to the timeout, the changes made will be deleted.
The station closes the menu automatically after 1 minute of inactivity, deleting any settings that were made
Summary of Contents for JOINON I-CON PREMIUM GWJ3201A
Page 15: ...15 Fissaggio mediante staffe supporto palo GW46551 ...
Page 41: ......
Page 55: ...55 Fixing with the aid of support brackets on pole GW46551 ...
Page 81: ......
Page 95: ...95 Fixation sur pattes support du poteau GW46551 ...
Page 121: ......
Page 135: ...135 Fijación mediante grapas de soporte poste GW46551 ...
Page 161: ......
Page 175: ...175 Befestigung mit Masthalterungen GW46551 ...
Page 201: ......
Page 215: ...215 Fixarea cu ajutorul suporturilor de susținere a stâlpului GW46551 ...
Page 241: ......
Page 255: ...255 Rögzítés oszlopra való tartókengyelekkel GW46551 ...
Page 281: ......
Page 295: ...295 Bevestiging met behulp van steunbeugels paal GW46551 ...
Page 321: ......
Page 322: ......
Page 323: ......


