background image

38 

Getting Started 


Adding Output Devices  


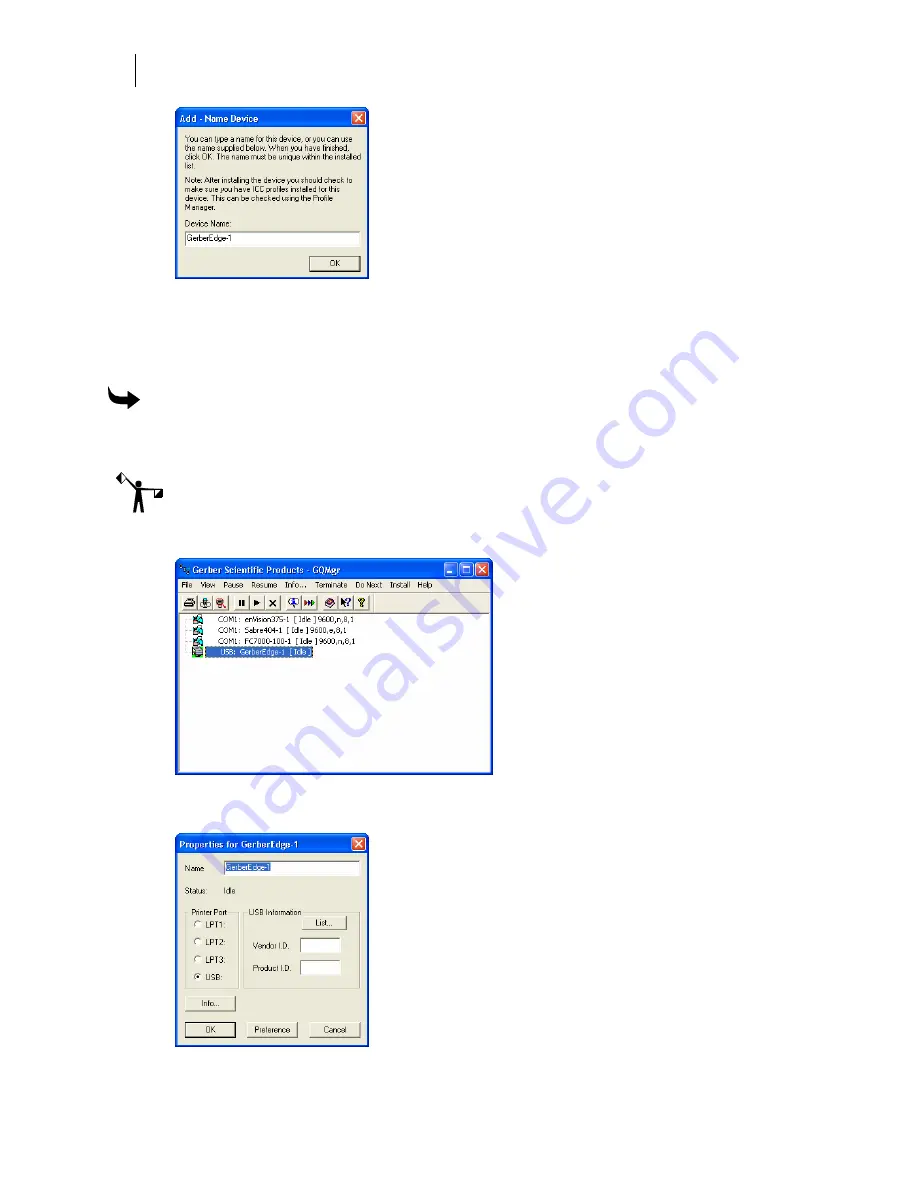
Accept the default name or enter your own description for the device. The description 
appears in the output dialog boxes. Click OK. The name of the new printer will appear 
in the Installed Printer(s) field of the Add or Delete Gerber Vinyl Printer(s) dialog box.  


Close the Add or Delete Gerber Vinyl Printer(s) dialog box. 

  To assign the Vendor I.D. and Product I.D. for the USB-to-Parallel cable 

Once you have installed the GERBER EDGE, you must assign the USB cable Vendor I.D. and 
Product I.D. to the USB port using the GERBER EDGE Properties dialog box. 

Note:  You must have installed OMEGA 2.5.1 or higher before assigning the Vendor I.D. and 
Product I.D. for the USB-to-Parallel cable. 


Click Start > Programs > GSP OMEGA > GQMgr to open the GQ Manager dialog box. 


Right click the USB: Gerber Edge and choose Properties to open the Properties for 
Gerber Edge dialog box. 


Summary of Contents for OMEGA 2.6

Page 1: ...e registered trademarks of Artifex Software Inc Allen Datagraph is a trademark of Allen Datagraph Inc Aristo AG50 and AG130 are registered trademarks of the Aristo Graphic Systeme GMBH CO KG ENCAD and...

Page 2: ...l resolution Dot structures halftones For optimal results we recommend that the following materials be used 1 3M Scotchcal 220 10 or 225 10 Gloss White Vinyl 2 GerberColor SUPER CMYK Foils THE PANTONE...

Page 3: ...rized distributor during the warranty period The foregoing Limited Warranty is made to the end user only and does not apply to media security devices damaged by accident abuse misuse or modification G...

Page 4: ......

Page 5: ...anding security key conversion 23 Installing OMEGA 2 6 software 24 Configuring the ports after OMEGA 2 6 installation 31 Activating Arabic language support 32 Chapter Three Adding Output Devices 33 Ad...

Page 6: ...iewed topics 75 Printing topics 75 Customer support 76 OMEGA 2 6 software support 76 Gerber hardware 76 FastFacts 76 Chapter Five Troubleshooting 77 Questions and answers 77 Technical support messages...

Page 7: ...wing manuals for specific device install instructions GERBER EDGE GERBER EDGE FX GERBER P2C GERBER SOLARA UV2 GERBER MAXX 2 Gerber enVision ODYSSEY and ODYSSEY XP Chapter Four Beyond Getting Started p...

Page 8: ...EGA 2 6 Security key 2 Software Password Envelope Card only in certain OMEGA 1 5x to OMEGA 2 6 upgrades 3 OMEGA 2 6 System Software CD 4 OMEGA Font Library CD 5 OMEGA Gerber Profile CD 6 OMEGA Overvie...

Page 9: ...t in OMEGA 2 0 2 1 Upgrades 2 Software Password Envelope Card only in OMEGA 1 5x OMEGA 2 0 2 1 to OMEGA 2 6 Upgrades 3 OMEGA 2 6 System Software CD 4 OMEGA Overview CD 5 OMEGA Gerber Profile CD 6 OMEG...

Page 10: ...Effects Repeats Merge and Posterize Image Raster to Vector Enhanced right click context menus for Tools Detail Edit and TOWS tools Measure Mode measuring tape can display as a single line so it does...

Page 11: ...ion on working with Layers Book Three Creating the Basic Design Text and Shapes Book Three presents OMEGA solutions for basic job design Information can be obtained on tasks such as drawing a box mani...

Page 12: ...ting the Job from Composer After a job is designed you can output it by sending the job to a plotter sending the job to a thermal printer or sending it by email Book Thirteen Printing and Cutting the...

Page 13: ...it x86 or 64 bit x64 processor 2 1 GB of system memory Support for DirectX 9 graphics with a WDDM driver 128 MB of graphics memory min 3 Pixel Shader 2 0 and 32 bits per pixel 40 GB of hard disk capac...

Page 14: ...does not support OMEGA parallel port usage Therefore you cannot perform Copy to USB parallel security key upgrades or communicate with a GERBER EDGE or EDGE 2 printer via a parallel port when using Vi...

Page 15: ...or upgraded OMEGA 2 6 systems require an OMEGA 2 6 USB security key connected to the system for the software to run The exceptions are OMEGA 2 5 and 2 5 1 USB security keys which will allow the insta...

Page 16: ...to version 7 3 2 CAUTION Only use the Sentinel System Driver version 7 3 2 that is installed from the OMEGA 2 6 CD Do not install the Sentinel System Driver from the SafeNet website Installing OMEGA...

Page 17: ...Center Make the keyboard easier to use Make it easier to use keyboard shortcuts and access keys Turn on the check box for Underline keyboard shortcuts and access keys To install OMEGA 2 6 software wh...

Page 18: ...tact Gerber Technical Support at 860 644 6971 1 Close any Windows or applications that are running including any virus scan software The screen displays the Windows desktop 2 Locate the OMEGA 2 6 USB...

Page 19: ...pgrades Fonts Libraries and Software have their own folders within the GSP directory Palettes and Manuals are folders within the GSP Software folder 12 Click Next Choosing the setup type The Setup Typ...

Page 20: ...you selected Typical and Compact installations or Custom installation To complete Typical and Compact installations 1 In the Select Program Folder dialog box follow the on screen instructions OMEGA 2...

Page 21: ...heck mark appears next to those programs The space required for each component is shown Tip To deselect a program with a check mark click the checkbox The check mark disappears 3 Click the Change butt...

Page 22: ...information dialog box opens Note Fonts and profiles must be loaded using the appropriate CD and GSPTray For more font information refer to the section Installing fonts from the OMEGA font CD on page...

Page 23: ...must be logged on as an Administrator to install software Your kit contains the OMEGA 2 6 installation CD for information on the kit contents go to page 3 Although screen prompts guide you through th...

Page 24: ...virus scan software The screen displays the Windows desktop 3 Insert the OMEGA 2 6 CD into the CD ROM drive If the OMEGA Setup Wizard doesn t start by itself click Start Run Browse the CD for Setup ex...

Page 25: ...should select Typical Typical installs all the most common software Unless you are installing an extra option or have limited disk space you should select Typical Compact installs the minimum require...

Page 26: ...play 3 Follow the on screen instructions in the dialog boxes that appear 4 Once the installation is finished the font and profile information dialog box opens Click OK Note Fonts and profiles must be...

Page 27: ...omponents dialog box to open the Select Sub components dialog box If a component does not have sub components the Change button is disabled 4 Choose the sub components to load and click Continue in th...

Page 28: ...information dialog box opens Note Fonts and profiles musts be loaded using the appropriate CD and GSPTray For more font information refer to the section Installing fonts from the OMEGA Font CD on pag...

Page 29: ...it easier to identify which key is the original and which key is the upgrade OMEGA 2 6 USB security key Using a permanent marker record the Gerber serial number from your original security key onto t...

Page 30: ...tall OMEGA 2 6 on a system with a parallel and a USB port for a parallel OMEGA 1 5x key or on a system with two USB ports for a USB OMEGA 1 5x key 1 Close any Windows applications that are running inc...

Page 31: ...ded displays 8 Click OK The Welcome dialog box opens Click Next 9 The Gerber Copy to USB Security Key dialog box opens Follow the instructions in the dialog box The original OMEGA 1 5x security key sh...

Page 32: ...send the original parallel security key back to Gerber in the postage paid pre addressed envelope provided Refer to the instructions on the envelope for more information Users outside of the USA shou...

Page 33: ...iting the installation process before completion will damage your security keys 1 Close any Windows applications that are running including GSPTray and any virus scan software 2 Insert your current OM...

Page 34: ...Security Key dialog box opens Follow the instructions in the dialog box Only the original 1 5x security key should be installed Click Next 9 The Gerber Copy to USB Security Key Password dialog box op...

Page 35: ...he OMEGA 1 5x security key to GSP in the provided envelope or give it to your distributor Click OK Note If you have not already done so using a permanent marker record the Gerber serial number from yo...

Page 36: ...30 Getting Started Installing OMEGA software 16 Proceed to step 9 Software License Agreement in Installing OMEGA 2 6 software for New Users and GRAPHIX ADVANTAGE Users on page 13...

Page 37: ...ration Utility 2 Click Configure Driver to open the Sentinel Driver Port dialog box 3 Configure all parallel ports non USB to say No in the Use Section All USB ports should say Yes 4 Use the Edit butt...

Page 38: ...ns Text tab Install the Arabic Font Pack using Font Manager or transfer existing Arabic fonts from GRAPHIX ADVANTAGE After enabling Arabic support for OMEGA Arabic fonts may be entered using the Enter...

Page 39: ...These procedures are described in the following pages To add output devices after installing OMEGA 2 6 software To add or delete a local vinyl printer parallel and USB to Parallel To add or delete a...

Page 40: ...Windows Vista 64 bit Gerber recommends that you use Vista 32 bit or upgrade to a GERBER EDGE FX which communicates via an Ethernet cable Alternately you can render on a Vista 64 bit system and output...

Page 41: ...me of the new vinyl printer and the port will appear in the Installed Vinyl Printers field of the Add or Delete Gerber Vinyl Printer s dialog box 6 If you wish to modify which profiles display in OMEG...

Page 42: ...se software updates are available from the download section of the GSP web site http www gspinc com support downloads software html Gerber has performed limited testing of USB to Parallel cable and ca...

Page 43: ...to the USB to Parallel cable Note This procedure assumes that you installed OMEGA 2 5 1 or higher OMEGA 2 5 requires the USB to Parallel software update from the GSP website before installing the GER...

Page 44: ...dialog box To assign the Vendor I D and Product I D for the USB to Parallel cable Once you have installed the GERBER EDGE you must assign the USB cable Vendor I D and Product I D to the USB port usin...

Page 45: ...re the USB Printing Support device is selected and click OK to return to the Properties for Gerber EDGE dialog box The Vendor I D and Product I D numbers should be visible in the USB Information field...

Page 46: ...XP inf GSPUSBXP sys Software update for OMEGA 2 5 only composed of the following files GQMgr exe version 2 5 0 11 or higher G32 Setup dll Note If you have OMEGA 2 5 1 or higher on your computer you DO...

Page 47: ...es not support OMEGA parallel port usage The USB to Parallel cable and driver is compatible with Windows 2000 Windows XP or Windows Vista 32 bit See page 8 for the Windows operating system compatibili...

Page 48: ...tions CD ROM drives and click Next Windows XP Windows 2000 6 When the Windows XP Wizard locates the driver on the CD the following Hardware Installation warning displays Click Continue Anyway 7 The fi...

Page 49: ...the driver and reinstall it through Control Panel as described in the following procedure If the installation was successful one of the following dialog boxes displays and you can click Finish to clo...

Page 50: ...using Category View rather than Classic View 1 Click Start Control Panel to display one of the following dialog boxes Windows XP Windows 2000 2 For Windows XP click the Performance and Maintenance ico...

Page 51: ...hould be open and the problem device should be identified by an exclamation mark in a yellow circle as shown in the Windows XP illustration If the driver was successfully installed it will appear as s...

Page 52: ...windows if they are still open Installing the GERBER EDGE EDGE 2 as a USB printer Install the GERBER EDGE EDGE 2 as a USB device via GSPTray or GQ Manager Note This procedure assumes that you have al...

Page 53: ...u encounter a Data Error 3 when sending the first job to the GERBER EDGE EDGE 2 do the following Abort the job at the GERBER EDGE by pressing RESET on the printer control panel Printing will pause and...

Page 54: ...ose The next time that you access the Add or Delete Gerber Vinyl Printer s dialog box the vinyl printer will be removed from the Installed Vinyl Printers field Remote vinyl printers To add a remote vi...

Page 55: ...er Vinyl Printers dialog box with the Remote Path filled in 5 Choose a printer from the Available Vinyl Printers on remote system list 6 Click Add to open the Add Name Device dialog box 7 Use the name...

Page 56: ...y and click OK 9 Click Close to close the Add or Delete Gerber Vinyl Printer s dialog box To delete a remote vinyl printer 1 Open the Add or Delete Gerber Vinyl Printer s dialog box using one of the m...

Page 57: ...g the GERBER EDGE FX and it is visible on the network it appears in the Devices Found drop down list Choose which GERBER EDGE FX to install from the Device Found list OR If you are installing a GERBER...

Page 58: ...lect the devices to hide the profiles that are unnecessary You can also use the Device Profile Manager to uninstall and reinstall profiles For complete help on this topic press F1 while in the Device...

Page 59: ...rocedure is for the original Gerber ImageRIP option and legacy Gerber ink jet printers This is not for ImageRIP Pro or Plus by Onyx and ink jet printers that communicate with that software To add a lo...

Page 60: ...he associated profiles EDGE EDGE 2 GERBER EDGE FX Elan Jetster MAXX or Solara Deselect the devices to hide the profiles that are unnecessary You can also use the Device Profile Manager to uninstall or...

Page 61: ...types of plotters can be installed with your OMEGA system local and remote Many Gerber plotters are installed via a COM port but some plotters such as the Gerber P2C can be installed using a USB port...

Page 62: ...e documentation that came with the plotter for specific instructions 1 Plug in and turn on the Gerber P2C plotter or other compatible USB plotter 2 Plug the USB cable into the plotter and then into th...

Page 63: ...ter GQ Manager will flash prompting you to open it The Select USB Vendor and Product Numbers dialog box displays 10 Choose the connected USB plotter from the Connected Devices list or the Common Devic...

Page 64: ...button in the Properties dialog box returns to the Select USB Vendor and Product ID dialog box To delete a local plotter 1 Open the Add or Delete Gerber Plotter Router s dialog box using one of the m...

Page 65: ...t the drive 1 Open the Add or Delete Gerber Plotter Router s dialog box using one of the methods on page 33 2 Click the Remote tab 3 Click the Browse button to open the Browse for Folder dialog box 4...

Page 66: ...will display in the output dialog boxes 9 Click OK The name of the newly installed plotter appears in the Installed Plotter Router s section of the Add or Delete Plotter Router s dialog box 10 Click C...

Page 67: ...ained at purchase Fonts are installed from the CD to your computer by highlighting one or more fonts in the Uninstalled Fonts list right pane and clicking Install Purchase Free fonts which install imm...

Page 68: ...ont and select Install Uninstalling fonts The Font Manager dialog box displays installed and uninstalled fonts Installed fonts are available for use in Composer If you uninstall a font it is not perma...

Page 69: ...the Gerber Library files off the OMEGA 2 5 or higher Font CD or you can copy the Library folders from the Font CD and paste them onto your computer in the following location C GSP Library where C is...

Page 70: ...or the printers in your workflow are available Profiles are no longer automatically installed during OMEGA installation You must install profiles from the Gerber Device Profile CD If you delete device...

Page 71: ...folder 5 Click OK to return to the Gerber Device Profile Manager dialog box The profiles that are available to install display in the Not Installed Information box 6 Select the ICC profiles to load fr...

Page 72: ...rofiles for the printers highlighted in the Device s list of the Gerber Device Profile Manager dialog box are available in OMEGA You may select one or more devices from the list using the Windows stan...

Page 73: ...Note If you delete device profiles using the Gerber Device Profile Manager they are removed permanently from your system If you want these profiles in the future you must reinstall them from the Gerbe...

Page 74: ...68 Getting Started Adding Output Devices 4 Click Uninstall The selected profiles are permanently removed from your system and no longer display in the Install Information list 5 Click OK...

Page 75: ...enu displays 2 Choose C Revision level The REVISION menu displays 3 On the Control line carefully note all the letters and numbers that follow To decide if the firmware can be updated 1 If the Control...

Page 76: ...stem version to install call GSP Field Service 860 644 6971 before continuing 5 Double click G32Flash V3 1 2 exe to open the Downloader program The G32Flash 3 1 2 GSP Flash Downloader window displays...

Page 77: ...again by pressing Download Selecting a language with an N3 4 MB Sabre operating system 1 From Main Menu 2 of the Sabre keyboard choose C Configuration The CONFIGURATION 1 menu displays 2 Press the UP...

Page 78: ...er you will periodically receive information on OMEGA updates and new product information as it becomes available Be sure to send any other hardware registration cards to their respective manufacturer...

Page 79: ...elp system that is part of OMEGA 2 6 software is designed to quickly and easily provide up to date procedures and information for you while you are working There are several ways to open Help topics I...

Page 80: ...button on the Help toolbar To find a topic 1 Click the Contents Index or Search tab to display the choice 2 Scroll through the list 3 Click a topic in the list to display it in the Topic pane Tip If...

Page 81: ...res To find additional topics and information 1 Click a green underlined word or phrase or on the See Also button If you click on the word or phrase the Help topic for this subject appears 2 Click on...

Page 82: ...rt at 860 644 6971 Before calling have the applicable information available Microsoft Windows release numbers GSP system ID and serial numbers The OMEGA 2 6 CD Windows disks or CDs and the computer ha...

Page 83: ...rom the Startup status bar Choose System Identification String from the menu list The serial number is also located on the security key When I try to install the software I get an error message tellin...

Page 84: ...available through most computer dealers Be sure that the GERBER EDGE is turned on before starting Composer or GSPPlot Static can cause a data error put static mats under the equipment and the operator...

Page 85: ...ve or the CD may be defective Try installing from a networked CD Rom drive Gerber recommends at least nnn MB of memory Do you want to continue If you continue without adding the recommended amount of...

Page 86: ...050 1100 1600 1800 1900 CAMM1 Pro Mimaki CG5 CG6 CG9 CG12 CG50 CG100 Summa SummaCut Summa Sign Pro SummaS Vytek 24 40 54 Wild TA10 TA10BC TA10S TA30 TA30RF TA40 TA40RF TA41 TA41RF TA400G TA400G RF TA4...

Page 87: ...how to control the plotter and how much plotting area is available To enter plotter information into DEVICE INI 1 Using a text editor such as Windows Notepad open the file called c GSP SOFTWARE DEVICE...

Page 88: ...0 com2 to the actual cutting height Y axis of the plotter Note If the cutting height is in millimeters convert it to inches and enter it in the form of nnn nnn For example a plotter has a plotting he...

Page 89: ...work exists when workstations on the network can operate as servers share resources run other applications such as OMEGA Note The following instructions are based on using a Windows XP version peer to...

Page 90: ...he Queue folder and choose Sharing and Security to open the Queue Properties dialog box Share tab 3 Turn on Share this folder 4 Click New Share to open the New Share dialog box 5 Enter gspqueue in the...

Page 91: ...Now to display a list of users on the network Select the user computer with which you will share the gspqueue folder 10 Click OK to return to the Select Users or Groups dialog box Click OK and return...

Page 92: ...e double click the Network Neighborhood icon located on the Computer B desktop 2 Double click the icon that represents your Computer A 3 Right click the gspqueue folder and select Map Network Drive 4...

Page 93: ...87...

Page 94: ...profiles 66 installing profiles 64 removing profiles 67 E EDGE 2 port type 31 EDGE FX installing 51 EDGE EDGE 2 installing 34 installing as USB 46 USB to Parallel 36 40 F FastFacts 76 Firmware Sabre...

Page 95: ...alling 14 19 Typical 13 14 19 20 Output devices installing 33 Installing fonts 61 P library files 63 Parallel cables 34 K Parallel ports 31 Plotter Key Read Error 79 deleting local 58 deleting remote...

Page 96: ...g 10 23 Serial Number locating 72 Setup type installation 13 19 Software requirements 7 Software Support 76 System ID locating 72 T Technical support 76 messages 78 Troubleshooting 77 Sabre firmware u...

Reviews: