background image

89

Main Menu

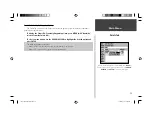
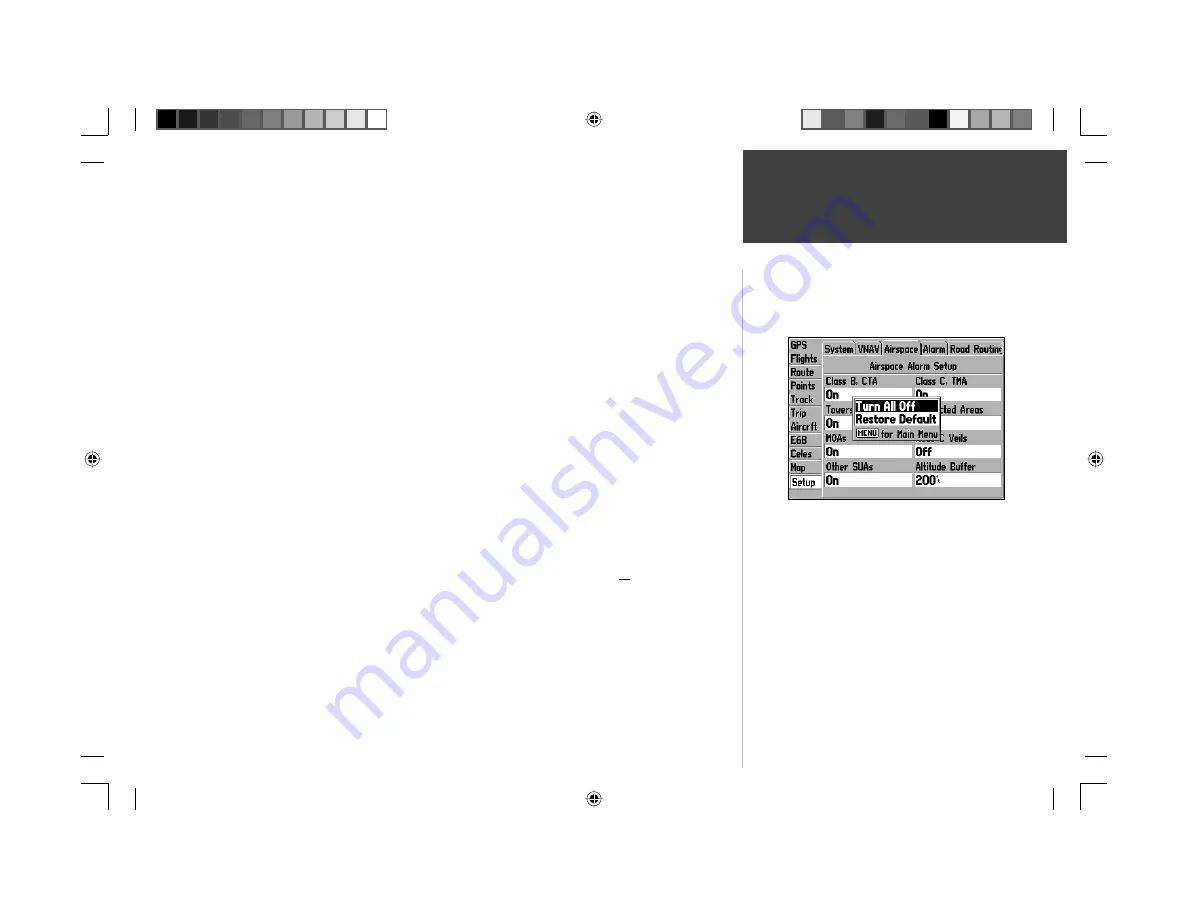
Setup Tab: Airspace

With the Airspace screen displayed, press 

MENU

to display con-

text-sensitive options for this screen. Use the 

ARROW KEYPAD

,

then

ENTER

 to select the desired option.

Select the ‘Turn All Off’ option to disable all airspace alerts.

Class B, CTA— enable/disable alarm for Class B or CTA (ICAO control areas) airspace.

Class C, TMA— provides alarm for Class C or TMA (ICAO terminal control areas) airspace.
Towers, Control Zones— provides alarm within a 4.3 nm radius from airports with control towers 
which are not associated with Class B or Class C airspace. (Typically Class D airspace.)
Restricted Areas— enable/disable alarm for restricted areas.

MOAs— enable/disable alarm for military operations areas.
Mode C Veils— provides alarm within the outer limit of an airspace (usually Class B or C) where a 
Mode C altitude-encoding transponder is required.
Other SUAs— provides alarm for other special-use airspace categories including: training, caution, 
danger, warning and alert areas.
Altitude Buffer— expands the vertical range of an airspace, providing an added margin of safety. For 
example, if the buffer is set to 500 feet, and you are more than 500 feet above or below an airspace, 
you will not be notifi ed with an alert message. If you are less than 500 feet from the fl oor-ceiling limits 
of the airspace, you will be notifi ed with an alert message.

To turn an  airspace alarm on or off and enter an  altitude buffer:

1.  From the ‘Setup’ tab, use the 

ARROW KEYPAD

 to select ‘Airspace’ at the top of the page.

2. Use the 

ARROW KEYPAD

 to select the fi eld corresponding to the desired airspace category and 

press

ENTER

.

3. Use the 

ARROW KEYPAD

 to select ‘On’ or ‘Off’ and press 

ENTER

.

4.  To change the altitude buffer, use the 

ARROW KEYPAD

 to select ‘Altitude Buffer’ and press 

ENTER

.

Use the 

ARROW KEYPAD

 to enter a new buffer setting and press 

ENTER

 once all characters for the 

new setting have been entered.

190-00283-00Backup.indd   89

12/8/2002, 8:09:42 PM

Summary of Contents for GPSMAP GPSMAP 196

Page 1: ...Pilot s Guide Reference GPSMAP 196 196PG Covers indd 1 12 9 2002 4 34 25 PM...

Page 2: ...c storage medium to be viewed for personal use provided that such electronic or printed copy of this manual contains the complete text of this copyright notice and provided further that any unauthoriz...

Page 3: ...missing please contact your Garmin dealer immediately Product Registration and Support Help us better support you by completing our on line registration today Have the serial number of your GPSMAP 19...

Page 4: ...the vehicle while the vehicle is in motion could result in an accident CAUTION GPS receivers operate by receiving and decoding very low power radio signals broadcast by satellites It is possible that...

Page 5: ...erence will not occur in a particular installation If this equipment does cause harmful interference to radio or television reception which can be determined by turning the equipment off and on the us...

Page 6: ...WARRANTY To obtain warranty service call your local Garmin authorized dealer Or call Garmin Customer Service at one of the numbers listed on the inside front cover of this manual for shipping instruc...

Page 7: ...s the property of Garmin and is protected under the United States of America copyright laws and international copyright treaties You further acknowledge that the structure organization and code of the...

Page 8: ...work Information on these features is readily available from many sources Use the following as a general guideline to help you nd the answers you seek Quick Start Guide A Quick Start Guide is included...

Page 9: ...e 39 Position Page Options 40 41 Direct To D 42 47 Waypoint Categories 42 Selecting a GOTO Destination 43 Jeppesen Database Information 44 45 Direct To Options 46 47 MARK 48 Marking Present Position 4...

Page 10: ...by turn road routing Enhanced mapping available by using optional MapSource City Select MetroGuide Road Recreation Topo or Fishing HotSpots PC products Coordinates Lat Lon UTM UPS Loran TD plus 24 gr...

Page 11: ...NU key displays a menu of available options for the current page Pressing the MENU key twice will display the Main Menu The NRST FIND key displays the nearest airports navaids points of communication...

Page 12: ...O button appearing at the bottom of the waypoint information pages SCROLL BAR When viewing a list of items too long to display on a single page a scroll bar will appear along the right hand side of th...

Page 13: ...ion date and time to determine which satellites should be in view A minimum of three satellites is required for a two dimensional position x 2D Navigation whereas at least four satellites are necessar...

Page 14: ...arching for satellites If Use Map is selected use the pointer on the Map page to select your approximate location and the unit will continue to acquire satellites normally Automatic may take longer to...

Page 15: ...illustrates the pages you ll see in Aviation Mode As you become more familiar with the GPSMAP 196 you ll nd that using both PAGE and QUIT allows you to quickly select the desired page For example to...

Page 16: ...g settings 2 Press the UP DOWN portion of the ARROW KEYPAD to change the backlighting settings UP will increase backlight intensity DOWN will decrease backlight intensity 3 Press the LEFT RIGHT portio...

Page 17: ...ned and used for the map display GOTO NAVIGATION In Aviation Mode when a GOTO is initiated the course line and course guidance is xed at the point where you started the GOTO By contrast in Land or Wat...

Page 18: ...8 Basic Operation This page intentionally blank 190 00283 00Backup indd 8 12 8 2002 8 08 50 PM...

Page 19: ...a mechanical HSI indicating the desired course and your deviation left right of this course If the needle points straight up and the course deviation needle is centered you are heading directly to yo...

Page 20: ...r present position and scroll to other map areas around the world As you pan past the edge of the current map display the screen will actively scroll forward to provide continuous map coverage Keep in...

Page 21: ...than one object appears on the map at the pointer location To save a map item as a waypoint press MENU and select Create Waypoint To GOTO an on screen airport navaid or map item 1 Follow steps 1 throu...

Page 22: ...es may then be displayed by highlighting the on screen Frequencies button and pressing ENTER Or with the on screen OK button highlighted press ENTER to return to the Map Page Selecting Map Scales The...

Page 23: ...remove the background detail lakes rivers highways remove airspace boundaries and at the highest declutter level remove all map detail except those waypoints which are part of your selected route Map...

Page 24: ...o select a menu option use the ARROW KEYPAD to highlight the desired option and press ENTER The following options are available Declutter Declutter Off Full Screen Map Show Data Fields Measure Distanc...

Page 25: ...ints on the map To measure the Bearing Distance between two points 1 Highlight the Measure Distance option and press ENTER An on screen pointer will appear on the map display at your present position...

Page 26: ...to zoom text size and maxi mum scale for each map item to appear The Auto setting available for many map items allows you to control all map features globally using the Detail setting see below The ma...

Page 27: ...sed on satellite conditions Your position will be within the circle The lock to roads feature is used with MapSource MetroGuide or City Select data and locks your present position icon to the nearest...

Page 28: ...name Zoom Auto Off 20 ft 800 mi sets the maximum scale at which user waypoints appear on the screen Active Route Text Off Small Medium and Large controls the screen size of active route waypoint name...

Page 29: ...TMA airspace appears on the screen Towers Cntrl Zone Zoom Auto Off 20 ft 800 mi sets the maximum scale at which Tower or Control Zone Class D airspace appears on the screen SUA Tab Restricted Areas Zo...

Page 30: ...m scale at which local road names appear on the screen Railroad Text Off Small Medium and Large controls the screen size of railway names Zoom Auto Off 20 ft 800 mi sets the maximum scale at which rai...

Page 31: ...ature names or numbers Zoom Auto Off 20 ft 800 mi sets the maximum scale at which marine features appear on the screen Optional MapSource marine navaid information includes day markers mile markers bu...

Page 32: ...ide road map and a topographic map as the GPSMAP 196 will only display one map at a time for a given area based upon its own internal priority scheme To review change data card information 1 From the...

Page 33: ...age show ing distance and time to next waypoint current speed and turn direction Each data eld may be con gured to display any one of 40 data options or you can display ten data elds with smaller text...

Page 34: ...y a Panel Page layout The GPSMAP 196 s HSI Page options menu provides access to functions and features relating to the HSI Page and options for layout of the page To display the HSI Page options press...

Page 35: ...be retained until cancelled as described above or until waypoint passage To release a waypoint hold and return to automatic sequencing of route waypoints highlight the Release Hold option and press EN...

Page 36: ...llows you to con gure the HSI page layout to your preferences You can select one column of four large text data elds two columns with ten smaller text data elds or replace the HSI Page completely with...

Page 37: ...e ARROW KEYPAD to select the desired scale and press ENTER The IN and OUT zoom keys may also be used to adjust CDI scale when no map is displayed Change Data Fields allows you to choose the data types...

Page 38: ...p of the page directly above the graphic RMI In Water Mode this text area indicates the name of the next waypoint in a Goto or route By default four user selectable data elds appear along the right ha...

Page 39: ...arge text data elds two columns with eight smaller text data elds or replace the RMI Page completely with the Panel Page described on page 26 To select an RMI Page layout 1 Use the ARROW KEYPAD to hig...

Page 40: ...he route the information on the Active Route Page will automatically update to indicate the current destination waypoint any remaining interim waypoints and the nal destination waypoint The three data...

Page 41: ...s Select the identi er facility name or city name eld as appropriate and press ENTER Use the ARROW KEYPAD to select the new waypoint UP DOWN to select the highlighted character and RIGHT to move to th...

Page 42: ...ct Approach Remove Approach Vectors Cancel Vectors Set Fuel Flow Change Data Fields Deactivate cancels navigation of the Goto or route you are currently using Edit on Map displays the active route on...

Page 43: ...ress ENTER Use the ARROW KEYPAD to select the new location for the waypoint and press ENTER Add Waypoint allows you to insert a new waypoint in front of the highlighted waypoint in the Active Route se...

Page 44: ...KEYPAD to select the desired approach and press ENTER A second pop up window will appear asking if you want to activate Vectors i e vectors to nal see the Vectors option on the following page 5 Use th...

Page 45: ...ENTER Set Fuel Flow allows you to enter a fuel ow gure which the GPSMAP 196 uses to calculate and display the fuel required for each leg of the active route To enter a fuel ow gure 1 Use the ARROW KE...

Page 46: ...ata eld term To change a data eld 1 Use the ARROW KEYPAD to highlight the Change Data Fields option and press ENTER 2 Move the eld highlight to the data eld you want to change and press ENTER 3 Move u...

Page 47: ...key can be used from any page to quickly retrieve the detail map for the next turn This next turn detail map will remain on the screen for approximately fteen seconds or you can press QUIT to return t...

Page 48: ...d To calculate a detour select the Detour option use the ARROW KEYPAD to select the detour distance portion of the route ahead you wish to avoid and press ENTER Recalculate recalculates the route from...

Page 49: ...s that can be displayed on the Position Page To select a different data item to display on any data eld see the following page and refer to Appendix D for de nitions of available data items You may al...

Page 50: ...can select one column of four large text data elds two columns with ten smaller text data elds or replace the entire page with four very large text data elds To select an Position Page layout 1 Use t...

Page 51: ...ars all trip computer maximum speed and odometer readouts To reset all trip computer maximum speed odometer readouts use the ARROW KEYPAD to highlight Reset All and press ENTER Restore Default resets...

Page 52: ...ogram is designed to operate on Windows compatible PCs and requires the included PC Interface Cable to connect your GPSMAP 196 to the PC s serial communications port The following information is provi...

Page 53: ...A course is plotted from your present position to the selected destination waypoint In Land Mode the GOTO line appearing on the map is constantly updated to your present position In Aviation and Water...

Page 54: ...Comm le tab 4 When viewing information for the Runway or Approach le tabs use the ARROW KEYPAD to highlight the runway designation or approach name and press ENTER Then use the UP DOWN por tion of th...

Page 55: ...To select and navigate an approach for the destination airport 1 Press the DIRECT TO key to display the Goto Page The current destination is already displayed on the GOTO Page 2 Press MENU to display...

Page 56: ...SMAP 196 creates a straight line course directly to the rst waypoint in the approach from wherever you are when you initiate the approach This works much like any other route with course guidance from...

Page 57: ...al vectors to the nal approach course Cancels the vectors option but retains the approach When using a route Cancel Vectors will return you to the route with the approach included but a direct course...

Page 58: ...tion for the new waypoint 2 The GPSMAP 196 will automatically assign a three digit number as the waypoint name but you may select any name you want up to ten characters in length To change the name hi...

Page 59: ...zed by a series of le tabs across the top of the page The following information is displayed on the Nearest Pages Airport fteen nearest with identi er bearing to and distance length of longest runway...

Page 60: ...RROW KEYPAD to highlight the desired waypoint on the list and press ENTER The cor responding waypoint information page will appear showing additional waypoint information 3 For airports use the ARROW...

Page 61: ...n the preceding page 2 Press MENU to display an options window then press ENTER A pop up window will appear with the current settings for runway surface and minimum runway length 3 With the runway sur...

Page 62: ...numbers on the list are the closest communication points Nearest Airspace Information When an airspace alert is provided pressing the NRST key automatically displays nearby airspace information This...

Page 63: ...KEYPAD to select the AIR SPACE le tab 2 Use the ARROW KEYPAD to select the desired airspace alert entry on the page then press ENTER An information page will indicate controlling agency status and oor...

Page 64: ...ll through these menus and the ENTER key to select the desired menu choices 5 A list of waypoints for the selected category criteria is displayed At the top of this list are two le tabs labeled By Nam...

Page 65: ...ointer position or nearest to your destination using an options menu To nd a highway exit 1 Press the FIND key use the ARROW KEYPAD to select Exits and press ENTER 2 A menu will appear with a choice o...

Page 66: ...o search for exits using the built in basemap or using optional MapSource MetroGuide or City Select data Finding a Street Address or Crossroads With optional MapSource MetroGuide or City Select data y...

Page 67: ...to select the category of your choice and then press ENTER 3 A list of types for the selected POI category is displayed Select the type of your choice and press ENTER to display a list of the points o...

Page 68: ...edit activate or delete routes See page 64 Points Allows you to create edit or delete user waypoints Provides proximity alarm waypoints Track Shows status of track memory recording criteria and list o...

Page 69: ...indicated by a 2D 2D Differential 3D or 3D Differential in the status eld The sky view shows a bird s eye view of the position of each satellite relative to the receiver s last known position The oute...

Page 70: ...eceived for GPS satellites numbers 32 or below a D will appear in the signal bar for any appli cable satellite and 2D Differential or 3D Differential will appear in the receiver status To learn more a...

Page 71: ...calculate a x 2D GPS Location at least three satellites with good geometry have been acquired and a 2 dimen sional position x latitude and longitude is being calculated 2D Differential will appear whe...

Page 72: ...on displayed To select a menu option use the ARROW KEYPAD to highlight the desired option and press ENTER The following options are available Start Stop Simulator toggles the unit simulator on or off...

Page 73: ...use the ARROW KEYPAD to highlight the the desired ight and press ENTER 2 With OK highlighted press ENTER to return to the Flights Tab An optional FlightBook software package is available to further s...

Page 74: ...se the ARROW KEYPAD to highlight the desired option and press ENTER The following options are available Activate Route select the highlighted route and begins navigation guidance along the closest leg...

Page 75: ...Window use the ARROW KEYPAD and ENTER to select the desired waypoint In Aviation Mode the Find Window provides editable elds for identi er facility name or city You can select the route waypoint from...

Page 76: ...r The bottom of the display will show you the number of available and used points A route line will appear on the map to indicate each completed leg and a dotted line will appear to indicate the dista...

Page 77: ...2 Use the ARROW KEYPAD to highlight the route you wish to rename and press ENTER to display the Route Review Page 3 Use the ARROW KEYPAD to highlight the route name eld at the top of the page and pres...

Page 78: ...TER 2 Press MENU highlight Edit on Map and press ENTER 3 To remove a route waypoint Use the ARROW KEYPAD and IN OUT zoom keys to place the panning pointer on the route waypoint you wish to remove Pres...

Page 79: ...route as described on page 67 Select Approach replaces the nal destination airport in the selected route with the sequence of waypoints for a selected approach To use this option keep in mind that th...

Page 80: ...The units of measure for fuel ow gallons or liters are not included on the GPSMAP 196 since they are not required for calculations Keep in mind the units from which the original ow rate gure was deriv...

Page 81: ...available data eld types 4 Use the ARROW KEYPAD to select the desired data type and press ENTER Creating Routes on a PC If you intend to use your GPSMAP 196 regularly you may wish to do your ight pla...

Page 82: ...the Waypoint Information Page press QUIT The GPSMAP 196 stores up to 1000 user waypoints which can result in a very long list under the User tab To quickly jump to the desired waypoint use the editab...

Page 83: ...l and present position for the new waypoint 3 To change the waypoint name or comment highlight the name comment eld at the top of the page and press ENTER Use the ARROW KEYPAD to enter the desired way...

Page 84: ...radius Once the desired alarm radius is selected press ENTER again To turn proximity alarms on or off 1 Use the ARROW KEYPAD to highlight the eld at the top of the page below Proximity Alarm and press...

Page 85: ...menu option use the ARROW KEYPAD to highlight the desired option and press ENTER The following options are available Remove Point removes the selected waypoint from the proximity list Remove All remo...

Page 86: ...ct Distance Time or Resolution and press ENTER Time allows you to specify a time interval between recorded points Distance adds a new track point once you have traveled the speci ed distance Resolutio...

Page 87: ...on screen TracBack button and press ENTER Or 1 From the Track tab use the ARROW KEYPAD to select the Saved tab at the top of the page 2 Use the ARROW KEYPAD to highlight the desired track record and p...

Page 88: ...or best performance If the receiver is turned off or satellite coverage is lost during your trip the TracBack will draw a straight line between any point where coverage was lost and where it resumed I...

Page 89: ...rent Aircraft eld Press ENTER when nished 4 Use the ARROW KEYPAD to highlight the Cruise Speed eld and press ENTER 5 Use the ARROW KEYPAD to enter the cruising speed for your aircraft Press ENTER when...

Page 90: ...corresponding arm eld and press ENTER 5 Use the ARROW KEYPAD to enter the arm gure Press ENTER when nished 6 Repeat steps 2 through 5 above until all gures are entered The calculated moment weight and...

Page 91: ...r density altitude and true airspeed are displayed at the bottom of the page To calculate winds aloft 1 Follow the steps above to determine true airspeed Or use the ARROW KEYPAD and ENTER to manually...

Page 92: ...Zone for that location under the Setup tab on the Main Menu see page 93 To change the time or date 1 From the Celes tab use the ARROW KEYPAD to select Sun Moon at the top of the page 2 Use the ARROW...

Page 93: ...hart shows a 24 hour block of local time LCL for your position with the reported station time STA appearing at the bottom Daytime light bar and nighttime dark bar show across the time scale with the t...

Page 94: ...KEYPAD to select At tide station and press ENTER 3 Press MENU select Nearest to Other and press ENTER 4 Use the ARROW KEYPAD to select a position on the map with the Map Pointer and press ENTER 5 Sel...

Page 95: ...r but navigation data is continuously updated based on last know speed and course Simulator used for demo or training operation allows you to animate the screens and observe unit operation without act...

Page 96: ...e occurs The time to vertical navigation will sequence from indicating time to initial descent point to indicating time to reach the target altitude Finally the descent angle will lock to prevent chan...

Page 97: ...the target altitude and press ENTER once all characters have been entered If necessary select the adjacent eld press ENTER and choose Above Waypoint or Above MSL Then press ENTER again 3 Use the ARRO...

Page 98: ...ithin the boundaries of the airspace Some airspace altitude limits may be charted in terms of altitude above ground level AGL If the actual lower limit of an airspace is charted in AGL the GPSMAP 196...

Page 99: ...SUAs provides alarm for other special use airspace categories including training caution danger warning and alert areas Altitude Buffer expands the vertical range of an airspace providing an added ma...

Page 100: ...if position accuracy degrades beyond the speci ed limits Use this alarm to ensure a required level of position accuracy or to be alerted when satellite coverage deteriorates To set approach arrival of...

Page 101: ...have to wait Best Route results in a longer time for route calculations but provides the best possible routing Calculate Routes for takes full advantage of the routing information built into the MapSo...

Page 102: ...r or reset the battery timer 1 From the Setup tab use the ARROW KEYPAD to select Timers at the top of the page 2 Use the ARROW KEYPAD to select User Fuel Tank or Battery and press ENTER A pop up windo...

Page 103: ...fferent for each operating mode For example you may wish to use knots for speed in Aviation Mode and miles per hour for speed in Land Mode Altitude Feet or Meters Pressure Inches or Millibars Vertical...

Page 104: ...datum if you are using a map or chart that speci es a different datum and you want position readings on the unit to correspond with position readings on the chart Datums are used to describe geograph...

Page 105: ...r and press ENTER 4 Use the ARROW KEYPAD to highlight the Magnetic Variation eld and press ENTER 2 Use the ARROW KEYPAD to enter the magnetic variation at your current position and press ENTER WARNING...

Page 106: ...lows Goto or route selection on the panel mounted GPS receiver to be automatically displayed on the GPSMAP 196 This eliminates the need to enter the destination on both units NMEA In NMEA Out supports...

Page 107: ...tically scan for a frequency 1 With the unit set to Garmin DGPS or RTCM In NMEA Out use the ARROW KEYPAD to highlight the Beacon eld and press ENTER 2 Highlight Scan and press ENTER The numbers in the...

Page 108: ...ttp www navcen uscg mil Advanced NMEA Output Setup The GPSMAP 196 NMEA data transmission can be customized to keep the output rate at two seconds If the unit is set up to output all of the available N...

Page 109: ...storing the unit for more than six months Do not store the GPSMAP 196 where prolonged exposure to temperature extremes may occur such as on the yoke of a parked airplane or in the trunk of a car as pe...

Page 110: ...d for connection of external devices Garmin proprietary Differential GPS DGPS Garmin proprietary aviation input NMEA 0183 versions 3 0 ASCII Text Output RTCM SC 104 input version 2 0 The following are...

Page 111: ...DGPS corrections Velocity Accuracy 0 05 meter sec steady state Dynamics 6g s Subject to accuracy degradation to 100m 2DRMS under the U S DOD imposed Selective Availability Program Power Batteries 4 A...

Page 112: ...urrent location to a GOTO destination or the next waypoint in a route DTK Desired Track The compass course between from and to waypoints in a route Same as Course ETA Destination Estimated Time of Arr...

Page 113: ...r route Track The direction of movement relative to a ground position Also referred to as ground track Trip Avg Speed Moving Average speed of unit when moving since last reset Trip Avg Speed Total Ave...

Page 114: ...ror Internal hardware error Contact your dealer or Garmin Customer Service for assistance Detail Maps Don t Support Routing The MapSource maps currently in use do not include routable road data Fuel T...

Page 115: ...urs in Aviation or Water modes when a Find Menu destination is selected and automatic road routing to the destination is activated Near SUA Your present position is within two nautical miles of an air...

Page 116: ...automatic turn by turn routing on secondary roads and residential streets Programmable Data Cards Blank data cards are available in 8MB 16MB 32MB 64MB and 128MB sizes Download street level map detail...

Page 117: ...ng Pointer 28 Bug Indicator 23 C Calculation Method 91 Cancel Approach 47 Cancel Vectors 47 Cautions ii CDI Scale 24 Celes 58 82 Cities 20 54 Cleaning 99 Communication Frequencies 52 Compass Card 23 C...

Page 118: ...J Jeppesen Database Information 44 L Lakes 21 Land Mode viii 7 28 37 54 65 85 Last Flight Timer 92 Length Runway 44 Lighting Runway 44 Limited Warranty iv Local Time 93 Location Format 94 M Main Menu...

Page 119: ...ions 18 Road Routing 91 Routes 30 58 64 Route Review Page 67 Route Tab 64 RTCM 96 Runway Designations 44 Runway Layout 44 Runway Length 51 Runway Numbers 18 Runway Surface 51 S Screen Backlighting 6 S...

Page 120: ...s of Measure 93 Usage Restrictions frequency 45 User Created Waypoints 42 54 72 V Vectors 32 35 46 Vector to Final 46 VNAV 24 26 86 VNAV Pro le 26 86 VORs 19 42 49 W WAAS 59 Warnings ii Warranty iv Wa...

Page 121: ...190 00283 00Backup indd 111 12 8 2002 8 10 01 PM...

Page 122: ...190 00283 00Backup indd 112 12 8 2002 8 10 01 PM...

Page 123: ...196PG Covers indd 3 12 9 2002 4 35 05 PM...

Page 124: ...Street Olathe Kansas 66062 U S A Garmin Europe Ltd Unit 5 The Quadrangle Abbey Park Industrial Estate Romsey SO51 9DL U K Garmin Corporation No 68 Jangshu 2nd Road Shijr Taipei County Taiwan www garmi...

Reviews: