background image

26

Product Features

Product Features

This section describes the product features and indicates their links.
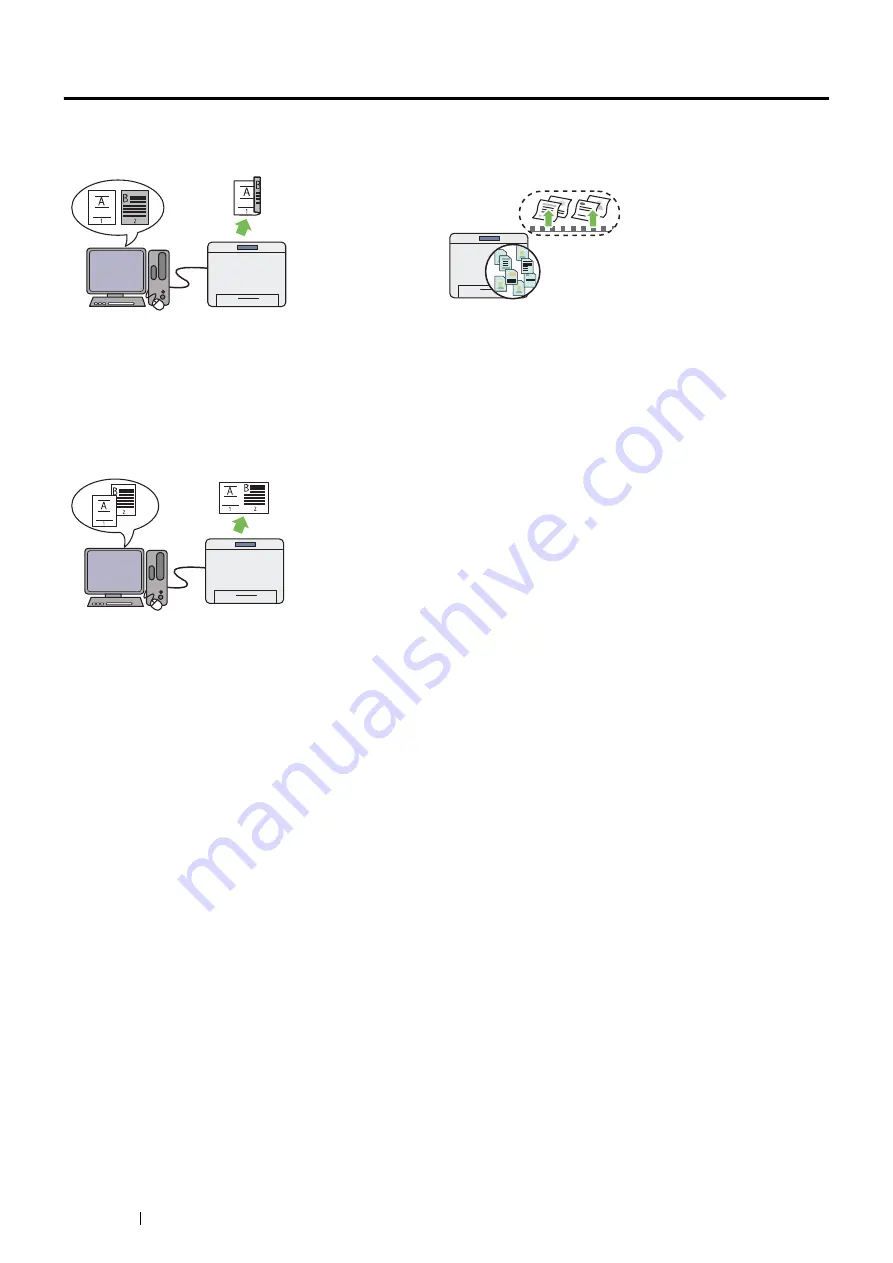
Duplex Print

The 2-Sided Print feature is to print two or more pages on 
the front and back side of a single sheet of paper. This 
feature helps reduce the paper consumption.
For more information, see 

"Duplex Printing" on page 139

.

Stored Print

The Stored Print feature allows you to temporarily store 
your print data in the printer memory and output it later. 
You can effectively manage your time when you print 
confidential data or large-volume data at off-peak hours.
For more information, see 

"Using the Stored Print Feature" 

on page 134

.

N-up Print

The Pages Per Sheet (N-Up) feature allows you to print 
multiple pages on a single sheet of paper. This feature 
helps reduce the paper consumption.
For more information, see the print driver's help.

Summary of Contents for DocuPrint P455 D

Page 1: ...DocuPrint P455 d User Guide ...

Page 2: ... either registered trademarks or trademarks of Xerox Corporation or Fuji Xerox Co Ltd In this manual safety instructions are preceded by the symbol Always read and follow the instructions before performing the required procedures It may be a legal offence to print currency notes certificates of stocks and securities or any other documents of similar nature regardless of whether they will be used T...

Page 3: ...t time and provides all the necessary operating information about the print function Please read this guide to achieve the best performance from this printer This guide assumes you are familiar with computers and the basics of network operation and configuration After reading this guide keep it safe and handy for future reference ...

Page 4: ...4 Preface ...

Page 5: ...2 Front View 32 Rear View 33 Operator Panel 34 Securing the Printer 35 Installing Optional Accessories 36 Installing the Optional 512MB Memory 36 Installing the Optional 550 Sheet Feeder 41 Installing the Optional Wireless Printer Adapter 48 Installing the Optional Font ROM 53 Installing the Optional Hard Disk Unit 56 Turning on the Printer 60 Printing a Panel Settings Page 61 Power Saver Mode 62 ...

Page 6: ... Installing Print Driver on Computers Running Mac OS X 96 Installing Print Driver on Computers Running Linux CUPS 97 Installing the Print Driver 97 Setting Up the Queue 98 Setting the Default Queue 99 Specifying the Printing Options 100 Setting the Password for Authority as the Printer Administrator 101 Uninstalling the Print Driver 101 Configuring Wireless Settings Windows Mac OS X 103 5 Printing...

Page 7: ... Menu 163 Tray Settings 188 Panel Language 195 Panel Lock Function 196 Enabling the Panel Lock 196 Disabling the Panel Lock 196 Changing the Language 197 Setting the Power Saver Time Option 198 Resetting to Factory Defaults 199 7 Troubleshooting 201 Clearing Jams 202 Avoiding Jams 202 Identifying the Location of Paper Jams 203 Clearing Paper Jams From the Bypass Tray 204 Clearing Paper Jams From t...

Page 8: ...ing Printer Messages 244 Contacting Service 246 Getting Help 247 LCD Panel Messages 247 SimpleMonitor Alerts 247 Obtaining the Product Information 247 Non Genuine Mode 248 8 Maintenance 249 Cleaning the Printer 250 Cleaning Inside the Printer 250 Replacing Consumables 253 Replacing the Toner Cartridge 254 Replacing the Drum Cartridge 257 Replacing the Fusing Unit Transfer Unit Retard Roll Feed Rol...

Page 9: ...moving the Optional 512MB Memory 279 Removing the Optional 550 Sheet Feeder 281 Removing the Optional Wireless Printer Adapter 285 Removing the Optional Font ROM 287 Removing the Optional Hard Disk Unit 289 Contacting Fuji Xerox 291 Technical Support 292 Online Services 293 Index 295 ...

Page 10: ...10 Contents ...

Page 11: ...s step by step instructions on how to set up your printer User Guide this guide Describes how to get ready to print and set various features It also covers the operator panel menus troubleshooting tips and maintenance information This guide is on the Driver CD Kit PostScript User Guide Describes how to set up your printer as a PostScript printer and the features that can be configured on your prin...

Page 12: ... specifications 2 Basic Operation Describes the main components of the printer the Power Saver mode and the preparation of the printer to use 3 Printer Management Software Describes the software available for the printer 4 Printer Connection and Software Installation Describes the basic information about how to connect the printer to your computer via the network or USB and how to install the prin...

Page 13: ...that if not followed strictly can lead death or severe or fatal injuries and the possibility to do it is comparatively high Used for items that if not followed strictly can lead to severe or fatal injuries Used for items that if not followed strictly can cause injuries to user or damages to machine A symbol for items to pay attention to when handling machine Follow instructions carefully to use ma...

Page 14: ...r panel of this product for its rated ampere and voltage Never touch the power cord with wet hands It may cause electric shock Do not put an object on the power cord Always keep the plug connection free of dust The dusty and damp environment may bring about minute electric current in a connector It may generate heat and eventually cause a fire accident To avoid the risk of electric shock and a fir...

Page 15: ... accident Once a month switch off this product and check if the power cord is plugged firmly into an electrical outlet the plug is not excessively heated rusted or bent the plug and electrical outlet are free of dust and the power cord is not cracked or worn down Once you notice any unusual condition switch off and unplug this product first and contact your local Fuji Xerox representative ...

Page 16: ...ceiving direct sunlight Near cookers or humidifiers Never put this product close to fire such as candles and cigarettes Otherwise it may cause a fire accident Locate this product on a level and sturdy surface that can withstand a weight of 22 5 Kg Otherwise if tilted the product may fall over and cause injuries Locate this product in a well ventilated area Do not obstruct ventilation openings of t...

Page 17: ...ox supplies Otherwise it may cause some defects To keep this product in a good performance and condition always use it in the following environment Temperature 10 32 C Humidity 10 85 When the product is left in a chilly room and the room is rapidly warmed up by heater dew condensation may form inside the product and cause a partial deletion on printing Right Left Right Left Front Back Front Back 1...

Page 18: ... staples or clips Heavy objects If liquid is spilled over or metal parts are slipped into the product it may cause electric shock or a fire accident Do not use conductive paper such as origami paper carbonic paper or conductively coated paper When paper jam occurs it may cause short circuit and eventually a fire accident When cleaning this product use the designated cleaning materials exclusive to...

Page 19: ...ay accidentally activate the product and cause injuries or electric shock Do not attempt to remove a paper deeply jammed inside the product particularly a paper wrapped around the fusing unit or the heat roller Otherwise it may cause injuries or burns Switch off the product immediately and contact your local Fuji Xerox representative Ventilate well during extended operation or mass printing It may...

Page 20: ...ing so may cause injuries Contact your local Fuji Xerox representative Keep a drum cartridge and a toner cartridge out of the reach of children If a child accidentally swallows toner spit it out rinse mouth with water drink water and consult a physician immediately When replacing a drum cartridge and a toner cartridge be careful not to spill the toner In case of any toner spills avoid contact with...

Page 21: ...ot touch areas with labels indicating high voltage or temperature This can cause an electric shock or burn CAUTION Always follow all warning instructions marked on or supplied with this product To avoid the risk of burn injuries and electric shock never touch the area with the High Temperature or High Voltage marks on ...

Page 22: ...returned toner cartridges and drums photoreceptors to make recycle parts recycle materials or energy recovery Proper disposal is required for toner cartridges and drums photoreceptors no longer needed Do not open toner cartridges and drums photoreceptors Return them to your local Fuji Xerox representative ...

Page 23: ...ference to radio communications However there is no guarantee that interference will not occur in a particular installation If this product does cause harmful interference to radio or television reception which can be determined by turning this product off and on the user is encouraged to try to correct the interference by one or more of the following measures Reorient or relocate the receiving an...

Page 24: ...opyright 2003 Dr BrianGladman Worcester UK All rights reserved This product uses published AES software provided by Dr Brian Gladmanunder BSD licensing terms TIFF libtiff LibTIFFCopyright 1988 1997 SamLeffler Copyright 1991 1997 Silicon Graphics Inc ICC Profile Little cms LittlecmsCopyright 1998 2004 Marti Maria JPEG Our printer software uses some of the codes defined by the Independent JPEG Group...

Page 25: ...ples of items that may be illegal to copy or print in your country Currency Banknotes and checks Bank and government bonds and securities Passports and identification cards Copyright material or trademarks without the consent of the owner Postage stamps and other negotiable instruments This list is not inclusive and no liability is assumed for either its completeness or accuracy In case of doubt c...

Page 26: ... on page 139 Stored Print The Stored Print feature allows you to temporarily store your print data in the printer memory and output it later You can effectively manage your time when you print confidential data or large volume data at off peak hours For more information see Using the Stored Print Feature on page 134 N up Print The Pages Per Sheet N Up feature allows you to print multiple pages on ...

Page 27: ...ment Continuous Print Speed 1 1 Sided 2 45 sheets minute 2 Sided 3 28 pages minute IMPORTANT 1 Print speed may decrease due to factors such as paper type paper size and printing conditions Print speed may also decrease for image quality adjustment 2 When continuously printing a single document of A4 plain paper 3 A4 continuous printing First Print Output Time 5 seconds IMPORTANT Measurements based...

Page 28: ...poor print quality When printing on envelopes use envelopes that do not have adhesive applied The type of paper being used and environmental conditions can affect printing quality Because of this it is recommended that you test print and confirm proper print quality before using the printer Paper Tray Capacity Standard 550 sheets Standard 550 sheet tray Tray 1 150 sheets Bypass tray Optional 1650 ...

Page 29: ... 5 Desktop x86 Red Hat Enterprise Linux 6 Desktop x86 SUSE Linux Enterprise Desktop 10 x86 SUSE Linux Enterprise Desktop 11 x86 IMPORTANT For information about the latest supported OS contact your local Fuji Xerox representative Connectivity Standard Ethernet 1000BASE T 100BASE TX 10BASE T USB 2 0 Optional IEEE802 11 b g n IMPORTANT When the optional wireless printer adapter is installed the stand...

Page 30: ...electricity when the power is switched off even with the power cord is plugged in Dimensions Width 393 Depth 426 Height 315 mm Machine Weight 12 8 kg IMPORTANT The weight of paper is not included The weight of the toner cartridge is included Usage Environment During Use Temperature 10 32 C Humidity 10 85 except malfunctions due to dew condensation Non Use Temperature 20 40 C Humidity 5 85 except m...

Page 31: ... 31 2 Basic Operation This chapter includes Main Components on page 32 Installing Optional Accessories on page 36 Turning on the Printer on page 60 Printing a Panel Settings Page on page 61 Power Saver Mode on page 62 ...

Page 32: ...n page 34 Securing the Printer on page 35 Front View IMPORTANT To avoid irregular screen image or malfunctioning of your printer avoid placing the printer in direct sunlight with the bypass tray opened 1 Operator Panel 5 Toner Cartridge 2 Bypass Tray 6 Drum Cartridge 3 Standard 550 Sheet Tray Tray 1 7 Front Cover 4 Optional 550 Sheet Feeder Tray 2 3 4 2 3 4 6 5 7 1 ...

Page 33: ...er adapter is not supplied in some regions 1 Control Board 7 Power Connector 2 Control Board Cover 8 Chute 3 Power Switch 9 Duplexer 4 Ethernet Port 10 Transfer Unit 5 USB Port 11 Fusing Unit 6 Wireless Adapter Socket 12 Rear Door 1 2 3 5 4 6 7 9 10 11 12 8 ...

Page 34: ...in the Menu mode To enter numbers or passwords press these buttons 5 buttons Selects submenus or setting values in the Menu mode 6 Stop button Cancels the current processing or pending job 7 button Displays the selected menu or item and determines the selected value in the Menu mode 8 Back button Switches to the Print mode from the top menu of the Menu mode Returns to the upper hierarchy of the me...

Page 35: ...inter To protect your printer from theft you can use the optional Kensington lock Attach the Kensington lock to the security slot on your printer For details see the operating instructions supplied with the Kensington lock Security slot ...

Page 36: ...1 Installing the Optional Wireless Printer Adapter on page 48 Installing the Optional Font ROM on page 53 Installing the Optional Hard Disk Unit on page 56 Installing the Optional 512MB Memory NOTE Your printer supports additional 512 MB memory module 1 Turn off the printer IMPORTANT If the optional hard disk unit is not installed on your printer note that the data in the memory are cleared when t...

Page 37: ...d and then insert it into the slot 5 Push the memory module firmly into the slot NOTE Ensure that the memory module is firmly fixed in the slot and does not move easily 6 Align the guide on the control board cover with the slot around the control board and slide it towards the front of the printer 7 Turn the screw clockwise ...

Page 38: ...the button The Printer Settings page is printed 10 Confirm the amount of Memory Capacity listed under General in the Printer Settings page If the memory capacity has not increased turn off the printer and re install the memory module 11 If you installed the optional 512MB memory after installing the print driver update your driver by following the instructions for the operating system you are usin...

Page 39: ...al Setup 4 Select Get Information from Printer and then select OK 5 Click Apply and then click OK 6 Close the Devices and Printers dialog box Windows Vista Windows Vista x64 1 Click Start Control Panel Hardware and Sound Printers 2 Right click the printer icon of the DocuPrint P455 d and select Properties 3 Click the Configuration tab and then select Bi Directional Setup 4 Select Get Information f...

Page 40: ...ect the Print Fax in System Preferences 2 Select the printer in Printers list and click Options Supplies 3 Select Driver select the options that have been installed on the printers and then click OK Mac OS X 10 3 x 10 4 x 1 Select the printer from the Printer List screen in Print Center or Printer Setup Utility 2 Click Printers on the Print Center or Printer Setup Utility menu bar and select Show ...

Page 41: ...RTANT If the optional hard disk unit is not installed on your printer note that the data in the memory are cleared when the printer is turned off 2 Disconnect all cables from the rear of the printer 3 Remove the tape and the bag holding the screws on the front of the optional 550 sheet feeder and then remove the screws from the bag 4 Place the optional 550 sheet feeder in the location that the pri...

Page 42: ...ws provided with the feeder with a coin or similar object NOTE The screw hole is located in 145 mm recess from the front of the printer 8 Insert the optional 550 sheet tray into the feeder and push until it stops IMPORTANT When you set the tray make sure that the bottom plate is lowered If the back side of the bottom plate is raised before setting the tray press the 1 to lower the plate 9 Repeat s...

Page 43: ...3 Hold the standard 550 sheet tray with both hands and remove it from the printer 14 Lift the printer and align the five guide pins of the optional 550 sheet feeder with the holes at the bottom of the printer Gently lower the printer onto the optional 550 sheet feeder IMPORTANT Be careful not to pinch your fingers when lowering the printer onto the optional 550 sheet feeder ...

Page 44: ...ray Doing so could damage the tray or the inside of the printer When you set the tray make sure that the bottom plate is lowered If the back side of the bottom plate is raised before setting the tray press the 1 to lower the plate 17 Insert the bypass tray into the printer push until it stops and close the cover 18 Apply the label to the upper part of the operator panel on the printer 19 Reconnect...

Page 45: ...r cord and re install the optional 550 sheet feeder 22 After loading paper in the optional 550 sheet feeder specify the paper type from the printer operator panel a Press the Menu button b Select Tray Settings and then press the button c Select Tray2 Tray3 or Tray4 and then press the button d Select Paper Type and then press the button e Select the paper type for the optional 550 sheet feeder and ...

Page 46: ...ect OK 5 Click Apply and then click OK 6 Close the Devices and Printers dialog box Windows Vista Windows Vista x64 1 Click Start Control Panel Hardware and Sound Printers 2 Right click the printer icon of the DocuPrint P455 d and select Properties 3 Click the Configuration tab and then select Bi Directional Setup 4 Select Get Information from Printer and then select OK 5 Click Apply and then click...

Page 47: ...ect the Print Fax in System Preferences 2 Select the printer in Printers list and click Options Supplies 3 Select Driver select the options that have been installed on the printers and then click OK Mac OS X 10 3 x 10 4 x 1 Select the printer from the Printer List screen in Print Center or Printer Setup Utility 2 Click Printers on the Print Center or Printer Setup Utility menu bar and select Show ...

Page 48: ...36 24 18 12 9 and 6 Mbps IEEE 802 11b 11 5 5 2 and 1 Mbps Security 64 40 bit key 128 104 bit key WEP WPA PSK TKIP AES WPA2 PSK AES Wi Fi Protected Setup WPS Push Button Configuration PBC Personal Identification Number PIN Fuji Xerox Co Ltd XXXX XXXXX DE4942Z4 1 Edition 1 June 2012 Printed in China Copyright 2012 by Fuji Xerox Co Ltd XXXX XXXXX Thank you for purchasing the Wireless Network Kit b g ...

Page 49: ...Recommended To install the wireless printer adapter using the video instructions on the Windows computer perform the following method 1 Insert the Driver CD Kit in your computer The Easy Install Navi file launches automatically 2 Select Optional Accessories Setup on the Easy Install Navi window ...

Page 50: ...50 Basic Operation 3 Click Wireless Network Kit b g n 4 Click the procedure you want to confirm to start the video instruction Follow the on screen instructions to install the wireless printer adapter ...

Page 51: ...ed when the printer is turned off 2 Align the connector and the three protrusions of the wireless printer adapter with the four holes and insert the adapter NOTE Ensure that the adapter is fully inserted and secured 3 Turn on the printer If a message displays telling you to make initial setup on the operator panel always do as instructed 4 Print the Printer Settings page to confirm the wireless pr...

Page 52: ...52 Basic Operation 5 Confirm that the Network Wireless section exists NOTE For more information on configuring the wireless printer adapter see Configuring Wireless Settings Windows Mac OS X on page 103 ...

Page 53: ...lled on your printer note that the data in the memory are cleared when the printer is turned off 2 Turn the screw on the control board cover counterclockwise NOTE Loosen the screw You do not need to remove the screw 3 Slide the control board cover towards the rear of the printer and remove the cover NOTE If the hard disk unit is installed remove it before installing the font ROM Re install the har...

Page 54: ...or toward the control board and then insert it into the slot 6 Push the font ROM firmly into the slot NOTE Ensure that the font ROM is firmly fixed in the slot and does not move easily 7 Align the guide on the control board cover with the slot around the control board and slide it towards the front of the printer ...

Page 55: ... by the printer a Press the Menu button b Select Report List and then press the button c Select PCL Fonts List and then press the button The PCL Fonts List page is printed 11 Confirm the TC SC fonts KR fonts or JP fonts listed in the PCL Fonts List page If the TC SC fonts KR fonts or JP fonts has not increased turn off the printer and re install the font ROM ...

Page 56: ...alled 1 Turn off the printer IMPORTANT If the optional hard disk unit is not installed on your printer note that the data in the memory are cleared when the printer is turned off 2 Turn the screw on the control board cover counterclockwise NOTE Loosen the screw You do not need to remove the screw 3 Slide the control board cover towards the rear of the printer and remove the cover 4 Insert the two ...

Page 57: ...rectly a Press the Menu button b Select Report List and then press the button c Select Printer Settings and then press the button The Printer Settings page is printed 10 Confirm the amount of Hard Disk is listed under Printer Options in the Printer Settings page If the Hard Disk is not listed turn off the printer unplug the power cord and re install the hard disk unit 11 If you installed the hard ...

Page 58: ...then click OK 6 Close the Devices and Printers dialog box Windows Vista Windows Vista x64 1 Click Start Control Panel Hardware and Sound Printers 2 Right click the printer icon of the DocuPrint P455 d and select Properties 3 Click the Configuration tab and then select Bi Directional Setup 4 Select Get Information from Printer and then select OK 5 Click Apply and then click OK 6 Close the Printers ...

Page 59: ...ect the Print Fax in System Preferences 2 Select the printer in Printers list box and click Options Supplies 3 Select Driver select the options that have been installed on the printer and then click OK Mac OS X 10 3 x 10 4 x 1 Select the printer from the Printer List screen in Print Center or Printer Setup Utility 2 Click Printers on the Print Center or Printer Setup Utility menu bar and select Sh...

Page 60: ...ension cords or power strips The printer should not be connected to an uninterrupted power supply UPS system 1 Connect the power cord to the power connector on the rear of your printer 2 Connect the other end of the power cord to the power source 3 Turn on the printer ...

Page 61: ...ings Page The Panel Settings page shows current settings for the operator panel menus 1 Press the Menu button 2 Select Report List and then press the button 3 Select Panel Settings and then press the button The Panel Settings page is printed ...

Page 62: ...ated The printer can switch from the ready to print state to the Low Power mode without waiting right after pressing Energy Saver button Press Energy Saver button to switch to Power Saver mode to save electricity NOTE The functions of Low Power mode and Sleep mode cannot be disabled See also Setting the Power Saver Time Option on page 198 Exiting the Power Saver Mode The printer automatically exit...

Page 63: ...hipped with your printer to install a combination of software programs depending on your operating system This chapter includes Print Drivers on page 64 CentreWare Internet Services on page 65 SimpleMonitor Windows Only on page 66 Setup Disk Creation Tool Windows Only on page 67 ...

Page 64: ...Drivers To access all of your printer s features install the print drivers from the Driver CD Kit or PostScript Driver Library CD The print drivers enable your computer and printer to communicate and provide access to your printer features ...

Page 65: ...ey will not be able to save or apply any changes to the current configuration Creating an Administrative Password 1 Launch your web browser 2 Enter the IP address in the browser s address field and then press the Enter key 3 Click the Properties tab 4 In the left navigation panel scroll down to Security and select Administrator Settings 5 Select Enabled for Administrator Mode 6 In the Administrato...

Page 66: ...itor window alerts you when there is a warning or when an error occurs for example when a paper jam occurs or toner is running low By default the Status Monitor window launches when printing and an error occurs When an error occurs the error message appears on the Status Monitor window You can specify the conditions for starting the Status Monitor window in Auto start setup To change the pop up se...

Page 67: ...Up document settings Watermarks Font references If you want to install the print driver with the same settings on multiple computers running the same operating system create a setup disk in a floppy disk or in a server on the network Using the setup disk that you have created will reduce the amount of work required when installing the print driver Install the print driver in the computer on which ...

Page 68: ...68 Printer Management Software ...

Page 69: ...Configuration on page 70 Connecting Your Printer on page 71 Setting the IP Address on page 74 Installing Print Driver on Computers Running Windows on page 78 Installing Print Driver on Computers Running Mac OS X on page 96 Installing Print Driver on Computers Running Linux CUPS on page 97 Configuring Wireless Settings Windows Mac OS X on page 103 ...

Page 70: ... the printer s TCP IP address which is required to identify the printer on the network Microsoft Windows operating systems Run the IP address setting tool on the Driver CD Kit to set the printer s IP address if the printer is connected to an established TCP IP network You can also manually set the printer s IP address on the operator panel Mac OS X and Linux systems Manually set the printer s TCP ...

Page 71: ... Your printer interconnection cables must meet the following requirements Connection Type Connection Specifications USB USB 2 0 Ethernet 1000BASE T 100BASE TX 10BASE T Wireless optional IEEE 802 11b 802 11g 802 11n 1 Ethernet port 2 USB port 3 Wireless adapter socket 1 2 3 ...

Page 72: ...3 To connect the printer to a computer 1 Connect the smaller USB connector into the USB port on the rear of the printer and the other end of the cable into a USB port of the computer NOTE Ensure that you match the USB symbol on the cable to the USB symbol on the printer Do not connect the printer USB cable to the USB port available on the keyboard Connection Type Available Features USB When connec...

Page 73: ...rinter and the other end to a LAN drop or hub Wireless Network Connection To set up a wireless connection insert the optional wireless printer adapter into the wireless adapter socket on the rear of the printer For details about wireless connection see Installing the Optional Wireless Printer Adapter on page 48 NOTE To use the wireless printer adapter be sure to disconnect the Ethernet cable ...

Page 74: ...t not the same only the last digit needs to be different For example your printer can have the address 192 168 1 2 while your computer has the address 192 168 1 3 Another device can have the address 192 168 1 4 Many networks have a Dynamic Host Configuration Protocol DHCP server A DHCP server automatically programs an IP address into every computer and printer on the network that is configured to ...

Page 75: ...ss the Menu button 2 Select Admin Menu and then press the button 3 Select Network Setup and then press the button 4 Select TCP IP and then press the button 5 Select IPv4 and then press the button 6 Select Get IP Address and then press the button 7 Select DHCP Autonet and then press the button 8 Turn off and turn on the printer IMPORTANT If the optional hard disk unit is not installed on your print...

Page 76: ...d then press the button 7 Select IPv4 and then press the button 8 Select Get IP Address and then press the button 9 Select Panel and then press the button 10 Ensure that the message Restart Printer to apply setting appears and then press the Back button twice 11 Select IP Address and then press the button The cursor is located at the first octet of the IP address 12 Specify the value of the IP add...

Page 77: ...erify if the printer is active on the network run the ping command in your computer 1 Click Start All Programs Accessories Run 2 Enter cmd and then click OK A black window is displayed 3 Enter ping xx xx xx xx where xx xx xx xx is the IP address of your printer and then press the Enter key Reply from the IP address denotes printer is active on the network See also Printing and Checking the Printer...

Page 78: ...er Settings page to check the IP address of your printer This section includes The Operator Panel on page 78 Changing the Firewall Settings Before Installing Your Printer on page 79 The Operator Panel 1 Press the Menu button 2 Select Report List and then press the button 3 Select Printer Settings and then press the button The Printer Settings page is printed 4 Find the IP address next to IP Addres...

Page 79: ...ettings 7 Click Allow another program 8 Click Browse 9 Click D setup exe where D is the drive letter of the optical drive in the File name text box and then click Open 10 Click Add 11 Click OK Inserting the CD ROM For Installing PCL 6 Driver 1 Insert the Driver CD Kit into your computer to start Easy Install Navi NOTE If the CD does not automatically launch click Start start for Windows XP All Pro...

Page 80: ... R2 Windows 7 and Windows 7 64 bit Edition Windows Vista or Windows Vista 64 bit Edition 1 Click Start Control Panel Hardware and Sound Printers 2 Click Add a printer 3 Click Add a local printer 4 Select the port connected to your printer and then click Next 5 Click Have Disk to display the Install From Disk dialog box 6 Click Browse and then select the extracted setup information inf file in For ...

Page 81: ...nstallation starts 12 If you do not share your printer select Do not share this printer If you share your printer select Share this printer so that others on your network can find and use it 13 Click Next 14 As the driver installation is completed click Print a test page to print a test page 15 Click Finish Windows 7 Windows 7 64 bit Edition or Windows Server 2008 R2 1 Click Start Devices and Prin...

Page 82: ...ver installation is completed click Print a test page to print a test page 15 Click Finish Network Connection Setup NOTE To use this printer in a Linux environment you need to install a Linux driver For more information on how to install and use these see also Installing Print Driver on Computers Running Linux CUPS on page 97 For Installing PCL 6 Driver 1 On the top screen of Easy Install Navi cli...

Page 83: ...TCP IP address or host name and then click Next 6 Select TCP IP Device from Device type and enter the IP address for Hostname or IP address and then click Next If the User Account Control dialog box appears click Continue NOTE If you are an administrator on the computer click Continue otherwise contact your administrator to continue the desired action 7 Click Have Disk to display the Install From ...

Page 84: ...nue NOTE If you are an administrator on the computer click Continue otherwise contact your administrator to continue the desired action 7 Click Have Disk to display the Install From Disk dialog box 8 Click Browse and then select the extracted setup information inf file in For Installing XML Paper Specification XPS Print Driver on page 79 9 Click Open 10 Click OK 11 Select your printer name and cli...

Page 85: ...action 5 Click Have Disk to display the Install From Disk dialog box 6 Click Browse and then select the extracted setup information inf file in For Installing XML Paper Specification XPS Print Driver on page 79 7 Click Open 8 Click OK 9 Select your printer name and click Next 10 To change the printer name enter the printer name in the Printer name box and then click Next Installation starts 11 If ...

Page 86: ...ver on page 79 9 Click Open 10 Click OK 11 Select your printer name and click Next 12 To change the printer name enter the printer name in the Printer name box and then click Next Installation starts 13 If you do not share your printer select Do not share this printer If you share your printer select Share this printer so that others on your network can find and use it 14 Click Next 15 To use this...

Page 87: ...ating systems of all network clients that print to the printer 5 Click OK If you are missing files you are prompted to insert the server operating system CD 6 Click Apply and then click OK For Windows Vista and Windows Vista 64 bit Edition 1 Click Start Control Panel Hardware and Sound Printers 2 Right click the printer icon and select Sharing 3 Click Change sharing options The message Windows nee...

Page 88: ... select the operating systems of all network clients that print to the printer 5 Click OK 6 Click Apply and then click OK To confirm that the printer is properly shared Ensure that the printer object in the Printers Printers and Faxes or Devices and Printers folder is shared The shared icon is shown under the printer icon Browse Network or My Network Places Find the host name of the server and the...

Page 89: ...hen double click the host name 3 Right click the shared printer name and then click Connect Wait for the driver information to be copied from the server computer to the client computer and for a new printer object to be added to the Printers and Faxes folder The copy time varies based on network traffic and other factors 4 Close My Network Places 5 Print a test page to verify installation a Click ...

Page 90: ... the printer you just created and click Properties d On the General tab click Print Test Page When a test page prints successfully installation is complete For Windows Server 2008 and Windows Server 2008 64 bit Edition 1 On the Windows desktop of the client computer click Start Network 2 Locate the host name of the server computer and then double click the host name 3 Right click the shared printe...

Page 91: ...ter name and then click Connect 4 Click Install driver 5 Wait for the driver information to be copied from the server computer to the client computer and for a new printer object to be added to the Devices and Printers folder The time this takes varies based on network traffic and other factors 6 Print a test page to verify installation a Click Start Devices and Printers b Right click the printer ...

Page 92: ... The printer that I want isn t listed a Click Connect to this printer or to browse for a printer select this option and click Next b Enter the path of the printer in the text box and then click Next The server host name is the name of the server computer that identifies it on the network The shared printer name is the name assigned during the server installation process 5 Click Browse for a printe...

Page 93: ...ter in the text box and then click Next The server host name is the name of the server computer that identifies it on the network The shared printer name is the name assigned during the server installation process If this is a new printer you may be prompted to install a print driver If no system driver is available you need to specify the path to available drivers 4 Specify the following settings...

Page 94: ...n the text box and then click Next For example server host name shared printer name The server host name is the name of the server computer that identifies it on the network The shared printer name is the name assigned during the server installation process If this is a new printer you may be prompted to install a print driver If no system driver is available you will need to provide a path to ava...

Page 95: ...erver host name is the name of the server computer that identifies it to the network The shared printer name is the name assigned during the server installation process If this is a new printer you may be prompted to install a print driver If no system driver is available you will need to provide the path to the available driver 4 Confirm the printer name and then click Next 5 Specify the followin...

Page 96: ...96 Printer Connection and Software Installation Installing Print Driver on Computers Running Mac OS X For information on how to install the print driver refer to the PostScript User Guide ...

Page 97: ...inux 5 6 Desktop x86 on page 97 For SUSE Linux Enterprise Desktop 10 11 x86 on page 97 NOTE The print driver Fuji_Xerox DocuPrint_P455 x x x noarch rpm is included in the linux folder in the Eng folder on the Driver CD Kit For Red Hat Enterprise Linux 5 6 Desktop x86 The following procedure uses Red Hat Enterprise Linux 6 Desktop x86 as an example 1 Copy the rpm file from Eng linux folder on the D...

Page 98: ...ters menu and then click Continue b Enter the IP address of the printer in Connection Format lpd xxx xxx xxx xxx the IP address of the printer c Click Continue d Enter the name of the printer in Name in the Add Printer window and then click Continue You can optionally specify the location and description of the printer for further information If you want to share the printer select the Share This ...

Page 99: ...Printer Configuration dialog box opens The printer name is displayed in the Determine Connection list b Select DocuPrint XXX vx x FujiXerox Fuji_Xerox_DocuPrint ppd gz from the Assign Driver list NOTE You can specify the printer name in Set Name 4 Confirm the settings and then click OK Setting the Default Queue For Red Hat Enterprise Linux 5 6 Desktop x86 The following procedure uses Red Hat Enter...

Page 100: ...Modify Printer 7 Specify the required settings and click Continue or Modify Printer The message Printer xxx has been modified successfully appears The setting is complete For SUSE Linux Enterprise Desktop 10 11 x86 The following procedure uses SUSE Linux Enterprise Desktop 11 x86 as an example 1 Open a web browser 2 Enter http localhost 631 admin in the address bar and press the Enter key 3 Enter ...

Page 101: ...ed Hat Enterprise Linux 5 6 Desktop x86 The following procedure uses Red Hat Enterprise Linux 6 Desktop x86 as an example 1 Select Applications System Tools Terminal 2 Enter the following command in the terminal window to delete the print queue 3 Repeat the command above for all queues for the same model 4 Enter the following command in the terminal window The print driver is uninstalled su Enter ...

Page 102: ...ications and select GNOME Terminal on Application Browser 2 Enter the following command in the terminal window to delete the print queue 3 Repeat the command above for all queues for the same model 4 Enter the following command in the terminal window The print driver is uninstalled su Enter the administrator password usr sbin lpadmin x Enter the print queue name rpm e Fuji_Xerox DocuPrint_P455 x x...

Page 103: ...the wireless network with up to 32 alphanumeric characters Network Mode Specifies the network mode from Ad hoc or Infrastructure Security Settings Security Selects the encryption method from No Security Mixed mode PSK WPA PSK TKIP WPA PSK AES WPA2 PSK AES and WEP Transmit Key Specifies the transmit WEP key from the list WEP Key Specifies the WEP key used through the wireless network only when WEP ...

Page 104: ...sing that tool If the Panel Lock Set is set to Enable you need to enter the four digit password to enter the Admin Menu menu Wizard Setup through Windows Only USB cable recommended WPS PBC 1 WPS PIN 2 Operator Panel Ethernet Cable CentreWare Internet Services Non Wizard Setup through WPS PBC 1 WPS PIN 2 Operator Panel CentreWare Internet Services 1 WPS PBC Wi Fi Protected Setup Push Button Configu...

Page 105: ...nter adapter with the following connection methods USB cable WPS PBC WPS PIN Operator Panel Ethernet Cable CentreWare Internet Services The following procedure uses USB cable for connection method as an example 1 Insert the Driver CD Kit provided with the printer in your computer Easy Install Navi launches automatically 2 Click Optional Accessories Setup ...

Page 106: ...106 Printer Connection and Software Installation 3 Click Wireless Network Kit b g n 4 Click Start wireless settings ...

Page 107: ...Printer Connection and Software Installation 107 5 Click Wireless Configuration 6 Select Wizard and then click Next ...

Page 108: ...Printer Adapter For Mac OS X you can configure a wireless settings only through non wizard setup NOTE The optional wireless printer adapter must be installed on the printer For details about installing a wireless printer adapter see Installing the Optional Wireless Printer Adapter on page 48 You can configure the wireless printer adapter with the following connection methods WPS PBC WPS PIN Operat...

Page 109: ...e of WPS PIN can only be configured from the operator panel NOTE WPS PIN Wi Fi Protected Setup Personal Identification Number is a method to authenticate and register devices required for wireless configuration by entering PIN assignments to a printer and computer This setting performed through an access point is available only when the access points of your wireless router supports WPS Before WPS...

Page 110: ... printer note that the data in the memory are cleared when the printer is turned off Manual SSID Setup 1 Press the Menu button 2 Select Admin Menu and then press the button 3 Select Network Setup and then press the button 4 Select Wireless Setup and then press the button 5 Select Manual Setup and then press the button 6 Enter the SSID and then press the button 7 Select the network mode from Infras...

Page 111: ...T Be sure to use one of the supported encryption methods to protect your network traffic 10 Enter the WEP key and then press the button 11 Select the desired transmit key from WEP Key 1 to WEP Key 4 and then press the button The Restart Printer to apply setting message appears 12 Turn off the printer and turn it on again to apply the settings Wireless settings are correctly configured IMPORTANT If...

Page 112: ...e Network Type drop down menu 9 Select the encryption method from WEP 128 bit HEX 26 Bytes WEP 128 bit ASCII 13 Bytes WEP 64 bit HEX 10 Bytes WEP 64 bit ASCII 5 Bytes WPA PSK AES WPA2 PSK AES WPA PSK TKIP and Mixed Mode PSK in the Encryption drop down menu and then set each item for the encryption method selected IMPORTANT Be sure to use one of the supported encryption methods to protect your netw...

Page 113: ...ort List and then press the button c Select Printer Settings and then press the button The Printer Settings page is printed d Confirm the IP address next to IP Address under Network Wireless on the Printer Settings page 2 Launch the CentreWare Internet Services by entering the IP address of the printer in your web browser 3 Click the Properties tab 4 Click Wireless 5 Change the wireless settings o...

Page 114: ...114 Printer Connection and Software Installation ...

Page 115: ...udes About Print Media on page 116 Supported Print Media on page 118 Loading Print Media on page 122 Setting Paper Sizes and Types on page 131 Printing on page 132 Printing With Web Services on Devices WSD on page 150 Using Digital Certificates on page 152 ...

Page 116: ...her specialty media before loading in the paper tray Do not print on label stock once a label has been removed from a sheet Use only paper envelopes Do not use envelopes with windows metal clasps or adhesives with release strips Print all envelopes single sided only Some wrinkling and embossing may occur when printing envelopes Do not overload the paper tray Do not load print media above the fill ...

Page 117: ...re print media in an environment where the temperature is approximately 70 F 21 C and the relative humidity is 40 Store print media in dark cool relatively dry locations Most paper items are susceptible to damage from ultraviolet UV and visible light UV radiation which is emitted by the sun and fluorescent bulbs is particularly damaging to paper items The intensity and length of exposure to visibl...

Page 118: ...ypass Tray XML Paper Specification XPS driver does not support custom size paper Paper Size A4 SEF 210 297 mm B5 SEF 182 257 mm A5 SEF 148 210 mm Letter SEF 8 5 11 inches Executive SEF 7 25 10 5 inches Folio SEF 8 5 13 inches Legal SEF 8 5 14 inches Com 10 Envelope SEF 4 125 9 5 inches Monarch Envelope SEF 3 875 7 5 inches DL Envelope SEF 110 220 mm C5 Envelope SEF 162 229 mm Custom size Width 76 ...

Page 119: ...rint Media in the Bypass Tray on page 126 Loading Small Print Media in the Bypass Tray on page 127 Loading Envelope in the Bypass Tray on page 129 Loading Letterhead in the Bypass Tray on page 130 Printing on print media that differs from the paper size or paper type selected on the print driver or loading print media into an unsuitable paper tray for printing may lead to paper jams To ensure that...

Page 120: ...tter Plain Hammermill Tidal MP Letter Plain Cascade X 9000 Folio Plain Cascade X 9000 Statement Plain Xerox Color Xpressions Select Legal 24 lb Plain Thick XeroxBusiness4200 Letter Plain Thick Hammermill Writing Bond Letter Plain Thick Hammermill Laser Print Letter Plain Thick GP Laser1000 Executive Plain Thick Xerox Color Xpressions Elite Letter 28 lb Plain Thick XeroxBusiness4200 Letter Plain Th...

Page 121: ... Thick Fuji Xerox JD A4 98 gsm Plain Thick Double sided paper suitable for a variety of uses including brochures and booklet Fuji Xerox JD B5 Plain Thick Special Paper Label A4 Label Labels Labels 24 Page A4 Labels Labels A4 Labels Label A4 Labels Avery Labels 5165 Letter Labels Colombia Brand Com 10 Envelope Envelope PrintMaster White Wove 24 Monarch Monarch 98 4 190 5 Envelope River Series DL 11...

Page 122: ...eets of the standard paper For special paper there is a limitation of the following From the bottom of the tray up to 20 mm height standard 550 sheet tray From the bottom of the tray up to 10 mm height bypass tray Print Media Dimensions The maximum dimensions of print media that the standard 550 sheet tray and the optional 550 sheet feeder can handle are Width 139 7 mm 5 5 inches to 215 9 mm 8 5 i...

Page 123: ...e printing is in progress Use only laser print media Do not use ink jet print media in your printer 1 Pull the tray out of the printer about 200 mm 2 Hold the tray with both hands and remove it from the printer 3 Adjust the paper guides NOTE When loading Legal size or user specified print media slide the extendable part of the tray while pinching the lever ...

Page 124: ...dth guides and length guide against the edges of the print media 7 Make sure that the paper is set properly by pressing down the paper from top 8 After confirming that the guides are securely adjusted insert the tray into the printer IMPORTANT Do not use excessive force on the tray Doing so could damage the tray or inside of the printer NOTE If the front side of the tray is extended the tray protr...

Page 125: ...ess the button Loading Letterhead in the Standard 550 Sheet Tray and the Optional 550 Sheet Feeder When you use the standard 550 sheet tray and the optional 550 sheet feeder letterhead and hole punched paper must be inserted top edge first with the print side facing up ...

Page 126: ...rst into the bypass tray NOTE Do not force the print media into the bypass tray 4 Slide both width guides until they rest lightly against the edge of the print media stack NOTE Do not force the print media into the bypass tray 5 On the operator panel select the appropriate paper size and then press the button NOTE If you use the driver setting select Use Driver Settings 6 Select the appropriate pa...

Page 127: ...inter 1 Gently pull open the bypass tray cover 2 Grasp both sides of the bypass tray and then pull the bypass tray from the printer 3 Slide the width guides to the edge of the tray The width guides should be fully extended 4 Pull up the length guide and slide it toward the bypass tray cover until it stops 5 Load the print media into the bypass tray with the recommended print side facing up so that...

Page 128: ... the print media 7 Insert the bypass tray into the printer 8 On the operator panel select the appropriate paper size and then press the button NOTE If you use the driver setting select Use Driver Settings 9 Select the appropriate paper type and then press the button ...

Page 129: ...e envelopes in the bypass tray Com 10 DL Load the envelopes short edge feed with the flaps closed and the print side up Ensure that the flaps come at the right when you face towards the printer Monarch You need to pull up and slide the length guide Load the envelopes short edge feed with the flaps closed and the print side up Ensure that the flaps come at the right when you face towards the printe...

Page 130: ...For more guidelines on print media see Print Media Usage Guidelines on page 116 Do not add or remove print media when there is still print media in the bypass tray or when the printer is printing from the bypass tray This may result in a paper jam Print media should be loaded with the recommended print side up and the top of the print media going into the bypass tray first Do not place objects on ...

Page 131: ...paper size and type on the operator panel 4 Select Paper Size and then press the button 5 Select the correct paper size for the print media loaded and then press the button Setting Paper Types IMPORTANT Paper type settings must match those of the actual print media loaded in the tray or the feeder Otherwise print quality problems can occur 1 On the operator panel press the Menu button 2 Select Tra...

Page 132: ...river opens Select the appropriate settings for the specific job that you are sending to print Print settings selected from the driver override the default menu settings selected from the operator panel You may need to click Preferences from the initial Print box to see all of the available system settings you can change If you are not familiar with a feature in the print driver window open the He...

Page 133: ...ter icon A list of print jobs appears in the printer window 2 Select the job you want to cancel 3 Press Delete key on the keyboard 4 Click Yes on the Printers dialog box to cancel a print job Canceling a Job From the Desktop 1 Click start Printers and Faxes for Windows XP Click Start Printers and Faxes for Windows Server 2003 Click Start Devices and Printers for Windows 7 and Windows Server 2008 R...

Page 134: ...You can store print jobs secured with a passcode in the memory Users with the passcode can print them from the operator panel This feature can be used to print confidential documents You can select whether to delete the stored job after printing Otherwise the stored jobs remain in the memory until you delete them from the operator panel or turn off the printer or in the hard disk until you delete ...

Page 135: ...er ID from a list Secure Print requires the passcode you specified in the driver when you sent the job To print the stored documents use the procedure below 1 Press the button 2 Select Secure Print or Sample Print and then press the button 3 Select your user ID and then press the button If you select Secure Print go to step 4 If you select Sample Print go to step 5 4 Enter the passcode you specifi...

Page 136: ... selected to do so on the operator panel Otherwise the job remains stored until you delete them on the operator panel or turn off the printer NOTE The data in the memory is cleared when the printer is turned off The data on the optional hard disk unit is not cleared even when the printer is turned off ...

Page 137: ...epending on how they are created In such case open the files and print them using a print driver Using the ContentsBridge Utility The ContentsBridge Utility is software that enables direct printing of PDF files by simply dragging and dropping files onto the icon To use the ContentsBridge Utility refer to the manual included on the Driver CD Kit Using the Commands You can also print PDF files using...

Page 138: ...le Example Printing event pdf when the printer s IP address is 192 168 1 100 Using the ftp command In the command prompt enter the ftp command as described in the following example Example Printing event pdf when the printer s IP address is 192 168 1 100 C lpr S 192 168 1 100 P lp event pdf C ftp 192 168 1 100 Connected to 192 168 1 100 220 FUJI XEROX DocuPrint XXXX User 192 168 1 100 none 331 Pas...

Page 139: ...lick start Printers and Faxes for Windows XP Click Start Printers and Faxes for Windows Server 2003 Click Start Devices and Printers for Windows 7 and Windows Server 2008 R2 Click Start Control Panel Hardware and Sound Printers for Windows Vista Click Start Control Panel Printers for Windows Server 2008 A list of available printers appears 2 Right click the printer and select Printing preferences ...

Page 140: ...cation XPS driver or the PS driver is used the Booklet Print feature is not available For details on the 2 Sided Print option see 2 Sided Print on page 140 2 Sided Print Assumes binding along the long edge of the page left edge for portrait orientation and top edge for landscape orientation The following illustration shows long edge binding for portrait and landscape pages 2 Sided Print Flip on Sh...

Page 141: ...erences The printer s Printing Preferences screen appears 3 Make selections on the driver tabs and then click OK to save your selections NOTE For more information about Windows print driver options click Help on the print driver tab to view the help Selecting Options for an Individual Job Windows If you want to use special printing options for a particular job change the driver settings before sen...

Page 142: ...arators Output Saved Settings Envelope Paper Setup Wizard Status Defaults Default All Image Options tab Image Quality Image Settings Application Reduce Enlarge Toner Saver Margins Screen Image Shift Summary Tone Balance Defaults Layout Watermark tab Page Layout Pages Per Sheet N Up Poster Booklet Layout Page Layout Options Background Form Watermark Annotation Defaults Advanced tab Advanced Setting...

Page 143: ...s To print jobs using specific printer settings click the applicable saved preset in the Presets menu 4 Click Print to print the job Mac OS X Print Driver Printing Options The table shown below uses Mac OS X 10 6 TextEdit as an example Printing options for Mac OS X Item Printing Options Copies Collated Two Sided Pages Paper Size Orientation Layout Pages per Sheet Layout Direction Border Two Sided ...

Page 144: ...th 127 mm 5 inches to 355 6 mm 14 inches XML Paper Specification XPS driver does not support custom size paper See also Loading Print Media in the Standard 550 Sheet Tray and the Optional 550 Sheet Feeder on page 123 Loading Print Media in the Bypass Tray on page 126 Setting Paper Sizes and Types on page 131 Watermark Watermark Edit Delete New Print on Page 1 only Defaults Printer Features Feature...

Page 145: ...thout the rights of administrator can only view the contents 1 Click Start Devices and Printers 2 Right click the printer and then select Printer properties 3 Select the Device Settings tab 4 Select Custom Paper Size and click Setup 5 Select the Create a New Form check box 6 Enter a name for the custom paper size in Name Up to 31 characters can be used for the paper name 7 Specify the values for W...

Page 146: ...ears Specify the orientation of the paper set on the bypass tray 6 Select the size of the original document from Original Document Size 7 Specify Scale Options If you select the custom paper size from Original Document Size in step 6 select No Scaling and go to step 9 If you select the standard paper size from Original Document Size in step 6 select Automatically Scale and go to step 8 8 Select th...

Page 147: ...be used as well as an account management that can be used to control usage based on authentication The following illustration shows how the printer works with Auditron NOTE You can configure the printer s Auditron settings with CentreWare Internet Services For more information refer to the online Help of CentreWare Internet Services To print using Auditron you need to set the print driver For more...

Page 148: ...cific 4 Select SimpleMonitor Help See also SimpleMonitor Windows Only on page 66 Checking Status in CentreWare Internet Services Windows Mac OS X You can check the status of the print job sent to the printer at the Jobs tab of CentreWare Internet Services See also Printer Management Software on page 63 Printing a Report Page You can print a various types of reports and lists For details on each re...

Page 149: ...etting 1 Press the Menu button 2 Select the desired menu and then press the button 3 Select the desired menu or menu item and then press the button If the selection is a menu the menu is opened and the first menu item in the menu appears If the selection is a menu item the current user setting for the menu item appears with an asterisk Each menu item has a list of values for the menu item A value ...

Page 150: ...ces to the Windows Server 2008 or Windows Server 2008 R2 client For Windows Server 2008 1 Click Start Administrative Tools Server Manager 2 Select Add Roles from the Action menu 3 Select the Print Services check box on the Server Roles window in the Add Roles Wizard and then click Next 4 Click Next 5 Select the Print Server check box and then click Next 6 Click Install For Windows Server 2008 R2 1...

Page 151: ...isn t listed 2 Select Add a printer using a TCP IP address or hostname and click Next 3 Select Web Services Device from Device type 4 Enter the printer s IP address in Hostname or IP address and click Next Before installing the driver using the Add Printer wizard on Windows Server 2008 R2 or Windows 7 perform one of the following Establish the Internet connection so that Windows Update can scan yo...

Page 152: ...ate on page 155 Confirming the Settings of a Digital Certificate on page 155 Deleting a Digital Certificate on page 156 Exporting a Digital Certificate on page 157 NOTE The external certificate management described in this section is enabled only when the optional hard disk unit is installed and Data Encryption is set to On Preparing to Manage Certificates Before managing digital certificates the ...

Page 153: ... press the button 8 The Initialize HDD Are You Sure message appears When you confirm that all stored documents will be deleted to change the encryption setting press the button to change the setting When you quit changing encryption setting press the button Setting HTTPS Communication Before managing certificates set HTTPS communication with a self signed certificate using CentreWare Internet Serv...

Page 154: ...re importing a certificate file back up the certificate file NOTE To manage digital certificates you must first set encryption of the optional hard disk unit to On and then set up HTTPS communication For details see Preparing to Manage Certificates on page 152 Be sure to import the certificate with Internet Explorer After importing a PKCS 12 format certificate the secret key is not exported even i...

Page 155: ... Certificate Management button is displayed only when the optional hard disk unit is installed and Data Encryption is set to On 6 Select Local Device 7 Select the purpose of use from the Certificate Purpose list 8 Click Display the List to display the Certificate List page NOTE If the list includes more than 20 certificates click Next to display the next page 9 Select the certificate to associate ...

Page 156: ...rst set encryption of the optional hard disk unit to On and then set up HTTPS communication For details see Preparing to Manage Certificates on page 152 1 Launch your web browser 2 Enter the IP address of the printer in the address bar and then press the Enter key NOTE To access CentreWare Internet Services when data encryption is enabled enter https before its address instead of http Example http...

Page 157: ...nce the secret key is not exported an imported PKCS 12 format certificate can be exported only as a PKCS 7 certificate 1 Launch your web browser 2 Enter the IP address of the printer in the address bar and then press the Enter key NOTE To access CentreWare Internet Services when data encryption is enabled enter https before its address instead of http Example https 192 168 1 100 The printer s web ...

Page 158: ...a Digital Certificate on page 155 4 Launch CentreWare Internet Services 5 Click the Properties tab 6 In the left navigation panel scroll down to Security and select IP sec 7 Select the Enabled check box for Protocol 8 Select Digital Signature from the IKE Authentication Method list 9 Set each item as necessary 10 Click Apply 11 After restarting the printer IPsec communication using digital signatu...

Page 159: ...p HTTPS communication For details see Preparing to Manage Certificates on page 152 This feature is enabled only when Enable is set for IEEE 802 1x EAP TLS 1 Import a certificate to be used with SSL Client See also Importing a Digital Certificate on page 154 2 Set a certificate to be used with SSL Client See also Setting a Digital Certificate on page 155 3 Confirm whether the certificate is set cor...

Page 160: ...160 Printing Basics ...

Page 161: ...he Operator Panel Menus This chapter includes Understanding the Printer Menus on page 162 Panel Lock Function on page 196 Changing the Language on page 197 Setting the Power Saver Time Option on page 198 Resetting to Factory Defaults on page 199 ...

Page 162: ...s Purpose To print a list of the current user default values the installed options the amount of installed print memory and the status of printer supplies Panel Settings Purpose To print a detailed list of all the settings on the operator panel menus PCL Fonts List Purpose To print a sample of the available PCL fonts PCL Macros List Purpose To print the information on the downloaded PCL macros PS ...

Page 163: ...tem always shows 0 on your printer Admin Menu Use the Admin Menu menu to configure a variety of printer features PCL Settings Use the PCL Settings menu to change printer settings that only affect jobs using the PCL emulation printer language NOTE Values marked by an asterisk are the factory default menu settings Paper Tray Purpose To specify the default paper tray Values 1 Tray2 Tray3 and Tray4 ar...

Page 164: ...x210 B5 182x257 Letter 8 5x11 Folio 8 5x13 Legal 8 5x14 Executive Monarch Env DL Env 110x220 C5 Env 162x229 10Env 4 1x9 5 New Custom Size Portrait Y 297 mm Specifies the length of the custom size paper 127 355 mm Landscape X 210 mm Specifies the width of the custom size paper 77 215 mm Letter 8 5x11 1 Folio 8 5x13 Legal 8 5x14 Executive A4 210x297 A5 148x210 B5 182x257 Monarch Env DL Env 110x220 C...

Page 165: ... LetterGothic It CourierPS Ob CG Times Bd LetterGothic Bd CourierPS Bd CG Times BdIt Albertus Md CourierPS BdOb Univers Md Albertus XBd SymbolPS Univers MdIt Clarendon Cd Palatino Roman Univers Bd Coronet Palatino It Univers BdIt Marigold Palatino Bd Univers MdCd Arial Palatino BdIt Univers MdCdIt Arial It ITCBookman Lt Univers BdCd Arial Bd ITCBookman LtIt Univers BdCdIt Arial BdIt ITCBookmanDm A...

Page 166: ...r nonscheduled mono spaced fonts the pitch is displayed but cannot be changed NOTE The Font Pitch menu is only displayed for fixed or mono spaced fonts Form Line Purpose To set the number of lines in a page Values 1 Denotes region specific factory default values The printer sets the amount of space between each line vertical line spacing based on the Form Line and Orientation menu items Select the...

Page 167: ...r by printing in the draft mode The print quality is reduced when you print in the draft mode Values LineTermination Purpose To add the line termination commands Values Ignore FormFeed Purpose To specify whether to ignore blank pages that only contain Form Feed control codes Values Disable Disables the Hex Dump feature Enable Enables the Hex Dump feature Disable Does not print in the draft mode En...

Page 168: ...lue Password Purpose To specify the password to print the secure PDF Value Off Disables A4 Wide On Enables A4 Wide 1sets Sets the value in increments of 1 1 999sets 1 Sided Prints on one side of a sheet of paper Long Edge Flip Prints on both sides of a sheet of paper to be bound by long edge Short Edge Flip Prints on both sides of a sheet of paper to be bound by short edge Normal For documents wit...

Page 169: ...nguage NOTE Values marked by an asterisk are the factory default menu settings PS Error Report Purpose To specify whether to print the contents of PostScript errors The change becomes effective after the printer is turned off and then on again Values NOTE Instructions from the PS driver override the settings specified on the operator panel Off Does not sort the job On Sorts the job A4 210x297 1 Le...

Page 170: ...speed and the duplex settings of Ethernet The change becomes effective after the printer is turned off and then on again Values Wireless Status NOTE Wireless Status feature is available only when the printer is connected using the wireless network Purpose To confirm the wireless communication status Values Off Job time out does not occur On 1min A PostScript error occurs if processing is not compl...

Page 171: ...reless setup You can also specify and configure the wireless network manually Values Select access Select the desired access point from the list or select Manual Setup to specify and configure wireless network manually PassPhraseEntry Displayed when the selected access point uses the security method of WPA PSK TKIP or WPA2 PSK AES Specify the pass phrase of 8 to 63 alphanumeric characters WEP Key ...

Page 172: ...hrase for WPA PSK TKIP Enter 8 to 63 alphanumeric characters WPA2 PSK AES Select to configure the wireless setting with the security method of WPA2 PSK AES PassPhrase Entry Specify the pass phrase for WPA2 PSK AES Enter 8 to 63 alphanumeric characters WEP Select to configure the wireless setting with the security method of WEP WEP Key Specify the WEP Key to use through the wireless network Enter 1...

Page 173: ... Purpose To initialize wireless network settings After executing this function and rebooting the printer all wireless network settings are reset to their default values Push Btn Ctrl Cancel Cancels the wireless setting with the security method of WPS PBC Start Starts the wireless setting with the security method of WPS PBC PIN Code Start Config Configures the wireless setting using the PIN code as...

Page 174: ...ss manually on the operator panel IP Address When an IP address is being set manually the IP is allocated to the printer using the format nnn nnn nnn nnn Each octet that makes up nnn nnn nnn nnn is a value in the range of 0 to 254 127 and any value in the range of 224 to 254 cannot be specified for the first octet of a gateway address Subnet Mask When an IP address is being set manually the subnet...

Page 175: ...rt Enable Enables IPP port SMB TCP IP Disable Disables SMB TCP IP port Enable Enables SMB TCP IP port SMB NetBEUI Disable Disables SMB Net BEUI port Enable Enables SMB Net BEUI port WSD Disable Disables WSD port Enable Enables WSD port SNMP UDP IP Disable Disables the Simple Network Management Protocol SNMP UDP port Enable Enables the SNMP UDP port StatusMessenger Disable Disables the Status Messe...

Page 176: ...lel interface you can configure the Adobe Protocol settings for the wired network The change becomes effective after the printer is turned off and then on again Values USB Settings Use the USB Settings menu to change printer settings affecting a USB port NOTE Values marked by an asterisk are the factory default menu settings Port Status NOTE Port Status feature is available only for the USB port o...

Page 177: ...ly returns to the standby mode from the Power Saver mode when it receives data from the computer You can also change the status of the printer to the standby mode by pressing the Energy Saver button on the operator panel Auto Reset Purpose To automatically reset the settings to the default settings and return to the standby mode after you do not specify any settings for the specified time Values A...

Page 178: ... and time formats Values 1 The default for Date Format varies depending on region specific factory default Off Disables the fault time out On 60sec Sets the amount of time the printer waits before canceling a job that stops abnormally 3 300 sec Off Disables the job time out On 30sec Sets the time the printer waits for data to arrive from the computer 5 300 sec Set Date Time Time Zone Sets the time...

Page 179: ...oes not emit a tone when the printer is ready to process a job On Emits a tone when the printer is ready to process a job Job Completed Off Does not emit a tone when a job is complete On Emits a tone when a job is complete Fault Tone Off Does not emit a tone when a job ends abnormally On Emits a tone when a job ends abnormally Alert Tone Off Does not emit a tone when a problem occurs On Emits a to...

Page 180: ...utputs PDL data which is not supported by the printer as text when the printer receives it Text data is printed on A4 or Letter size paper Values Off Does not automatically print a job history report On Automatically prints a job history report 1 Sided Prints on one side of a sheet of paper 2 Sided Prints on both sides of a sheet of paper Off Does not print the user ID Top Left Prints the user ID ...

Page 181: ...n the specified tray does not match the paper size settings for the current job Values Insert Position Off Does not print the banner sheet Start Sheet Inserted before the first page of every job End Sheet Inserted after the last page of every job Start End Sheet Inserted before the first page of every job and after the last page of every job Select Tray Bypass Tray The banner sheet is loaded in th...

Page 182: ...w the alert message when the toner is low Values FW Download Mode Purpose To specify whether to update the printer by downloading firmware Values Off Does not limit functions by Auditron authentication On Limits functions by Auditron authentication Off Does not permit non account user to print the data On Permits non account user to print the data Disable Does not print on both sides of letterhead...

Page 183: ...ify paper density settings Values Adjust TransUnit Purpose To specify the transfer unit voltage adjustment for each paper type The default settings may not give the best output on all paper types If you see mottles on the print output try to increase the voltage If you see white spots on the print output try to decrease the voltage NOTE The print quality changes depending on the setting values you...

Page 184: ...o adjust density level Values Chart Purpose To print various charts that can be used for diagnosis of the printer Values Clean Developer Purpose To stir the developer in a drum cartridge Plain 0 3 to 3 Plain Thick 0 3 to 3 Light Card 0 3 to 3 Heavy Card 0 3 to 3 Envelope 0 3 to 3 Labels 0 3 to 3 0 3 to 3 Pitch Chart Prints a full halftone page Also prints a page to check the pitch A total of two p...

Page 185: ...lized the meter count is reset to zero Reset TransUnit Purpose To initialize the transfer unit counter Reset FusingUnit Purpose To initialize the life counter of the fusing unit After replacing the fusing unit be sure to initialize its life counter Clear JobHistory Purpose To clear the job history of all finished jobs Clear Storage NOTE Clear Storage feature is available only when the optional 512...

Page 186: ...c pressure Adjustments are performed by specifying the altitude of the location where the printer is being used NOTE An incorrect altitude adjustment setting leads to problems such as poor printing quality and incorrect indication of remaining toner Values StaticMemory Ctr Purpose To widen the print gap not to leave toner streak on the next page NOTE StaticMemory Ctr feature shortens the life of t...

Page 187: ... only when the optional hard disk unit is installed Overwrite of the hard disk may take several hours When overwriting the hard disk all functions of the printer are inoperable Purpose To erase the contents of the entire optional hard disk unit by overwriting the optional hard disk unit with meaningless data Values Panel Lock Set Disable Disables password protection for Admin Menu Enable Enables p...

Page 188: ...dmin Menu and Report List menu Values Tray Settings Use the Tray Settings menu to define the print media loaded in the bypass tray the standard 550 sheet tray and the optional 550 sheet feeder NOTE Values marked by an asterisk are the factory default menu settings Off Does not allow an administrator to log in after one error entry attempt On 5 times Sets the number of error entry attempts allowed ...

Page 189: ...of the custom size paper 127 355 mm Landscape X 210 mm Specifies the width of the custom size paper 77 215 mm inch series Driver Size Letter 8 5x11 Folio 8 5x13 Legal 8 5x14 Executive A4 210x297 A5 148x210 B5 182x257 Monarch Env DL Env 110x220 C5 Env 162x229 10Env 4 1x9 5 New Custom Size Portrait Y 11 7 Specifies the length of the custom size paper 5 0 14 0 Landscape X 8 3 Specifies the width of t...

Page 190: ... in the bypass tray On Displays a popup menu that prompts to set Paper Type and Paper Size when paper is loaded in the bypass tray Paper Size mm series Auto New Custom Size Portrait Y 297 mm Specifies the length of the custom size paper 210 355 mm Landscape X 210 mm Specifies the width of the custom size paper 140 215 mm inch series Auto New Custom Size Portrait Y 11 7 Specifies the length of the ...

Page 191: ...10 mm Specifies the width of the custom size paper 140 215 mm inch series Auto New Custom Size Portrait Y 11 7 Specifies the length of the custom size paper 8 3 14 0 Landscape X 8 3 Specifies the width of the custom size paper 5 5 8 5 Paper Type Plain Plain Thick Light Card Heavy Card Labels Letterhead Hole Punched Colored Other Type Display Screen Off Does not display a popup menu that prompts to...

Page 192: ...e X 210 mm Specifies the width of the custom size paper 140 215 mm inch series Auto New Custom Size Portrait Y 11 7 Specifies the length of the custom size paper 8 3 14 0 Landscape X 8 3 Specifies the width of the custom size paper 5 5 8 5 Paper Type Plain Plain Thick Light Card Heavy Card Labels Letterhead Hole Punched Colored Other Type Display Screen Off Does not display a popup menu that promp...

Page 193: ... 210 mm Specifies the width of the custom size paper 140 215 mm inch series Auto New Custom Size Portrait Y 11 7 Specifies the length of the custom size paper 8 3 14 0 Landscape X 8 3 Specifies the width of the custom size paper 5 5 8 5 Paper Type Plain Plain Thick Light Card Heavy Card Labels Letterhead Hole Punched Colored Other Type Display Screen Off Does not display a popup menu that prompts ...

Page 194: ... optional 550 sheet feeder as the second priority Tray3 Sets the optional 550 sheet feeder as the second priority Tray4 Sets the optional 550 sheet feeder as the second priority 3rd Priority Bypass Tray Sets the bypass tray as the third priority Tray1 Sets the standard 550 sheet tray as the third priority Tray2 Sets the optional 550 sheet feeder as the third priority Tray3 Sets the optional 550 sh...

Page 195: ...Using the Operator Panel Menus 195 Panel Language Purpose To determine the language of the text on the LCD panel Values English Simplified Chinese Traditional Chinese Korean ...

Page 196: ... NOTE The factory default panel password is 0000 If you forget your password turn off the printer Then while holding the Menu button turn on the printer Continue to hold the Menu button until the display indicates to enter the new password Enter the new password and then press the button Re enter the password and then press the button The display will briefly indicate the password has been initial...

Page 197: ...tor Panel Menus 197 Changing the Language To change language used on the operator panel 1 Press the Menu button 2 Select Panel Language and then press the button 3 Select the desired language and then press the button ...

Page 198: ...o enter the Admin Menu 1 Press the Menu button 2 Select Admin Menu and then press the button 3 Select System Settings and then press the button 4 Select Power Saver Time and then press the button 5 Select Low Power Timer or Sleep Timer and then press the button 6 Press the or button or enter the desired value and then press the button You can select from 1 60 minutes for Low Power Timer or 1 60 mi...

Page 199: ...the parameters for the network are reset to their default values 1 Press the Menu button 2 Select Admin Menu and then press the button 3 Select Maintenance Mode and then press the button 4 Select Initialize NVM and then press the button 5 Ensure that Are You Sure appears and then press the button The printer restarts automatically to apply the settings ...

Page 200: ...200 Using the Operator Panel Menus ...

Page 201: ...page 223 Printing Problems on page 224 Print Quality Problems on page 226 Noise on page 240 Digital Certificate Problem on page 241 Problems With Installed Optional Accessories on page 242 Other Problems on page 243 Understanding Printer Messages on page 244 Contacting Service on page 246 Getting Help on page 247 Non Genuine Mode on page 248 ...

Page 202: ...dia in the Bypass Tray on page 126 to load print media properly Do not overload the print media sources Ensure that the print media stack height does not exceed the maximum height indicated by the load line in the tray Do not load wrinkled creased damp or curled print media Flex fan and straighten print media before you load it If a jam occurs with print media try feeding one sheet at a time throu...

Page 203: ...WARNING Fusing Unit Safety Do not remove the Fusing Unit If you cannot remove the paper jam by doing the procedures in the manual do not try to forcibly remove the jam Doing so may cause injuries Contact your local Fuji Xerox representative CAUTION Do not attempt to remove a paper deeply jammed inside the product particularly a paper wrapped around the fusing unit or the heat roller Otherwise it m...

Page 204: ...eteriorate NOTE To resolve the error displayed on the LCD panel you must clear all print media from the print media path 1 Remove the remaining documents from the bypass tray 2 Grasp both sides of the bypass tray and then pull the bypass tray from the printer 3 Pull the standard 550 sheet tray from the printer about 200 mm 4 Hold the standard 550 sheet tray with both hands and remove it from the p...

Page 205: ...t the standard 550 sheet tray into the printer and push until it stops IMPORTANT Do not use excessive force on the tray Doing so could damage the tray or the inside of the printer 8 Insert the bypass tray into the printer push until it stops and close the cover 9 Close the rear door and press the button ...

Page 206: ...rint quality may deteriorate NOTE To resolve the error displayed on the LCD panel you must clear all print media from the print media path 1 Open the bypass tray cover 2 Grasp both sides of the bypass tray and then pull the bypass tray from the printer 3 Pull the standard 550 sheet tray from the printer about 200 mm 4 Hold the standard 550 sheet tray with both hands and remove it from the printer ...

Page 207: ...per 7 Insert the standard 550 sheet tray into the printer and push until it stops IMPORTANT Do not use excessive force on the tray Doing so could damage the tray or the inside of the printer 8 Insert the bypass tray into the printer push until it stops and close the cover 9 Close the rear door ...

Page 208: ...ght If the rear door remains open for more than 3 minutes print quality may deteriorate NOTE To resolve the error displayed on the LCD panel you must clear all print media from the print media path 1 Open the bypass tray cover or remove the remaining documents from the bypass tray 2 Grasp both sides of the bypass tray and then pull the bypass tray from the printer 3 Pull the standard 550 sheet tra...

Page 209: ...the fusing unit IMPORTANT The fusing unit is hot Do not touch it doing so may cause burns 7 If the document is jammed under the fusing unit remove the jammed document from under the fusing unit If the document is jammed above the fusing unit a Hold and lower the right side of the tab to open the inner part ...

Page 210: ...e the inner part 8 Insert the standard 550 sheet tray into the printer and push until it stops IMPORTANT Do not use excessive force on the tray Doing so could damage the tray or the inside of the printer 9 Insert the bypass tray into the printer push until it stops and close the cover ...

Page 211: ...Troubleshooting 211 10 Press down the levers on both sides of the fusing unit and then close the rear door ...

Page 212: ...he transfer unit may reduce print quality Protect the drum of the drum cartridge against bright light If the rear door remains open for more than 3 minutes print quality may deteriorate NOTE To resolve the error displayed on the LCD panel you must clear all print media from the print media path 1 Pull the rear door handle to open the rear door 2 Remove the jammed paper from the duplexer 3 Close th...

Page 213: ...ht If the rear door remains open for more than 3 minutes print quality may deteriorate NOTE To resolve the error displayed on the LCD panel you must clear all print media from the print media path 1 Open the bypass tray cover or remove the remaining documents from the bypass tray 2 Grasp both sides of the bypass tray and then pull the bypass tray from the printer 3 Pull the standard 550 sheet tray...

Page 214: ...he regi roll 7 Insert the standard 550 sheet tray into the printer and push until it stops IMPORTANT Do not use excessive force on the tray Doing so could damage the tray or the inside of the printer 8 Insert the bypass tray into the printer push until it stops and close the cover 9 Close the rear door ...

Page 215: ...ure for the tray indicated in the error message displayed on the LCD panel To resolve the error displayed on the LCD panel you must clear all print media from the print media path 1 Pull the optional 550 sheet feeder from the printer about 200 mm 2 Hold the optional 550 sheet feeder with both hands and remove it from the printer 3 Pull the rear door handle to open the rear door ...

Page 216: ...roubleshooting 4 Remove the jammed paper If you cannot remove the paper go to step 5 and if you can remove go to step 8 5 Open the optional rear door 6 Remove the jammed paper 7 Close the optional rear door ...

Page 217: ...217 8 Insert the optional 550 sheet feeder into the printer and push until it stops IMPORTANT Do not use excessive force on the feeder Doing so could damage the feeder or the inside of the printer 9 Close the rear door ...

Page 218: ...e correct print media is being used See also Usable Print Media on page 118 If not use the print media recommended for the printer If the problem persists ensure that the print media is not curled Ensure that the print media is not curled If the problem persists fan the print media Ensure that the print media is not damp If the print media is damp turn over the print media If the problem persists ...

Page 219: ...to the Help provided for the PCL 6 driver If the problem persists ensure that the print media is not damp Ensure that the print media is not curled If the problem persists fan the print media Ensure that the print media is not damp If the print media is damp turn over the print media If the problem persists use print media that is not damp If the print media is not damp fan the print media Fan the...

Page 220: ...em persists ensure that the transfer unit is installed correctly Ensure that the transfer unit is installed correctly If the problem persists replace the transfer unit the retard roll and the feed roll as instructed in Replacing the Fusing Unit Transfer Unit Retard Roll Feed Roll and Nudger Roll on page 261 Replace the transfer unit the retard roll and the feed roll See also Replacing the Fusing U...

Page 221: ...d occurred with a cloth moistened with water See also Cleaning Inside the Printer on page 250 If the problem persists contact the Fuji Xerox local representative office or an authorised dealer Problem Action Print media multiple feeds occur in the bypass tray Ensure that the media type you are using If the problem persists use print media that is not damp Use print media that is not damp If the pr...

Page 222: ...All options are properly installed If you have checked all of the above and still have a problem turn off the printer wait for 10 seconds and then turn on the printer This often fixes the problem IMPORTANT If the optional hard disk unit is not installed on your printer note that the data in the memory are cleared when the printer is turned off NOTE If error messages are displayed on the LCD panel ...

Page 223: ...play Problems Problem Action Menu settings changed from the operator panel have no effect Settings in the software program the print driver or the printer utilities have precedence over the settings made on the operator panel ...

Page 224: ...t the print media is loaded correctly Ensure that the width and length guides of the print media sources are adjusted correctly Ensure that the standard 550 sheet tray the optional 550 sheet feeder or the bypass tray is securely inserted Do not overload the standard 550 sheet tray the optional 550 sheet feeder or the bypass tray Do not force print media into the bypass tray when you load it otherw...

Page 225: ... Turn the print media stack over in the standard 550 sheet tray or the bypass tray Cannot print from the standard 550 sheet tray or the optional 550 sheet feeder because the print media in the tray or feeder is curled Load the print media into the bypass tray Problem Action ...

Page 226: ...duced Fatigue on page 234 Fog on page 234 Bead Carry Out BCO on page 235 Jagged Characters on page 235 Banding on page 236 Auger Mark on page 236 Wrinkled Stained Paper on page 237 Damage on the Leading Edge of Paper on page 238 The Top and Side Margins Are Incorrect on page 238 Protrudent Bumpy Paper on page 239 Images Are Skewed on page 239 NOTE In this section some procedures use the operator p...

Page 227: ...rrect print media is being used Verify that the correct print media is being used See also Usable Print Media on page 118 If not use the print media recommended for the printer If the problem persists ensure the transfer unit is correctly installed Ensure the transfer unit is correctly installed See also Installing a Transfer Unit on page 264 If the problem persists adjust the density level Adjust...

Page 228: ...place the drum cartridge See also Replacing the Drum Cartridge on page 257 Installing a Drum Cartridge on page 260 2 After you replace the drum cartridge test print your document again If the problem persists replace the fusing unit as instructed in Replacing the Fusing Unit Transfer Unit Retard Roll Feed Roll and Nudger Roll on page 261 Replace the fusing unit See also Replacing the Fusing Unit T...

Page 229: ...on page 33 If the problem persists lower the transfer unit voltage Lower the transfer unit voltage 1 Check the transfer unit voltage in the Adjust TransUnit menu 2 Decrease the voltage See also Adjust TransUnit on page 183 If the problem persists replace the drum cartridge if you have a spare cartridge Replace the drum cartridge if you have a spare cartridge See also Replacing the Drum Cartridge o...

Page 230: ...aper Type setting in the print driver For example change the plain paper to heavyweight using the PCL 6 driver 1 On the Paper Output tab change the Paper Type setting If the problem persists verify that the correct print media is being used Verify that the correct print media is being used See also Usable Print Media on page 118 If not use the print media recommended for the printer If the problem...

Page 231: ...nce Mode Clean Developer 2 Press the button If the problem persists replace the drum cartridge if you have a spare cartridge Replace the drum cartridge if you have a spare cartridge See also Replacing the Drum Cartridge on page 257 Installing a Drum Cartridge on page 260 If the problem persists replace the fusing unit as instructed in Replacing the Fusing Unit Transfer Unit Retard Roll Feed Roll a...

Page 232: ...tridge See also Installing a Drum Cartridge on page 260 If the problem persists replace the drum cartridge if you have a spare cartridge Replace the drum cartridge if you have a spare cartridge See also Replacing the Drum Cartridge on page 257 Installing a Drum Cartridge on page 260 If the problem persists replace the fusing unit as instructed in Replacing the Fusing Unit Transfer Unit Retard Roll...

Page 233: ...e if you have a spare cartridge See also Replacing the Drum Cartridge on page 257 Installing a Drum Cartridge on page 260 If the problem persists contact the Fuji Xerox local representative office or an authorised dealer If the type of the ghosting is negative ghost Verify that the print media recommended for the printer is being used If you are using non recommended print media use the print medi...

Page 234: ...stalling a Drum Cartridge on page 260 If the problem persists contact the Fuji Xerox local representative office or an authorised dealer Problem Action The printed result is foggy Replace the drum cartridge if you have a spare cartridge See also Replacing the Drum Cartridge on page 257 Installing a Drum Cartridge on page 260 If the problem persists contact the Fuji Xerox local representative offic...

Page 235: ...r Problem Action The printed result has jagged characters Enable Bitmap Smoothing in the print driver The following procedure uses the PCL 6 driver as an example 1 On the Advanced tab set Bitmap Smoothing under Image Options to On If the problem persists check whether or not the downloaded font you are using is recommended If using a downloaded font ensure that the font is recommended for the prin...

Page 236: ... Replace the transfer unit and the retard roll See also Replacing the Fusing Unit Transfer Unit Retard Roll Feed Roll and Nudger Roll on page 261 If the cause of the problem is not located contact the Fuji Xerox local representative office or an authorised dealer Problem Action The printed result has auger mark Stir the developer in a drum cartridge 1 On the operator panel press the Menu button an...

Page 237: ...ondition Check whether the wrinkle of the four edges of the envelope is within 30 mm If the wrinkle of the four edges of the envelope is within 30 mm this type of wrinkle is considered normal Your printer is not at fault If not load the envelopes in the bypass tray properly Load the envelopes in the bypass tray properly See also Loading Envelope in the Bypass Tray on page 129 If the problem persis...

Page 238: ...place of the bypass tray Use the standard 550 sheet tray or optional 550 sheet feeder in place of the bypass tray If the problem persists replace the fusing unit as instructed in Replacing the Fusing Unit Transfer Unit Retard Roll Feed Roll and Nudger Roll on page 261 Replace the fusing unit if you have a spare unit See also Replacing the Fusing Unit Transfer Unit Retard Roll Feed Roll and Nudger ...

Page 239: ... print a blank sheet of paper If the problem persists contact the Fuji Xerox local representative office or an authorised dealer Problem Action The printed result are skewed Adjust the paper guides properly If the problem persists install the transfer unit according to an appropriate procedure Install the transfer unit according to an appropriate procedure See also Installing a Transfer Unit on pa...

Page 240: ...nit See also Replacing the Fusing Unit Transfer Unit Retard Roll Feed Roll and Nudger Roll on page 261 If the problem persists replace the toner cartridge Replace the drum cartridge if you have a spare cartridge See also Replacing the Drum Cartridge on page 257 If the problem persists replace the toner cartridge Replace the toner cartridge See also Replacing the Toner Cartridge on page 254 If the ...

Page 241: ...encryption of the optional hard disk unit to off A certificate is deleted when formatting the optional hard disk unit A certificate cannot be set in Certificate Details page The validity period of the certificate is invalid Confirm whether the time setting of the machine is correct and whether the validity period of the certificate has expired The certificate chain path validation of the imported ...

Page 242: ...blem contact customer support Problem Action The optional 550 sheet feeder does not work correctly Ensure that the optional 550 sheet feeder is correctly installed on the printer Re install the optional 550 sheet feeder See also Removing the Optional 550 Sheet Feeder on page 281 Installing the Optional 550 Sheet Feeder on page 41 If the problem persists contact customer support Ensure that the pri...

Page 243: ...ed inside the printer This usually occurs within several hours after you heat the room in winter This also occurs when the printer is operating in a location where relative humidity reaches 85 or more Adjust the humidity or relocate the printer to an appropriate environment ...

Page 244: ...inter 016 404 Contact your system administrator 016 405 016 500 Turn off the printer and turn it on again 016 501 016 502 016 520 Contact your system administrator 016 521 016 522 016 523 016 524 016 527 016 737 Turn off the printer and turn it on again 016 741 016 744 016 750 Press the button or wait for the time set in Fault Time out for the printer to recover 016 753 016 755 016 757 016 758 016...

Page 245: ...Troubleshooting 245 116 317 Turn off the printer and turn it on again 116 320 Remove the unsupported optional memory module ...

Page 246: ...hen you call for printer service be prepared to describe the problem you are experiencing or the error message on the LCD panel You need to know the model type and service tag of your printer See the label located on the rear of your printer ...

Page 247: ...ite The following procedure uses the PCL 6 driver as an example NOTE The communication fee shall be borne by users 1 In your print driver s Printing Preferences dialog box click the Advanced tab and then click About 2 Click Fuji Xerox Web Site Your web browser launches and our web site is displayed 3 Follow the instructions on the web site and download an appropriate print driver NOTE You can brow...

Page 248: ...Genuine mode are not covered by our quality guarantee The continuous use of the Non Genuine mode can also cause the printer to break down and any repair charges for such break down will be incurred by users NOTE Before starting the operation described below confirm that Ready is displayed on the LCD panel 1 Press the Menu button 2 Select Admin Menu and then press the button 3 Select Maintenance Mo...

Page 249: ... Replacing Consumables on page 253 Ordering Supplies on page 272 Storing Print Media on page 273 Storing Consumables on page 274 Managing the Printer on page 275 Conserving Supplies on page 276 Checking Page Counts on page 277 Moving the Printer on page 278 Removing Options on page 279 ...

Page 250: ...optional hard disk unit is not installed on your printer note that the data in the memory are cleared when the printer is turned off 2 Gently pull open the bypass tray cover 3 Grasp both sides of the bypass tray and then pull the bypass tray from the printer WARNING When cleaning this product use the designated cleaning materials exclusive to it Other cleaning materials may result in poor performa...

Page 251: ...er 6 Wipe the feed roller inside the printer with a cloth moistened with water 7 Insert the standard 550 sheet tray into the printer and push until it stops IMPORTANT Do not use excessive force on the tray Doing so could damage the tray or the inside of the printer Bypass Tray Feed Roller Standard 550 Sheet Tray Feed Roller ...

Page 252: ...252 Maintenance 8 Insert the bypass tray into the printer push until it stops and close the cover ...

Page 253: ...eded contact your local Fuji Xerox representative for its disposal CAUTION Keep a drum cartridge and a toner cartridge out of the reach of children If a child accidentally swallows toner spit it out rinse mouth with water drink water and consult a physician immediately When replacing a drum cartridge and a toner cartridge be careful not to spill the toner In case of any toner spills avoid contact ...

Page 254: ...eld is approx 2 500 pages The remaining page yield differs depending on printing conditions contents of the documents and frequency of turning on off the printer For more information see IMPORTANT of Consumables on page 272 IMPORTANT When placing a used toner cartridge on the floor or on a table place a few sheets of paper under the toner cartridge to catch any toner that may spill Do not reuse ol...

Page 255: ... the hole on the front cover and then pull it down to open 2 Grasp the toner cartridge lock lever and then raise it upward to unlock 3 Grasp the handle on the toner cartridge and then pull it out IMPORTANT Do not shake the toner cartridge as it may cause toner spills ...

Page 256: ... of the toner 2 Shake the new toner cartridge five or six times to distribute the toner evenly 3 Make sure that the two tabs of the toner cartridge align with the grooves on the printer and then insert it into the printer until it clicks 4 Grasp the toner cartridge lock lever and then pull it down until it stops 5 Close the front cover ...

Page 257: ...s Removing the Drum Cartridge on page 258 Installing a Drum Cartridge on page 260 Overview When a drum cartridge reaches its usable life span the following messages appear on the LCD panel Message Remaining Page Yield Printer Status and Action K Drum Cartridge Replace Soon 10 000 pages The drum cartridge is near the end of its life Prepare a new one Replace Black Drum Cartridge The drum cartridge ...

Page 258: ...r cartridge lock lever and then raise it upward to unlock 3 Grasp the handle on the toner cartridge and then pull it out IMPORTANT Do not shake the toner cartridge as it may cause toner spills Keep the removed toner cartridge on a level surface 4 Grasp the handle on the front of the drum cartridge and then pull it out halfway with one hand ...

Page 259: ...Maintenance 259 5 Grasp the handle on the top of the drum cartridge with the other hand and then pull it out completely ...

Page 260: ...ive cover of the drum comes off while inserting the drum cartridge into the cartridge slot You do not need to remove it in advance 3 Make sure that the two tabs of the toner cartridge align with the grooves on the printer and then insert it into the printer until it clicks 4 Grasp the toner cartridge lock lever and then pull it down until it stops 5 Close the front cover ...

Page 261: ...age 262 Installing a Fusing Unit on page 263 Removing the Transfer Unit on page 263 Installing a Transfer Unit on page 264 Removing the Retard Roll in the Standard 550 Sheet Tray on page 265 Installing a Retard Roll in the Standard 550 Sheet Tray on page 266 Removing the Feed Roll and Nudger Roll on page 267 Installing the Feed Roll and Nudger Roll on page 270 Resetting the Counter of the Fusing U...

Page 262: ... your printer note that the data in the memory are cleared when the printer is turned off 2 Pull the rear door handle on the rear of the printer to open the rear door 3 Raise the two gray levers on the both sides of the fusing unit to unlock 4 Grasp the grips on both sides of the fusing unit placing thumb on the knurling and then pull out the unit ...

Page 263: ... unit with your hands Make sure that the fusing unit is firmly set in the slots and cannot be moved easily 4 Lower the two gray levers to lock the fusing unit NOTE After replacing the fusing unit initialize its life counter For details see Resetting the Counter of the Fusing Unit on page 271 Removing the Transfer Unit 1 Push the tabs on both sides of the transfer unit inward and then lift it out o...

Page 264: ...by its both ends 3 Push the both ends of the transfer unit inward put it on the duplexer and then rotate the transfer unit forward 4 Make sure that the arrow marks on the transfer unit and the printer face each other and then press the two tabs on transfer unit inward to lock 5 Close the rear door ...

Page 265: ...m the printer NOTE Ensure that you remove all the paper from the standard 550 sheet tray before removing the retard roll 2 Slightly pressing down the lock lever on the standard 550 sheet tray to the right with one hand raise the retard roll with the other hand 3 Slide the retard roll to the left to remove it from the standard 550 sheet tray ...

Page 266: ...d roll into the holes on the standard 550 sheet tray 3 Press down the retard roll until it snaps 4 Load paper in the standard 550 sheet tray and then insert the standard 550 sheet tray into the printer and push until it stops IMPORTANT Do not use excessive force on the tray Doing so could damage the tray or the inside of the printer ...

Page 267: ...lacement For details see Removing the Optional 550 Sheet Feeder on page 281 1 Turn off the printer and disconnect the power cord IMPORTANT If the optional hard disk unit is not installed on your printer note that the data in the memory are cleared when the printer is turned off 2 Pull the tray out of the printer about 200 mm 3 Hold the tray with both hands and remove it from the printer 4 Hold the...

Page 268: ...tenance 5 Rotate the feed roll so that its tab comes to the front 6 Pull the tab toward you and pull the feed roll upward to remove it from the shaft 7 Rotate the nudger roll so that its tab comes to the front ...

Page 269: ...Maintenance 269 8 Pull the tab toward you and pull the nudger roll upward to remove it from the shaft ...

Page 270: ...ement rollers 2 Insert the nudger roll into the right shaft Set the knob of the roller into the notches of the clutch 3 Insert the feed roll into the left shaft Set the knob of the roller into the notches of the clutch NOTE Make sure that the feed roll and nudger roll are firmly set in the shaft and cannot be moved easily 4 Hold the printer with both hands and gently place the printer upright ...

Page 271: ...he feed roll and nudger roll perform two or three test prints Resetting the Counter of the Fusing Unit After replacing the fusing unit use the operator panel to reset the counter of the fusing unit 1 Press the Menu button 2 Select Admin Menu and then press the button 3 Select Maintenance Mode and then press the button 4 Select Reset FusingUnit and then press the button 5 Ensure that Are You Sure a...

Page 272: ...r details on error messages about replacing the toner cartridge drum cartridge fusing unit or transfer unit see Replacing Consumables on page 253 To order supplies contact the Fuji Xerox local representative office or an authorised dealer IMPORTANT This printer is designed to provide the most stable performance and print quality when used with the recommended consumables Not using consumables reco...

Page 273: ...media in an environment where the temperature is approximately 70 F 21 C and the relative humidity is 40 Store cartons of print media on a pallet or shelf rather than directly on the floor If you store individual packages of print media out of the original carton ensure that they rest on a flat surface so the edges do not buckle or curl Do not place anything on top of the print media packages ...

Page 274: ...until you need to use them Do not store consumables in Temperatures greater than 104 F 40 C An environment with extreme changes in humidity or temperature Direct sunlight Dusty places A car for a long period of time An environment where corrosive gases are present A humid environment ...

Page 275: ... address field and then press the Enter key The CentreWare Internet Services screen appears Using Online Help For details regarding the items that can be set in each CentreWare Internet Services screen click the Help button to display the online Help Checking Printer Status with SimpleMonitor Windows Only SimpleMonitor is a tool that is installed with your Fuji Xerox print driver It automatically ...

Page 276: ...This check box allows the users to select a print mode that uses less toner The image quality will be lower when this feature is used Print media Pages Per Sheet N Up in the Layout Watermark tab The printer prints two or more pages on one side of a sheet Values for Pages Per Sheet N Up are 1 Up 2 Up 4 Up 8 Up 16 Up 32 Up Combined with the duplex setting Pages Per Sheet N Up allows you to print up ...

Page 277: ...Sheet N Up is counted as two During 2 sided printing if an error occurs after one side is printed properly it is counted as one When doing 2 sided printing a blank page may be inserted automatically depending on the settings of the application In this case the blank page is counted as one page For information about the individual meter see Meter Readings on page 163 Use the following procedure to ...

Page 278: ...nter it may fall to the ground and cause injuries For details on how to uninstall the optional 550 sheet feeder see Removing the Optional 550 Sheet Feeder on page 281 1 Turn off the printer and disconnect the power cord interface cable and any other cables IMPORTANT If the optional hard disk unit is not installed on your printer note that the data in the memory are cleared when the printer is turn...

Page 279: ...rinter Adapter on page 285 Removing the Optional Font ROM on page 287 Removing the Optional 512MB Memory IMPORTANT When you remove the optional 512MB memory be sure to turn off the printer unplug the power cord and disconnect all cables from the rear of the printer before starting these tasks 1 Turn off the printer IMPORTANT If the optional hard disk unit is not installed on your printer note that...

Page 280: ...outward to raise the 512MB memory 5 Hold the 512MB memory and pull it straight out 6 Align the guide on the control board cover with the slot around the control board and slide it towards the front of the printer 7 Turn the screw clockwise 8 Turn on the printer ...

Page 281: ...rear of the printer before starting these tasks 1 Turn off the printer IMPORTANT If the optional hard disk unit is not installed on your printer note that the data in the memory are cleared when the printer is turned off 2 Disconnect the power cord from the power connector on the rear of the printer 3 Gently pull open the bypass tray cover 4 Grasp both sides of the bypass tray and then pull the by...

Page 282: ...feeder by unscrewing them with a coin or similar object NOTE The screw hole is located in 145 mm recess from the front of the printer 7 Gently lift the printer off the optional 550 sheet feeder and place it on a level surface When you remove the multiple optional 550 sheet feeders go to step 8 When you remove a single optional 550 sheet feeder go to step 13 8 Pull the optional 550 sheet tray out o...

Page 283: ... off the other feeder and place it on a level surface 11 Insert the optional 550 sheet tray into the feeder and push until it stops 12 Repeat steps 8 to 11 when installing another optional 550 sheet feeder 13 Insert the standard 550 sheet tray into the printer and push until it stops IMPORTANT Do not use excessive force on the tray Doing so could damage the tray or the inside of the printer ...

Page 284: ...284 Maintenance 14 Insert the bypass tray into the printer push until it stops and close the cover 15 Reconnect all cables into the rear of the printer and turn on the printer ...

Page 285: ...nter before removing the adapter 1 Turn off the printer IMPORTANT If the optional hard disk unit is not installed on your printer note that the data in the memory are cleared when the printer is turned off 2 Disconnect the power cord from the power connector on the rear of the printer 3 Turn the screw on the control board cover counterclockwise 4 Slide the control board cover towards the rear of t...

Page 286: ...ile pushing the wireless printer adapter towards the front of the printer 6 Align the guide on the control board cover with the slot around the control board and slide it towards the front of the printer 7 Turn the screw clockwise 8 Reconnect all cables into the rear of the printer and turn on the printer ...

Page 287: ...hard disk unit is not installed on your printer note that the data in the memory are cleared when the printer is turned off 2 Turn the screw on the control board cover counterclockwise NOTE Loosen the screw You do not need to remove the screw 3 Slide the control board cover towards the rear of the printer to remove the cover 4 Pull the tabs on both sides of the font ROM outward to raise it IMPORTA...

Page 288: ...ht out NOTE If you need bring the removed hard disk unit back to the printer 6 Align the guide on the control board cover with the slot around the control board and slide it towards the front of the printer 7 Turn the screw clockwise 8 Turn on the printer ...

Page 289: ... disconnect all cables from the rear of the printer before removing the hard disk unit 1 Turn off the printer 2 Disconnect the power cord from the power source 3 Turn the screw on the control board cover counterclockwise NOTE Loosen the screw You do not need to remove the screw 4 Slide the control board cover towards the rear of the printer and remove the cover ...

Page 290: ...leasing the hook of hard disk unit 6 Align the guide on the control board cover with the slot around the control board and slide it towards the front of the printer 7 Turn the screw clockwise 8 Reconnect all cables into the rear of the printer and turn on the printer ...

Page 291: ...Contacting Fuji Xerox 291 9 Contacting Fuji Xerox This chapter includes Technical Support on page 292 Online Services on page 293 ...

Page 292: ...ppropriate assistance to Telephone Support personnel to resolve issues such as restoration of the operating system software program and drivers to their default configuration and settings verification of functionality of Fuji Xerox supplied products replacement of customer replaceable units clearing paper misfeeds and cleaning the unit and other prescribed routine and preventative maintenance If t...

Page 293: ...registering your details on our website at http www fujixerox com support docuprint Fuji Xerox Online Support Assistant provides instructions and troubleshooting guides to resolve your printer problems It is an easy to use searchable online help To find out more please visit our online support at http www fujixerox com support docuprint ...

Page 294: ...294 Contacting Fuji Xerox ...

Page 295: ...l 133 From your computer 133 CentreWare Internet Services 65 Managing printer 275 Online help for 275 Starting 275 Chart 184 Checking page counts 277 Checking printed pages How to check the meter 277 Checking status of print data 148 Chute 33 Clean Developer 184 Clean TransUnit 185 Cleaning inside the printer 250 Clear Job History 185 Clear Storage 185 Clearing paper jam 202 From bypass tray 204 F...

Page 296: ...166 Form Line 166 Format HDD 186 Front cover 32 FTP 175 Fusing system 27 Fusing unit 33 203 FW Download Mode 182 G Gateway Address 174 Get IP Address 174 Getting help 247 SimpleMonitor alerts 247 Ghost Control 186 H HDD 28 HDD Over write 187 Heavy Card 183 184 Hex Dump 167 How to check the meter 277 How to install option 36 How to remove option 279 I IEEE 802 1x 176 Ignore Form Feed 167 Init Print...

Page 297: ...s tray 126 Optional 550 sheet feeder 123 Standard 550 sheet tray 123 Loading small print media Bypass tray 127 Login Error 188 Low Toner Msg 182 LPD 175 M Machine weight 30 Main components 32 Maintenance 249 Maintenance Mode 183 Managing Printer 275 Memory 28 Menu button 34 Messages LCD panel 247 SimpleMonitor 247 Meter Readings 163 Total printed pages 277 mm inch 179 Moving Printer 278 N Network ...

Page 298: ...nt driver pre install status 78 Print ID 180 Print media 276 Bypass tray 118 Optional 550 sheet feeder 119 Standard 550 sheet tray 119 Print media dimensions 122 Print Meter 163 Print Mode 168 Print quality problems 226 Print resolution 27 Print Text 180 Printer Managing 275 Moving 278 Printer connection and software installation 69 Printer management software 63 Printer Settings 162 Printer setti...

Page 299: ...aults 199 S Safety Electrical 14 Operational 18 Sample Print 134 Secure Print 134 Secure Settings 187 Securing the printer 35 Security slot 35 Selecting options Mac OS X 143 Selecting options Windows 141 Selecting printing options 141 Selecting Printing Preferences Windows 141 Sending print job 132 Setting paper sizes 131 Setting paper types 131 Setting the IP address 74 Setup Disk Creation Tool 6...

Page 300: ... port 33 71 USB Settings 176 Using 2 Sided Print 139 Using digital certificates 152 Using the bypass tray 130 V Verifying the IP settings 77 W Warm up time 27 Web Services on Devices 150 When to order supplies 272 Width guides 124 Wired network connection 73 Wireless adapter socket 71 Wireless network connection 73 Wireless Setup 171 Wireless Status 170 WPS Setup 173 WSD 150 175 ...

Page 301: ......

Page 302: ...DocuPrint P455 d User Guide Fuji Xerox Co Ltd ME5893E2 1 Edition 1 June 2012 Copyright 2012 by Fuji Xerox Co Ltd ...

Reviews: