background image

Installing the ValueLoader
Installing the ValueLoader into a Rack

12

ValueLoader LTO Tape Autoloader User Manual

3

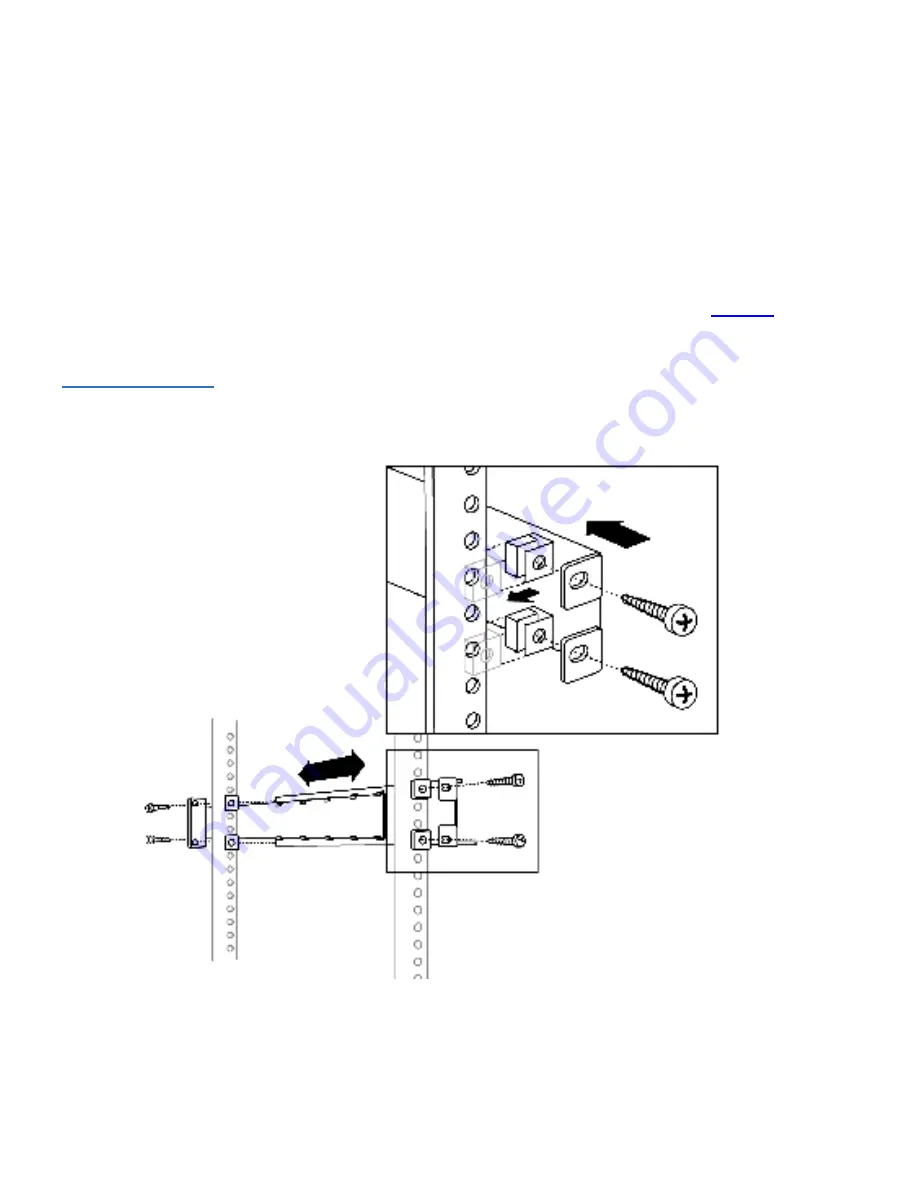
Using screws and clip nuts from the rackmount hardware 

package, secure one rail to each side of the rack in the location 

where you plan to install the ValueLoader.
• Be sure to secure both the front and rear of each rail. The 

rails extend to fit a variety of rack depths.

• The correct orientation of the left rail is shown in 

figure 6

Repeat for the right rail.

Figure 6  Installing 
Rails in the Rack (Left 
Side Shown)

Summary of Contents for ValueLoader

Page 1: ...ValueLoader LTO Tape Autoloader User Manual 6326709 01 Ver A Rel 01...

Page 2: ...on All rights reserved Your right to copy this manual is limited by copyright law Making copies or adaptations without prior written authorization of Quantum Corporation is prohibited by law and const...

Page 3: ...tanding ValueLoader Features 2 Barcode Reader 3 SCSI Requirements 3 Product Overview 4 Choosing a Location 6 Unpacking the ValueLoader 7 Identifying ValueLoader Accessories 9 Installing the ValueLoade...

Page 4: ...the Tape Drive 32 Creating an Inventory of Cartridges 33 Chapter 3 ValueLoader Administration 35 Configuring the ValueLoader 35 Resetting the ValueLoader 36 Changing the SCSI ID 36 ValueLoader Operat...

Page 5: ...ueLoader LTO Tape Autoloader User Manual v ValueLoader Error Codes 59 Appendix A Technical Specifications 65 Appendix B Customer Support 69 Information Needed 69 Information Needed by Software Vendors...

Page 6: ...vi ValueLoader LTO Tape Autoloader User Manual...

Page 7: ...6 Installing Rails in the Rack Left Side Shown 12 Figure 7 Sliding the ValueLoader into the Rack Slot 13 Figure 8 Attaching SCSI and Power Cables 14 Figure 9 Operator s Panel Drive Empty 22 Figure 10...

Page 8: ...Figures viii ValueLoader LTO Tape Autoloader User Manual Figure 16 Pulling the Cartridge Release Lever 57 Figure 17 Installing the Carrier 58...

Page 9: ...EDs 24 Table 3 Control Buttons 25 Table 4 Common ValueLoader Problems 50 Table 5 Error Codes 60 Table 6 Physical Specifications 65 Table 7 Operating Specifications 66 Table 8 ValueLoader Environmental...

Page 10: ...Tables x ValueLoader LTO Tape Autoloader User Manual...

Page 11: ...ce This user manual is designed and written for end users and field service engineers Purpose The purpose of this manual is to provide end users with the following information ValueLoader LTO descript...

Page 12: ...and tape operations Chapter 3 ValueLoader Administration This chapter describes how to configure the ValueLoader upgrade firmware and retrieve ValueLoader information Chapter 4 Diagnostics and Troubl...

Page 13: ...information on support or to access our Frequently Asked Questions database visit our Web site Note Notes emphasize important information related to the main topic Caution Cautions indicate potential...

Page 14: ...xiv ValueLoader LTO Tape Autoloader User Manual...

Page 15: ...Overview on page 2 Understanding ValueLoader Features on page 2 Choosing a Location on page 6 Unpacking the ValueLoader on page 7 Identifying ValueLoader Accessories on page 9x Installing the ValueLoa...

Page 16: ...erver page 13 6 Attach ValueLoader to the SCSI bus 7 Attach the power cable between the ValueLoader and a grounded power outlet Power the ValueLoader on to ensure it passes the power on self test POST...

Page 17: ...el is stored in memory and available through SCSI to the computer s operating system or backup application upon request If you plan to utilize the barcode reader you must adhere a barcode label into t...

Page 18: ...ValueLoader Features 4 ValueLoader LTO Tape Autoloader User Manual Product Overview 1 Figure 1 describes front panel controls Figure 1 Front Panel 1 Power switch 2 Import export slot 3 Front panel LED...

Page 19: ...5 Figure 2 describes the ValueLoader rear panel Figure 2 Rear Panel Note The arrows in the figure indicate screws that need to be removed to remove the top cover In addition to the screws pictured the...

Page 20: ...e or upside down or stack items that weigh more than 15 kg 33 lbs on top of the ValueLoader Rack requirements Standard 19 inch rack with a clearance of 2U Room temperature 10 35 C 50 95 F Power source...

Page 21: ...have room to unpack the ValueLoader 2 Inspect the shipping box for damage If you notice any damage report it to the shipping company immediately 3 Open the shipping box and remove the accessories pac...

Page 22: ...acing up Do not set the ValueLoader on either end or side 5 Carefully remove the shipping padding from the left and right sides of the ValueLoader Then remove the bag from the ValueLoader Caution Plac...

Page 23: ...TO Tape Autoloader User Manual 9 Identifying ValueLoader Accessories 1 Figure 3 identifies accessories for use with the ValueLoader Figure 3 Basic ValueLoader Accessories 1 SCSI cable 2 SCSI terminato...

Page 24: ...lling the ValueLoader Identifying ValueLoader Accessories 10 ValueLoader LTO Tape Autoloader User Manual Figure 4 shows additional accessories used for rackmount installations Figure 4 Rack Kit Compon...

Page 25: ...you need to install the mounting brackets on both sides of the ValueLoader and the rails in the selected rack location To install the ValueLoader follow these steps 1 Use a screwdriver or Torx T10 to...

Page 26: ...hardware package secure one rail to each side of the rack in the location where you plan to install the ValueLoader Be sure to secure both the front and rear of each rail The rails extend to fit a var...

Page 27: ...figure 7 Figure 7 Sliding the ValueLoader into the Rack Slot Connecting the SCSI and Power Cables 1 To connect the SCSI and power cables to the ValueLoader follow these steps 1 Shut down and turn off...

Page 28: ...bus attach the terminator to the remaining SCSI connector on the rear panel of the ValueLoader as shown in figure 8 Otherwise attach the cable to the next device on the SCSI bus Make sure the last dev...

Page 29: ...the Home screen 9 Turn on the server Preparing the Host and Verifying the Connection 1 If necessary install a SCSI host adapter software and compatible driver s Refer to the manuals for the host compu...

Page 30: ...r than the SCSI host adapter on the SCSI bus it must be terminated Likewise if the ValueLoader is physically the last SCSI device on the SCSI bus it must be terminated Only the devices physically at t...

Page 31: ...um 1 SCSI Sequential Device listing click Uninstall and then click the OK button to confirm that you want to remove the device 4 Click the Action button in the upper left corner of the Computer Manage...

Page 32: ...Drive entry and click the Next button 13 Click the Next button again to install the driver 14 Click the Finish button 15 Close the Device Properties dialog box The drive appears in the Device Manager...

Page 33: ...Select the Drivers tab 8 Click the Reinstall Driver or Update Driver button 9 When the Upgrade Device Driver Wizard appears click the Next button 10 Click Display a list and then click the Next button...

Page 34: ...Installing the ValueLoader Preparing the Host and Verifying the Connection 20 ValueLoader LTO Tape Autoloader User Manual...

Page 35: ...2Operating the ValueLoader This chapter describes the following Operator s Panel Overview on page 22 Understanding the Menu Structure on page 26 Using Cartridges on page 27 Cleaning the Tape Drive on...

Page 36: ...nventory on the second line If the tape drive does not have a cartridge loaded the top line displays Drive empty The cartridge inventory indicates all slots that contain a cartridge by displaying the...

Page 37: ...rt Export slot opening If either condition occurs reset or power cycle the ValueLoader to clear the condition If the tape drive has a cartridge loaded the top line displays Drive loaded The cartridge...

Page 38: ...urs This type of error may occur if an invalid cartridge type is inserted or if data is written to a tape cartridge while the drive s read write heads are dirty The offending cartridge is indicated by...

Page 39: ...ormation menus These buttons are described in table 3 Table 3 Control Buttons Button Description Cancel Cancels the current menu option and returns to the previous menu level or Home screen Previous S...

Page 40: ...isplays the menu structure of the Operator s Panel Figure 11 Operator s Panel Menu Structure DIAGNOSTICS System Test Impor t Expor t Load Cartridge Unload Cartridge Cycle Count View Event Log Clean Dr...

Page 41: ...re to use only compatible cleaning cartridges The tape drive rejects all other types of cleaning cartridges Importing Cartridges 2 The option forces the ValueLoader to import a cartridge into a specif...

Page 42: ...t as shown in figure 12 7 Repeat steps 5 and 6 as needed for additional cartridges 8 Press the Cancel button when you have finished importing cartridges 9 Verify that the LCD screen shows that the des...

Page 43: ...ort appears on the LCD screen Then press Enter 3 Press the or button until the desired slot number appears on the LCD screen Then press the Enter button You are given the option to export from an empt...

Page 44: ...the tape drive Status messages appear while the cartridge is loading Drive Stopped appears when the operation is complete 5 Press the Cancel button when you are done loading the cartridge Unloading C...

Page 45: ...dge is write protected Slide the switch to the right to allow the ValueLoader to write data to the cartridge The lock icon on the switch indicates that the cartridge is write enabled Figure 14 Write P...

Page 46: ...such as computer monitors electric motors speakers or X ray equipment Exposure to electromagnetic energy or magnetic fields can destroy data on cartridges Place identification labels only in the slide...

Page 47: ...Screen or main menu press the or button until Commands appears on the top line of the LCD screen 2 Press the Enter button to access the available options 3 Press the or button until Re inventory appea...

Page 48: ...Operating the ValueLoader Creating an Inventory of Cartridges 34 ValueLoader LTO Tape Autoloader User Manual...

Page 49: ...n page 35 Updating Firmware on page 40 Running the ValueLoader System Test on page 42 Retrieving Information About the ValueLoader on page 43 Configuring the ValueLoader 3 The Configuration menu provi...

Page 50: ...reen or main menu press the or button until Configuration appears on the top line of the LCD screen 2 Press the Enter button to select 3 Press the or button until Reset appears on the LCD screen 4 Pre...

Page 51: ...ired item appears on the LCD screen 6 Press the Enter button to select The second line on the LCD screen displays New ID 7 Press the or button until the desired SCSI ID appears 8 Press the Enter butto...

Page 52: ...drive instead it waits for commands from the software To use Random mode you do not need to configure anything from the ValueLoader front panel In addition your backup software package must support V...

Page 53: ...the LCD screen The second line displays the current status of this mode 4 Press Enter to select The LCD screen indicates whether you are about to turn Circular Mode on or off 5 Press the Enter button...

Page 54: ...r SCSI commands Using a Firmware Upgrade Tape 3 This option performs a firmware update for the ValueLoader and or the HP LTO drive using firmware upgrade cartridge Caution Regardless of the firmware u...

Page 55: ...cartridge into the Import Export slot During the firmware update which can take several minutes the LCD screen displays Code update in Progress When the firmware update is complete the ValueLoader res...

Page 56: ...ding all cartridges in the carousel Running a System Test verifies the operational soundness of both the ValueLoader and tape drive The System Test continues indefinitely until you press the Cancel bu...

Page 57: ...is loaded into the drive or exported from the ValueLoader To use this option 1 From the Home Screen or main menu press the or button until Information appears on the top line of the LCD screen 2 Pres...

Page 58: ...button until Information appears on the top line of the LCD screen 2 Press the Enter button to access the available options 3 Press the or button until Product Rev appears on the LCD screen The LCD s...

Page 59: ...rmation About the ValueLoader ValueLoader LTO Tape Autoloader User Manual 45 4 Press the Cancel button when done Note After a firmware update the firmware revision displayed on the LCD will not be upd...

Page 60: ...ValueLoader Administration Retrieving Information About the ValueLoader 46 ValueLoader LTO Tape Autoloader User Manual...

Page 61: ...ins some general suggestions to aid you in solving problems It also includes information on error codes and diagnostics Troubleshooting on page 47 Removing Stuck Cartridges on page 55 ValueLoader Erro...

Page 62: ...can use the ValueLoader Select an unused SCSI ID See the manuals for the other devices on the SCSI bus or your operating system to determine which SCSI IDs are currently in use If the ValueLoader is...

Page 63: ...A green LED on the terminator indicates that the unit is attached to a SCSI bus running in LVD mode A red LED on the terminator indicates that the unit is attached to a SCSI bus running in SE mode If...

Page 64: ...Device Drivers on page 17 Also refer to our Web site for more information Troubleshooting Table 4 Table 4 lists common problems with the ValueLoader and possible solutions Table 4 Common ValueLoader P...

Page 65: ...al end of the media Make sure that the backup software is not reserving the slot or preventing the tape drive from ejecting the cartridge The backup software needs to cancel the reservation and any ho...

Page 66: ...se you may have to perform an erase format or label operation on the cartridge Make sure you understand any data protection or overwrite protection schemes that your backup application may be using wh...

Page 67: ...rm that the backup application is utilizing block sizes of at least 32 KB preferably 64 KB Refer to your application s documentation for details Cleaning Recurring cleaning message Make sure you are u...

Page 68: ...ght after three or more attempts discard it and use a new cleaning cartridge Nonacclimated media A cartridge should be acclimated for a minimum of 24 hours before being used particularly if it has bee...

Page 69: ...y An exclamation point displayed in the inventory means that the ValueLoader has identified a cartridge in the indicated slot that is either an invalid cartridge type or a cartridge with a media relat...

Page 70: ...e the front cover screws that secure the mounting brackets from both sides of the ValueLoader as shown in figure 15 Figure 15 Removing Mounting Brackets Left Side Shown 5 Remove the seven screws that...

Page 71: ...ueLoader 8 On each carrier carefully pull the cartridge lock lever away from the carrier allowing the cartridge to slide out as shown in figure 16 Figure 16 Pulling the Cartridge Release Lever Note To...

Page 72: ...each carrier is inserted into the proper ValueLoader belt loop Figure 17 Installing the Carrier 10 Ensure the carrier is properly installed on the belt by gently pressing on the top of the carrier an...

Page 73: ...on If the error persists contact support personnel To view the error log follow these steps 1 From the Home Screen or main menu press the or button until Information appears on the top line of the LCD...

Page 74: ...rs Update the inventory using the Re inventory option in the Configuration menu 3 0 84 Source Empty There is no cartridge in the location from which a cartridge move was issued 3 0 85 Destination Full...

Page 75: ...ng to import a data cartridge to a carousel slot 3 0 96 Export Error An error occurred while trying to export a data cartridge from its carousel slot This can be caused by an empty slot that is expect...

Page 76: ...pt the operation again If the error recurs contact Technical Support 3 0 B2 NVRAM Error Cycle power on the ValueLoader and attempt the operation again If the error recurs contact Technical Support 3 0...

Page 77: ...l 63 3 0 BC Drive Bug checked Cycle power on the ValueLoader and attempt the operation again If the error recurs contact Technical Support 3 0 BF Fatal Error Cycle power on the ValueLoader and attempt...

Page 78: ...Diagnostics and Troubleshooting ValueLoader Error Codes 64 ValueLoader LTO Tape Autoloader User Manual...

Page 79: ...ions Operating Specifications Environmental Specifications Tape Drive Specifications Media Specifications Table 6 Physical Specifications Characteristic Product Alone Product in Package Height 8 4 cm...

Page 80: ...ive 15 MB s Compressed 6 MB s assuming 2 1 compression ratio Drive type 1 HP LTO drive Number of slots 8 MSBF 250 000 swaps Interface LVD ultra wide SCSI 2 16 bits wide 68 pin HD connector Characteris...

Page 81: ...equency range 500 Hz Characteristic Specification Read write transfer rate maximum sustained Native 15 MB second Compressed 2 1 typical 30 MB second Burst transfer rate 80 MB second Average access tim...

Page 82: ...GB compressed 2 1 typical Basic description Advanced metal particle Tape Length 609 meters 1998 feet Cartridge dimensions 10 2 x 10 54 x 2 15 cm 4 x 4 15 x 0 85 in Shelf life 30 years minimum 20 C 40...

Page 83: ...a backup software vendor for technical support Information Needed 2 Before contacting Technical Support please have the following information ready Model number for your ValueLoader Serial number Med...

Page 84: ...acting the software vendor make sure you have the following information Your name and telephone number The product name firmware revision operating system build and serial number Detailed list of repo...

Page 85: ...loading 30 maintaining 31 removing stuck 55 58 unloading 30 write enabling 31 write protecting 31 Clean Drive LED 24 Cleaning the tape drive 32 Clearance ValueLoader 7 Configuring the ValueLoader 35...

Page 86: ...7 28 In Transit message 23 Inventory 33 L Labels barcode 3 LEDs 24 Loading cartridges 30 Location criteria installation 6 7 Low voltage differential 2 3 LTO cartridge 27 LVD SCSI bus 2 3 M Maintaining...

Page 87: ...ial mode 38 Single ended SCSI bus 3 Specifications 65 68 Stacker mode 38 Stuck cartridge removing 55 58 System test 42 T Temperature operating 32 storage 32 Termination SCSI 16 Troubleshooting 47 63 U...

Page 88: ...74 ValueLoader LTO Tape Autoloader User Manual...

Reviews: