184
Camera
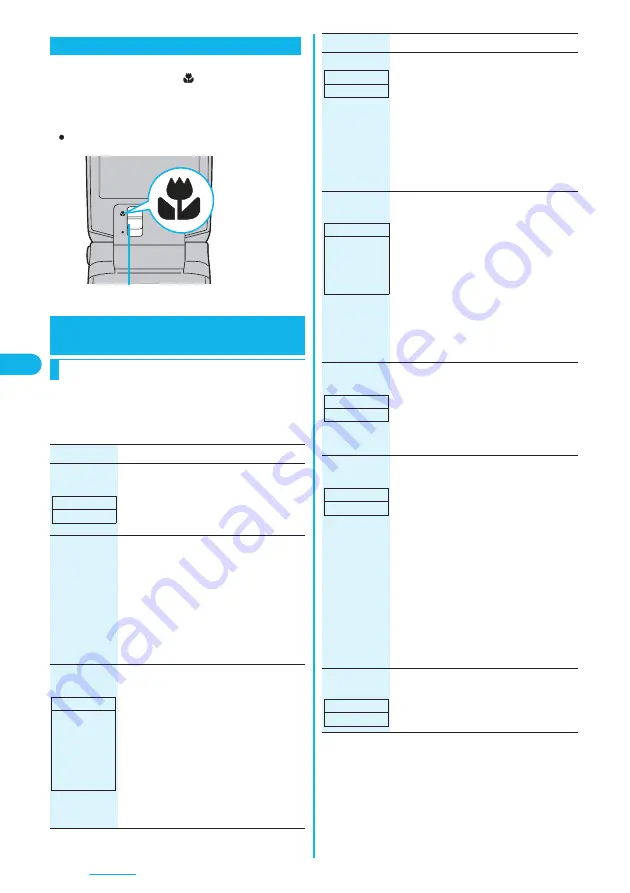
You can shoot a subject from as close as about 8 cm.
Slide the close-up lever to “
”.
You can set close-up mode for the outside camera
only.
After close-up shooting, return the close-up lever to
“
”.
p
The settings for camera shooting or for saving files are
retained even if you end the camera. When you start up
the camera again, the previous settings before ending the
camera return.
Close-up
Setting Image Size and Image
Quality
Function Menu of the Finder Display
Close-up lever
Function menu
Operation/Explanation
Inside camera/
Outside camera
You can switch between the inside camera
and outside camera.
p
You can switch between the inside
camera and outside camera also by
pressing
d
from the Finder display.
CHG
camera-mode
Select a mode.
p
When you select “Continuous mode”, the
camera starts in the mode you used last
time, “Auto”, “Manual”, or “Auto bracket”
(starts in “Auto” at the time of purchase).
p
Each time you press
c
from the Finder
display, the mode switches in order of
“Photo mode”
→
“Movie mode”
→
“Continuous mode”.
Image size
setting
[Photo/Continuous
Mode]
Select an image size.
p
When you shoot a photo for sending
during a voice call, you can select only
“QCIF (176 x 144)” and “Sub-QCIF (128 x
96)”.
p
You can display the Icon Menu by
pressing
5
from the Finder display.
(See page 187)
p
When you shoot a moving image, the
image size is determined by “Image
quality set.”.
Setting at purchase
Outside camera
Setting at purchase
Photo Mode:
Stand-by
(240 x 320)
Continuous Mode:
CIF (352 x 288)
Photo-sending:
QCIF (176 x 144)
File size setting
[Movie Mode
only]
Select an item.
Mail restrict’n (S)
. . . You can shoot up to 490 Kbytes.
Mail restrict’n (L)
. . . You can shoot up to 1.99 Mbytes.
Long time
. . You can shoot for a long time. The
moving image is saved to the microSD
memory card.
Image quality
set.
You can set the image quality for saving.
Select an image quality.
p
In Movie Mode, the image size for
“Normal” (Phone), “Prefer img qual”,
“Prefer motion spd”, “Normal” (microSD)
or “Fine” is QCIF (176 x 144). The image
size for “Long dur. mode” is Sub-QCIF
(128 x 96). The image size for “Super fine”
or “Extra fine” is QVGA (320 x 240).
p
You can display the Icon Menu by
pressing
4
from the Finder display.
(See page 187)
Camera settings
(Brightness)
You can adjust to -3 (dark) t3
(bright).
Brightness
Select a brightness.
p
You can display the Icon Menu by
pressing
1
from the Finder display.
(See page 187)
Camera settings
(White balance)
You can adjust the coloring of the image on
the Finder display to create a natural color
tone.
White balance
Select an item.
Auto
. . . . . . . For adjusting white balance
automatically
Fine
. . . . . . . . For shooting outdoors in fine
weather
Cloudy
. . . . . For shooting in cloudy
weather or in the shade
Light bulb
. . . For shooting under lighting
p
You can display the Icon Menu by
pressing
2
from the Finder display.
(See page 187)
Camera settings
(Color mode set)
Color mode set
Select a color mode.
Normal
. . . . . . . . Shoots in normal color.
Sepia
. . . . . . . . . . Shoots in sepia color.
Monochrome
. . . Shoots in monochrome.
Function menu
Operation/Explanation
Setting at purchase
Mail restrict’n (L)
Setting at purchase
Photo Mode/
Continuous Mode:
Fine
Movie Mode:
Normal
At Camera start-up
±
0
At Camera start-up
Auto
At Camera start-up
Normal
Summary of Contents for P703i
Page 52: ...50 MEMO ...
Page 108: ...106 MEMO ...
Page 396: ...394 MEMO ...
Page 455: ...453 Index Quick Manual Index 454 Quick Manual 460 ...
Page 506: ...Kuten Code List ...


