321023
48
8.1.7
Fahrenheit or Celsius Mode
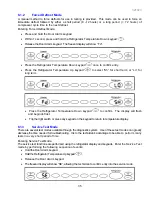
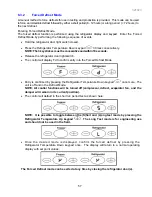
Enter the Fahrenheit or Celsius Mode by performing the following sequence of events:
1. Open the fresh food compartment door and press and hold the
DOOR ALARM
keypad for 6
seconds.
2. Press
the
FREEZER TEMPERATURE UP
keypad until “F_C” is in the freezer display.
3. Press
the
FRESH FOOD COMPARTMENT TEMPERATURE UP
keypad or the
FRESH FOOD
COMPARTMENT TEMPERATURE DOWN
keypad to toggle between “
O
F” and “
O
C” in the fresh
food compartment display.
4. Close the door or toggle the door switch to activate the selection.
8.1.8
Cooling Fan Mode
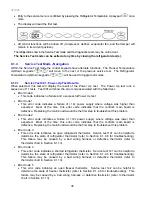
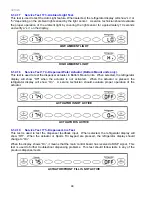
Enter the Cooling Fan Mode by performing the following sequence of events:
1. Open the fresh food compartment door and press and hold the
DOOR ALARM
keypad for 6
seconds.
2. Press
the
FREEZER TEMPERATURE UP
keypad until “CC” is in the freezer display.
3.
Press
the
FRESH FOOD COMPARTMENT TEMPERATURE UP
keypad or the
FRESH FOOD
COMPARTMENT TEMPERATURE DOWN
keypad to toggle between ON and OFF in the fresh
food compartment display.
4. Close the door or toggle the door switch to activate the selection.
8.1.9
Alarm Enable Mode
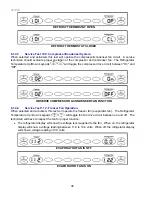
Enter the Alarm Enable Mode by performing the following sequence of events:
1. Open the fresh food compartment door and press and hold the
DOOR ALARM
keypad
for 6
seconds.
2. Press
the
FREEZER TEMPERATURE UP
keypad until “AL” is in the freezer display.
3. Press
the
FRESH FOOD COMPARTMENT TEMPERATURE UP
keypad or the
FRESH FOOD
COMPARTMENT TEMPERATURE DOWN
keypad to toggle between ON and OFF in the fresh
food compartment display.
4. Close the door or toggle the door switch to activate the selection.
8.1.10
Light Level Mode
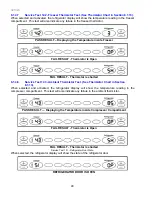
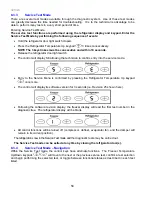
Enter the Light Level Mode by performing the following sequence of events:
1. Open the fresh food compartment door and press and hold the
DOOR ALARM
keypad
for 6
seconds.
2. Press
the
FREEZER TEMPERATURE UP
keypad until “LL” is in the freezer display.
3. Press the
FRESH FOOD COMPARTMENT TEMPERATURE UP
keypad or
FRESH FOOD
COMPARTMENT TEMPERATURE DOWN
keypad to raise or lower the light level of the
dispenser light from 1 (darkest light level setting) to 9 (lightest light level setting) in the fresh food
compartment display.
4. Close the door or toggle the door switch to activate the selection.
8.1.11
Filter Status Light
This feature reminds users to replace the water filter after 1 year has passed or after 500 gallons of water
are filtered, whichever happens first.
NOTE:
The filter status light turns red after 1 year has passed or after 500 gallons of water are dispensed,
even if a bypass is installed and the unit is used without a filter cartridge.
The green light indicates the filter is in good condition. The red light indicates the filter
replacement is needed. The filter monitor works by keeping track of time:
•
Six months is approximately 16 million seconds.
•
The refrigerator’s water system requires about 53,000 seconds to pass 500 gallons of
water.
•
Each second that water is dispensed counts as 1.20 ounces of water.
•
An additional 3.20 ounces of water is counted every 30 minutes that water is dispensed. This
attempts to account for ice usage.
Summary of Contents for RX256DT4X1
Page 11: ...321023 11 2 3 Refrigerant Flow...
Page 12: ...321023 12 2 4 Cabinet Air Flow...
Page 13: ...321023 13 2 5 Ice And Water Dispenser Diagram...
Page 14: ...321023 14 2 6 Water Valve Diagram...
Page 15: ...321023 15 2 7 Typical External Sweat Pattern...
Page 16: ...321023 16 3 INSTALLATION...
Page 17: ...321023 17...
Page 18: ...321023 18...
Page 76: ...321023 76 Ice Water Dispensing Board...
Page 78: ...321023 78 Mid Electronic Specification Control RX256DT4X1 RX256ET2B1 RX256ET2W1...
Page 104: ...321023 104 14 WIRING DIAGRAMS 14 1 Wiring Schematic RX256DT7X1...
Page 105: ...321023 105 14 2 Wiring Diagram RX256DT7X1...
Page 106: ...321023 106 14 3 Wiring Schematic RX256DT4X1 RX256ET2B1 RX256ET2W1...
Page 107: ...321023 107 14 4 Wiring Diagram RX256DT4X1 RX256ET2B1 RX256ET2W1...
Page 108: ...321023 108 NOTES...


