The Sliding Table… A Second Approach
If you find adjusting the sliding table especially difficult then try something slightly
different. This will also work well for cases when the sliding has to be assembled to
the machine and the fixing screws have been either removed or loosened – but in
either case no longer have any useful settings to work with. It may also work better
for longer sliding tables, 6ft in particular.
If you have been trying to adjust the sliding table for hours on end then it is
recommended to loosen the sliding table so that it is not under stress and leave it for
24 hours to prevent any permanent damage being caused.
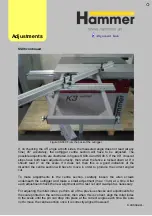
When re-starting, follow the same procedures as described before but this time begin
with only 3 fixing points, not 4. Try to adjust the slding table with 3 of the 4 points
shown in the graphic illustrations in SS02. This will ensure that the sliding table
begins co-planar and then will not be twisted or distorted by subsequent minor
adjustments.
Once within tolerance – or close to – tighten up the 4
th
nut, being careful not to
change the current setting. Hand tighten to begin with and make any small
adjustments necessary. Then, where applicable, move to the outer four fixing points
or the inner fixing point. These points are described in SS03, Sliding Table End
Positions.
Alig nm e nt Link
Adjust
ments
Summary of Contents for Hammer
Page 1: ...Machine Setup Guide InstallVersion1 09...
Page 5: ...15 Completion You re Good To Go 16 FAQ s 17 Links Contact Details Contents 3...
Page 32: ...The rip fence side is complete 11 Assembly...
Page 74: ...Figure SS03 2 End position 2 Adjustments Alignme nt Link SS03 continued...
Page 79: ...Figure SS07 3 Crosscut stop and block adjustment Adjustments Alignme nt Link SS07 continued...

