background image

Programming manual

CNC 8055

CNC 8055i

PATH

 CONTROL

6.

·M· & ·EN· M

ODELS

S

OFT

: V02.2

X

·89·

C

ircular interp

olatio

n (G02

, G0

3)

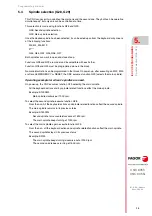
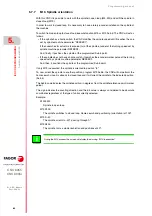
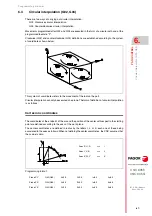
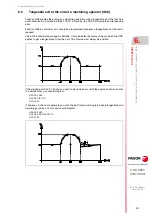
If P0 is the starting point and P1 the endpoint, there are 4 arcs which have the same value passing
through both points.

Depending on the circular interpolation G02 or G03, and on the radius sign, the relevant arc is
defined. Thus the programming format of the sample arcs is as follows:

Arc 1

G02 X.. Y.. R- ..

Arc 2

G02 X.. Y.. R+..

Arc 3

G03 X.. Y.. R+..

Arc 4

G03 X.. Y.. R- ..

Execution of the circular interpolation

The CNC calculates, depending on the programmed arc, the radii of the starting point and endpoint.
Although both of them should be "exactly" the same, general parameter "CIRINERR" allows a
certain calculation tolerance by establishing the maximum difference between these two radii. When
exceeding this value, the CNC will issue the corresponding error message.

In all these programming cases, the CNC checks that the center or radius coordinates do not exceed
214748.3647mm. Otherwise, the CNC will display the corresponding error.

The programmed feedrate "F" may vary between 0% and 120% via the switch located on the Control
Panel of the CNC, or by selecting between 0% and 255% from the PLC, or via the DNC or the
program.

The CNC, however, is equipped with the general machine parameter "MAXFOVR" to limit maximum
feedrate variation.

If the general machine parameter "PORGMOVE" has been selected and a circular interpolation
(G02 or G03) is programmed, the CNC assumes the center of the arc to be a new polar origin.

Functions G02 and G03 are modal and incompatible both among themselves and with G00, G01,
G33 and G34. Functions G02 and G03 can be programmed as G2 and G3.

Also, function G74 (home search) and G75 (probing) cancel the G02 and G03 functions.

On power-up, after executing M02, M30 or after EMERGENCY or RESET, the CNC assumes code
G00 or G01, depending on how general machine parameter "IMOVE" has been set.

Summary of Contents for 8055 EN

Page 1: ...CNC 8055 M EN Programming manual Ref 1711 Soft V02 2x...

Page 2: ...associated documentation however Fagor Automation does not guarantee the validity of those applications Therefore except under the express permission from Fagor Automation any CNC application that is...

Page 3: ...remental programming G90 G91 45 3 5 Coordinate programming 46 3 5 1 Cartesian coordinates 47 3 5 2 Polar coordinates 48 3 5 3 Cylindrical coordinates 50 3 5 4 Angle and Cartesian coordinate 51 3 6 Rot...

Page 4: ...09 7 1 1 G04 K0 Block preparation interruption and coordinate update 111 7 2 Dwell G04 K 112 7 3 Working with square G07 and round G05 G50 corners 113 7 3 1 G07 square corner 113 7 3 2 G05 round corne...

Page 5: ...211 10 3 1 Basic operation 213 10 4 G63 Multiple machining in a circular pattern 214 10 4 1 Basic operation 216 10 5 G64 Multiple machining in an arc 217 10 5 1 Basic operation 219 10 6 G65 Machining...

Page 6: ...n G49 347 13 2 5 Variables associated with machine parameters 349 13 2 6 Variables associated with work zones 350 13 2 7 Variables associated with feedrates 351 13 2 8 Variables associated with coordi...

Page 7: ...ameters associated with function G49 434 15 1 7 Programming example 435 15 2 Movement according to the tool coordinate system G47 436 15 3 TCP Transformation G48 437 15 3 1 Considerations about the G4...

Page 8: ...8 Programming manual CNC 8055 CNC 8055i SOFT V02 2X...

Page 9: ...thernet Option Option Option RS232 serial line Standard Standard Standard 16 digital inputs and 8 outputs I1 to I16 and O1 to O8 Standard Standard Standard Another 40 digital inputs and 24 outputs I65...

Page 10: ...pping Stand Stand Stand Stand Stand Stand Stand Tool life monitoring Opt Opt Opt Stand Opt Opt Opt Probing canned cycles Opt Opt Opt Stand Opt Opt Opt DNC Stand Stand Stand Stand Stand Stand Stand Sta...

Page 11: ...C is available in the downloads section of FAGOR S corporate website at http www fagorautomation com Type of file Declaration of conformity WARRANTY TERMS The warranty conditions for the CNC are avail...

Page 12: ...12 CNC 8055 CNC 8055i Declaration of conformity and Warranty conditions...

Page 13: ...atures Manual Open communication INST Improvements to Look Ahead machining INST Blocks with helical interpolation in G51 PRG G84 Tapping with relief PRG List of features Manual Spindle parameter OPLDE...

Page 14: ...r parameters MAXGEAR1 4 P2 5 SLIMIT P66 and MAXSPEED P0 INST Retracing function of 2000 blocks INST Quick block search OPT Local subroutines within a program PRG Avoid spindle stop with M30 or RESET S...

Page 15: ...ault value for generalmachine parameters MAINOFFS P107 MAINTASF P162 and FEEDTYPE P170 INST New variable EXTORG INST PRG Image handling via DNC PRG Save restore a trace of the oscilloscope OPT List of...

Page 16: ...16 CNC 8055 CNC 8055i Version history...

Page 17: ...id electrical discharges and fire hazards do not apply electrical voltage outside the range selected on the rear panel of the central unit Ground connection In order to avoid electrical discharges con...

Page 18: ...disturbances coming from the machine tool The machine tool must have all the interference generating elements relay coils contactors motors etc uncoupled DC relay coils Diode type 1N4000 AC relay coi...

Page 19: ...ltage of the external power supply over 33 Vdc and against reverse connection of the power supply Monitor The type of protection fuse depends on the type of monitor See identification label of the uni...

Page 20: ...ower Before manipulating the connectors inputs outputs feedback etc make sure that the unit is not connected to AC power Symbol for danger or prohibition It indicates actions or operations that may ca...

Page 21: ...ing used to make the box must have a resistance of 170 kg 375 pounds 2 Attach a label indicating the owner of the unit person to contact type of unit and serial number 3 In case of failure also indica...

Page 22: ...22 CNC 8055 CNC 8055i Returning conditions...

Page 23: ...o prevent electrical shock at the monitor of the 8055 CNC use the proper mains AC connector A with 3 wire power cables one of them for ground connection Before turning on the monitor of the 8055 CNC a...

Page 24: ...24 CNC 8055 CNC 8055i Additional notes...

Page 25: ...irected to the end user It describes how to operate and program in TC mode It contains a self teaching manual MCO TCO model Directed to the end user It describes how to operate and program in MCO and...

Page 26: ...26 CNC 8055 CNC 8055i Fagor documentation...

Page 27: ...Once the editing mode or desired table has been selected the CNC allows you to enter data from the keyboard Entering programs and tables from a Computer DNC or peripheral device TheCNCallowsdatatobee...

Page 28: ...disk KeyCF in a PC or in the USB disk it must be previously copied into RAM memory Executing and editing a part program Part programs stored anywhere may be executed or simulated Simulation is carried...

Page 29: ...from Modify a program from Delete a program from Yes Yes Yes Yes Yes Yes No No Yes Copy from to RAM memory to from Copy from to HD to from Copy from to DNC to from Yes Yes Yes Yes Yes Yes Yes Yes Yes...

Page 30: ...HD the following verification takes place File name The file number must always have 6 digits and the extension PIM for milling or PIT for lathe Examples 001204 PIM 000100 PIM 123456 PIT 020150 PIT I...

Page 31: ...feature the possibility of working in DNC Distributed Numerical Control enabling communication between the CNC and a computer to carry out the following functions Directory and delete commands Transfe...

Page 32: ...cks should be programmed These will all be programmed according to the programming rules indicated in this manual After each block to separate it from the others the RT RETURN or LF LINE FEED characte...

Page 33: ...s 0 1 2 3 4 5 6 7 8 9 Programming allows spaces between letters numbers and symbols in addition to ignoring the numerical format if it has zero value or a symbol if it is positive The numeric formatof...

Page 34: ...block skip will be analyzed at the time when the block is read i e 200 blocks before execution If the block skip needs to be analyzed at the time of execution it is necessary to interrupt the block pr...

Page 35: ...linear and circular interpolations threading etc Control functions for axis feedrate and spindle speeds Tool control functions Complementary functions with technological instructions High level langua...

Page 36: ...place if N0 is programmed only the movement programmed within the block takes place Movement blocks can only be repeated which at the time of their execution are under the influence of a modal subrout...

Page 37: ...number Followed by the contents of the subroutine The range of local subroutines is from 0 to 9999 LSUB 0 LSUB 9999 The actual beginning of the program is identified with the sign Any text may follow...

Page 38: ...ed It only takes into account the ones defined in the root program It only takes into account local subroutines that are in programs that are executed from the CNC execution channel either in ISO mode...

Page 39: ...Given that the purpose of the CNC is to control the movement and positioning of axes it is necessary to determine the position of the point to be reached through its coordinates The CNC allows you to...

Page 40: ...racteristics of the system of axes X and Y main movements on the main work plane of the machine Z parallel to the main axis of the machine perpendicular to the main XY plane U V W auxiliary axes paral...

Page 41: ...ble axes that may exist the CNC allows the manufacturer to select up to 7 of them Moreover all the axes should be suitably defined as linear rotary etc through the axis machine parameters which appear...

Page 42: ...axis2 axis3 Enables selection of the desired work plane plus the direction of G02 G03 circular interpolation axis1 being programmed as the abscissa axis and axis2 as the ordinate axis The axis3 is th...

Page 43: ...axis the CNC does not allow functions G17 G18 and G19 if any one of the X Y or Z axes is not selected as being controlled by the CNC On power up after executing M02 M30 or after EMERGENCY or RESET the...

Page 44: ...Depending on whether G70 or G71 has been programmed the CNC assumes the corresponding set of units for all the blocks programmed from that moment on The G70 and G71 functions are modal and are incomp...

Page 45: ...remental coordinates G91 the numerical value programmed corresponds to the movement information for the distance to be traveled from the point where the tool is situated at that time The sign in front...

Page 46: ...of these may be linear linear to position only normal rotary rotary to position only or rotary with hirth toothing positioning in complete degrees according to the specification in the machine paramet...

Page 47: ...h the point of intersection is called Cartesian Origin or Zero Point of the Coordinate System The position of the different points of the machine is expressed in terms of the coordinates of the axes w...

Page 48: ...depending on whether you are working with G90 or G91 and their programming format will be R5 5 Q 5 5 The radius value must always be positive The values R and Q are incremental and their programming...

Page 49: ...e G01 The polar origin apart from being able to be preset using function G93 described later can be modified in the following cases On power up after executing M02 M30 EMERGENCY or RESET the CNC will...

Page 50: ...ates To define a point in space the system of cylindrical coordinates can be used as well as the Cartesian coordinate system A point on this system would be defined by The projection of this point on...

Page 51: ...lane can be defined via one of its Cartesian coordinates and the exit angle of the previous path Example of programming assuming that the main plane is XY X10 Y20 Point P0 starting point Q45 X30 Point...

Page 52: ...ates the turning direction If the programmed movement exceeds 360 theaxiswill rotate more than one turn before positioningatthedesired point Non rollover axis programming In G90 and G91 like a linear...

Page 53: ...ined in each axis G20 Defines the lower limits in the desired zone G21 Defines the upper limits in the desired zone The format to program these functions is G20 K X C 5 5 G21 K X C 5 5 Where K Indicat...

Page 54: ...nto account at all times tool offset table to avoid it exceeding the programmed limits The presetting of work zones is done via Function G22 the programming format being G22 K S Where K Indicates the...

Page 55: ...be freely selected by the programmer and its machine reference zero can be set by the zero offset Machine Reference point This is a point on the machine established by the manufacturer around which t...

Page 56: ...will be carried out one axis at a time at the feedrate indicated in the axis machine parameter REFEED2 until the machine reference point is reached i e the marker pulse is found Home search using the...

Page 57: ...These coordinates should be expressed in millimeters or inches depending on how the general machine parameter INCHES is defined By programming G53 alone without motion information the current active...

Page 58: ...in one of two ways Via Function G92 coordinate preset The CNC accepts the coordinates of the programmed axes after G92 as new axis values Through the use of zero offsets G54 G59 G159N1 G159N20 the CN...

Page 59: ...as new axis values NootherfunctioncanbeprogrammedintheblockwhereG92isdefined theprogrammingformat being G92 X C 5 5 Spindle speed limitation When executing a G92 S5 4 type block the CNC limits the spi...

Page 60: ...offset programmed with respect to machine zero canceling the possible active zero offsets If one of the incremental offsets G58 or G59 is executed the CNC adds its values to the absolute zero offset a...

Page 61: ...in the same program without having to set them previously in the offset table or use high level instructions Whenapplyinganincrementalzerooffset theCNCaddsittotheabsolutezerooffsetactiveatatime Progr...

Page 62: ...ro offset Machining of profile A2 N300 G55 It applies the second absolute zero offset The incremental zero offset stays active Machining of profile A3 N200 G158 Z 180 It applies the second incremental...

Page 63: ...play in the zero offset table In ISO mode and conversational mode the zero offset table is one line over the the G54 position where it identifies the G158 with its values X Y Z etc This line cannot be...

Page 64: ...he polar origin On power up or after executing M02 M30 or after an EMERGENCY or RESET the CNC assumes the currently active part zero as polar origin When selecting a new work plane G16 G17 G18 G19 the...

Page 65: ...s you to program figures from 0 00001 to 99999 9999 with or without sign working in millimeters G71 called format 5 4 or either from 0 00001 to 3937 00787 with or without sign if the programming is do...

Page 66: ...ons 7 5 G15 Longitudinal axis selection 8 2 G16 Main plane selection by two addresses and longitudinal axis 3 2 G17 Main plane X Y and longitudinal Z 3 2 G18 Main plane Z X and longitudinal Y 3 2 G19...

Page 67: ...g move until touching 12 1 G76 Probing move while touching 12 1 G77 Axis coupling slaving 7 8 1 G77S Spindle synchronization 5 5 G78 Cancellation of axis coupling slaving 7 8 2 G78S Cancellation of sp...

Page 68: ...by the CNC when it is powered on after executing M02 M30 or after EMERGENCY or RESET In those cases indicated by it should be understood that the DEFAULT of these G functions depends on the setting of...

Page 69: ...fective working in linear G01 or circular G02 G03 interpolation If function F is not programmed the CNC assumes the feedrate to be F0 When working in rapid travel G00 the machine will move at the rapi...

Page 70: ...p between the feedrate of the axis component and the programmed feedrate F is the same as that between the movement of the axis and the resulting programmed movement Example On a machine which has lin...

Page 71: ...in mm rev or inches mm This function does not affect the rapid moves G00 which will be made in mm min or inch min By the same token it will not be applied to moves made in the JOG mode during tool ins...

Page 72: ...on the part By using this function the finished surface is uniform in curved sections In this manner working in function G96 the speed of the center of the tool in the inside or outside curved sectio...

Page 73: ...rresponding to the feedrate of the center of the tool In this manner working in function G97 the speed of the cutting point on the inside or outside curved sections is reduced keeping the speed of the...

Page 74: ...by using function G92 S5 4 The programmed turning speed S may be varied from the PLC DNC or by the SPINDLE keys and on the Operator Panel of the CNC This speed variation is made between the maximum an...

Page 75: ...n power up after executing an M02 M30 or after an EMERGENCY or RESET the CNC assumes function G29 selects the main spindle Operating example for when 2 spindles are used On power up the CNC assumes fu...

Page 76: ...the main spindle assumes the programmed speed While the spindles are synchronized in speed function G77S active with G30 they may also be synchronized in position and set an angular offset between th...

Page 77: ...rogramming T5 D23 means selecting the turret position 5 and assuming the geometry and dimensions of tool offset 23 Tool length and radius compensation The CNC looks up the tool offset table and assume...

Page 78: ...lock preparation or not An indicator which determines if the M function is executed or not after the execution of the associated subroutine An indicator which determines if the CNC must wait for the s...

Page 79: ...h return to the first block Identical to M02 except that the CNC returns to the first block of the program 5 7 5 M03 M4 M5 Spindle start and stop M03 Clockwise spindle rotation This code represents cl...

Page 80: ...ge it again If when activating the M3 M4 or M5 marks via PLC the main channel is transferring something to the PLC the PLC keeps the mark active until the CNC can attend to it Once the M function is e...

Page 81: ...ctions to the tool changer and updates the table corresponding to the tool magazine It is recommended to set this function in the table of M functions so that the subroutine corresponding to the tool...

Page 82: ...home switch it searches the encoder marker pulse at the turning speed set by spindle machine parameter REFEED2 And then it positions the spindle at the programmed S 5 5 point If only M19 is executed t...

Page 83: ...g to be programmed If this machine parameter is set for non automatic gear change M41 thru M44 will have to be programmed every time a gear change is required Bear in mind that the maximum velocity co...

Page 84: ...rning speed in rpm and the sign indicates the turning direction The CNC will output the velocity command corresponding to the selected speed according to the value assigned to the machine parameter MA...

Page 85: ...always a straight line between the starting point and the final point It is possible via the general machine parameter RAPIDOVR to establish if the feedrate override switch when working in G00 operat...

Page 86: ...een 0 and 120 via the switch located on the Control Panel of the CNC or by selecting between 0 and 255 from the PLC or via the DNC or the program The CNC however is equipped with the general machine p...

Page 87: ...tes refers to the movement of the tool on the part Circular interpolation can only be executed on a plane The form of definition of circular interpolation is as follows Cartesian coordinates The coord...

Page 88: ...ill assume that it coincides with the current polar origin Programming format Cartesian coordinates with radius programming The coordinates of the endpoint of the arc and radius R are defined Programm...

Page 89: ...message In all these programming cases the CNC checks that the center or radius coordinates do not exceed 214748 3647mm Otherwise the CNC will display the corresponding error The programmed feedrate...

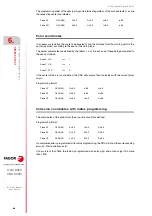
Page 90: ...modes are analyzed below point X60 Y40 being the starting point Cartesian coordinates G90 G17 G03 X110 Y90 I0 J50 X160 Y40 I50 J0 Polar coordinates G90 G17 G03 Q0 I0 J50 Q 90 I50 J0 or G93 I60 J90 de...

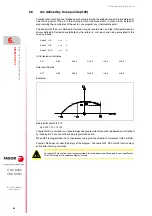
Page 91: ...us programming modes analyzed below point X170 Y80 being the starting Point Cartesian coordinates G90 G17 G02 X170 Y80 I 50 J0 or G90 G17 G02 I 50 J0 Polar coordinates G90 G17 G02 Q36 0I 50 J0 or G93...

Page 92: ...ter of the arc I J or K in absolute coordinates i e with respect to the zero origin and not to the beginning of the arc Function G06 is not modal so it should be programmed any time the coordinates of...

Page 93: ...rogram a straight line then an arc tangential to the line and finally an arc tangential to the previous one Function G08 is not modal so it should always be programmed if you wish to execute an arc ta...

Page 94: ...J or K each one being associated to the axes as follows In Cartesian coordinates Polar coordinates Example Being initial point X 50 Y0 G09 X35 Y20 I 15 J25 Function G09 is not modal so it should alway...

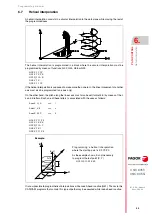
Page 95: ...near movement of another axis must also be programmed one axis only On the other hand the pitch along the linear axis must also be set format 5 5 by means of the I J and K letters Each one of these le...

Page 96: ...the same example you require the entrance of the tool to the part to be machined tangential to the path and describing a radius of 5 mm you should program G90 G01 G37 R5 X40 G02 X60 Y10 I20 J0 As can...

Page 97: ...al so it should be programmed whenever a tangential exit of the tool is required Value R 5 5 should always appear after G38 It also indicates the radius of the arc which the CNC applies to get a tange...

Page 98: ...start and end points of the arc Function G36 is not modal so it should be programmed whenever controlled corner rounding is required This function should be programmed in the block in which the moveme...

Page 99: ...unction G39 is not modal so it should be programmed whenever the chamfering of a corner is required This function should be programmed in the block in which the movement whose end you want to chamfer...

Page 100: ...edrate set by s m p REFEED2 P35 After finding home the spindle will speed up or slow down to the programmed speed without stopping If the spindle has motor feedback with a SINCOS encoder without refer...

Page 101: ...ng G33 Example We would like to a make a thread in a single pass in X0 Y0 Z0 with a depth of 100 mm and a pitch of 5 mm using a threadcutting tool located in Z10 G90 G0 X Y Z Positioning G33 Z 100 L5...

Page 102: ...33 and G75 On power up after executing M02 M30 or after EMERGENCY or RESET the CNC assumes code G00 or G01 depending on how general machine parameter IMOVE has been set Blending a fixed pitch thread G...

Page 103: ...rmat is G52 X C 5 5 After G52 program the desired axis as well as the target coordinate of the move The axis will move towards the programmed target coordinate until running into something If the axis...

Page 104: ...its 1 min Example G32 X22 F4 indicates that the movement must be executed in 1 4 minute i e in 0 25 minutes Function G32 is modal and incompatible with G94 and G95 On power up after executing M02 M30...

Page 105: ...xis Every time G45 tangential control is activated the CNC acts as follows 1 Positions the tangential axis with respect to the first section in the programmed position 2 The interpolation of the plane...

Page 106: ...ound corner G05 the tool orientation is not maintained at the corners since it begins before ending the current section It is recommended to work in square corner G07 However to work in round corner G...

Page 107: ...n While in JOG mode tangential control may be activated in MDI mode and the axes may be moved by programming blocks in MDI Tangential control is canceled when jogging the axes with the jog keys not in...

Page 108: ...e used to cancel the tangential control G415 temporarily G145 K0 It cancels the tangential control temporarily Function G45 stays in the history and the new function G145 comes up in it If no G45 has...

Page 109: ...ation of blocks once more A case in point is the evaluation of the status of block skip inputs which is defined in the block header Example G04 Interrupts block preparation 1 G01 X10 Y20 block skip co...

Page 110: ...Block N15 interrupts block preparation and the execution of block N10 will finish at point A Once the execution of block N15 has been carried out the CNC continues preparing blocks starting from block...

Page 111: ...xis goes into DRO mode and then back into normal axis mode during the execution of part programs G04 operation If bit 10 of the g m p ADIMPG P176 1 with the instruction G04 K0 the coordinates are init...

Page 112: ...second 0 5 seconds G04 K200 Dwell of 200 hundredths of a second 2 seconds Function G04 K is not modal so it should be programmed whenever a dwell is required Function G04 K can be programmed as G4 K T...

Page 113: ...e current block has been reached The CNC considers that the programmed position has been reached when the axis is within the INPOSW in position zone or dead band from the programmed position The theor...

Page 114: ...r to the programmed position where the CNC starts executing the next block depends on the actual axis feedrate Via this function round corners can be obtained as shown in the figure The difference bet...

Page 115: ...ng block of the program Function G50 assures that the difference between the theoretical and actual paths stays smaller than what was set by machine parameter INPOSW2 On the other hand when working in...

Page 116: ...r the look ahead algorithm without jerk management Considerations for execution When calculating the feedrate the CNC takes the following into account The programmed feedrate The curvature and the cor...

Page 117: ...nd the new one will be selected Function G51 must be programmed alone in a block and there must be no more information in that block On power up after executing an M02 M30 of after an EMERGENCY or RES...

Page 118: ...algorithm will internally activate FIR filters of the 5th order and a frequency of 30 Hz in all the axes of the channel If there are Fagor filters set by machine parameters activating the advanced loo...

Page 119: ...gorithm It will only be considered if the advanced look ahead algorithm is deactivated that is if bit 15 of g m p LOOKATYP P160 0 To activate deactivate this option use bit 13 of g m p LOOKATYP P160 E...

Page 120: ...le with each other Function G14 must be programmed alone in the block If function G73 pattern rotation is also active in a mirror image program the CNC first applies the mirror image function and then...

Page 121: ...function G72 you can enlarge or reduce programmed parts In this way you can produce families of parts which are similar in shape but of different sizes with a single program Function G72 should be pr...

Page 122: ...MERGENCY or RESET The following subroutine defines the machining of the part G90 X 19 Y0 G01 X0 Y10 F150 G02 X0 Y 10 I0 J 10 G01 X 19 Y0 The programming of the parts would be Execution of subroutine M...

Page 123: ...pply the scaling factor indicated both to the movement of the corresponding axis or axes and to their feedrate If within the same program both scaling factor types are applied the one applied to all t...

Page 124: ...LS SOFT V02 2X Scaling factor G72 If a scaling factor equal to 360 2 R is applied to a rotary axis R being the radius of the cylinder on which you wish to machine this axis can be considered linear an...

Page 125: ...I 5 5 J 5 5 Where The I and J values are defined in absolute coordinates and referred to the coordinate origin of the work plane These coordinates are affected by the active scaling factor and mirror...

Page 126: ...nd then the turn The pattern rotation function can be cancelled either by programming G72 on its own without angle value or via G16 G17 G18 or G19 or on power up after executing M02 M30 or after EMERG...

Page 127: ...re coupled There are three possible ways of coupling axes Mechanical coupling This is imposed by the manufacturer of the machine and is selected via the axis machine parameter GANTRY By PLC This enabl...

Page 128: ...wing rules should be observed when slaving axes electronically You may use one or two different electronic couplings G77 X Y U Couples the Y and U axes to the X axis G77 V Z Couples the Z axis to the...

Page 129: ...laving G78 Function G78 enables you to uncouple all the axes that are coupled slaved or only uncouple indicated axes Example G77 X Y U Couples the Y and U axes to the X axis G77 V Z Couples the Z axis...

Page 130: ...owed by one of the axes to be toggled back Up to three pairs of axes may be toggled at the same time The main axes cannot be toggled while the C axis is active on a lathe On power up after executing a...

Page 131: ...in work units in I 5 5 format The CNC adds this value to the theoretical radius R to calculate the real radius R I Wear of tool length in work units in K 5 5 format The CNC adds this value to the theo...

Page 132: ...on G42 Tool radius compensation to the right of the part G41 The tool is to the left of the part depending on the machining direction G42 The tool is to the right of the part depending on the machinin...

Page 133: ...the previously programmed G41 or G42 is canceled The selection of tool radius compensation G41 or G42 can only be made when functions G00 or G01 are active straight line movements If the compensation...

Page 134: ...134 Programming manual CNC 8055 CNC 8055i 8 TOOL COMPENSATION M EN MODELS SOFT V02 2X Tool radius compensation G40 G41 G42 STRAIGHT STRAIGHT path...

Page 135: ...Programming manual CNC 8055 CNC 8055i TOOL COMPENSATION 8 M EN MODELS SOFT V02 2X 135 Tool radius compensation G40 G41 G42 STRAIGHT CURVED path...

Page 136: ...by a tool controlled by a programmed CNC with tool radius compensation The programmed path is shown with solid line and the compensated path with dashed line The way the various paths are blended joi...

Page 137: ...compensation in which the programmed path is represented by a solid line and the compensated path with a dotted line End of the compensation without programmed movement After cancelling the compensati...

Page 138: ...138 Programming manual CNC 8055 CNC 8055i 8 TOOL COMPENSATION M EN MODELS SOFT V02 2X Tool radius compensation G40 G41 G42 STRAIGHT STRAIGHT path...

Page 139: ...Programming manual CNC 8055 CNC 8055i TOOL COMPENSATION 8 M EN MODELS SOFT V02 2X 139 Tool radius compensation G40 G41 G42 CURVED STRAIGHT path...

Page 140: ...g with radius compensation The programmed path is shown with solid line and the compensated path with dashed line Tool radius 10mm Tool number T1 Tool offset number D1 Preset G92 X0 Y0 Z0 Tool offset...

Page 141: ...ompensation The programmed path is shown with solid line and the compensated path with dashed line Tool radius 10mm Tool number T1 Tool offset number D1 Preset G92 X0 Y0 Z0 Tool offset and spindle sta...

Page 142: ...path is shown with solid line and the compensated path with dashed line Tool radius 10mm Tool number T1 Tool offset number D1 Preset G92 X0 Y0 Z0 Tool offset and spindle start at S100 G90 G17 F150 S1...

Page 143: ...er the change To change the type of compensation the different cases are solved according to the following criteria A The compensated paths cut each other Theprogrammedpathsarecompensatedeachonitscorr...

Page 144: ...ation of tool length compensation Function G43 only indicates that a longitudinal compensation is to be applied The CNC starts applying it when the longitudinal perpendicular axis starts moving When G...

Page 145: ...th tool length compensation It is assumed that the tool used is 4 mm shorter than the programmed one Tool length 4mm Tool number T1 Tool offset number D1 Preset G92 X0 Y0 Z0 Tool offset G91 G00 G05 X5...

Page 146: ...sued for each loop or collision eliminated Possible cases step on a straight path a step in a circular path and tool radius compensation too large The information contained in the eliminated blocks no...

Page 147: ...anned cycle with constant peck drilling step G84 Tapping canned cycle G85 Reaming canned cycle G86 Boring cycle with withdrawal in G00 G87 Rectangular pocket canned cycle G88 Circular pocket canned cy...

Page 148: ...d cycle and its corresponding parameters A canned cycle cannot be defined in a block which has nonlinear movements G02 G03 G08 G09 G33 or G34 Also a canned cycle cannot be executed while function G02...

Page 149: ...mmed at the end of the block the CNC repeats the programmed positioning and the machining operation corresponding to the canned cycle the indicated number of times If a number of repetitions times N0...

Page 150: ...gs of the canned cycle with the updated parameters The G79 function must be programmed alone in a block and this block must not contain any more information Next 2 programming examples are shown assum...

Page 151: ...zone of a canned cycle T1 M6 Starting point G00 G90 X0 Y0 Z60 Defines drilling cycle Drills in A G81 G99 X15 Y25 Z32 I18 Drills in B G98 X25 Modifies reference plane G79 Z52 Drills in C G99 X35 Drill...

Page 152: ...ation A canned cycle can be canceled via Function G80 which can be programmed in any block After defining a new canned cycle This will cancel and replace any other that may be active After executing M...

Page 153: ...d a canned cycle be entered with the spindle stopped it will start in a clockwise direction M03 and maintain the same turning direction until the cycle is completed Should it be required to apply a sc...

Page 154: ...tudinal axis had when the cycle was defined The structure of a canned cycle definition block is as follows It is possible to program the starting point in the canned cycle definition block except the...

Page 155: ...Y in both directions Function G81 defines the drilling canned cycle It is defined with these parameters X Coordinate of the point to be machined along the abscissa axis Y Coordinate of the point to be...

Page 156: ...156 Programming manual CNC 8055 CNC 8055i 9 CANNED CYCLES M EN MODELS SOFT V02 2X Machining canned cycles Example 4 G18 G1 Y 25 F1000 S1000 M3 G81 X15 Y60 Z 2 I8 K1...

Page 157: ...ordinates may be absolute or incremental according to whether the machine is operating in G90 or G91 Z 5 5 Reference plane Defines the reference plane coordinate It can be programmed in absolute coord...

Page 158: ...ference plane RP With J1 it will return to the reference plane RP after each peck With J0 it will return to the relief position indicated by H K5 Dwell Defines the dwell in hundredths of a second afte...

Page 159: ...hs of a second if it has been programmed 2 Withdrawal of the longitudinal axis in rapid G00 as far as the reference plane if the number of drillings programmed in J were made otherwise it withdraws th...

Page 160: ...s and the tool is withdrawn without stopping the spindle The spindle stops when the tool is retracted once it reaches the starting plane Options after tool withdrawal Once the tool has been retracted...

Page 161: ...hole nor go to the next hole it is possible to go into a standard tool inspection In this case a block must be selected and a standard repositioning must be done before resuming the execution of the p...

Page 162: ...f the main plane to position the tool at the machining point This point can be programmed in Cartesian coordinates or in polar coordinates and the coordinates may be absolute or incremental according...

Page 163: ...programmed in I 4 Dwell K in hundredths of a second if it has been programmed 5 Withdrawal at rapid feedrate G00 of the longitudinal axis to the initial or reference plane depending on whether G98 or...

Page 164: ...next SKIPCYCL Finish the hole To finish the hole press the START key It goes down in G0 with spindle running to 1 mm before the coordinate where the hole stopped From then on it continues at the F an...

Page 165: ...es of the main plane to position the tool at the machining point This point can be programmed in Cartesian coordinates or in polar coordinates and the coordinates may be absolute or incremental accord...

Page 166: ...on whether G98 or G99 has been programmed Programming example assuming that the work plane is formed by the X and Y axes that the Z axis is the longitudinal axis and that the starting point is X0 Y0 Z...

Page 167: ...rom then on it continues at the F and S programmed in the cycle Go to the next hole To go to the next hole activate the PLC mark SKIPCYCL The CNC will display the following message Press START to cont...

Page 168: ...he Reference Plane once the hole has been drilled X Y 5 5 Machining coordinates These are optional and define the movement of the axes of the main plane to position the tool at the machining point Thi...

Page 169: ...CYCLES 9 M EN MODELS SOFT V02 2X 169 G83 Deep hole drilling canned cycle with constant peck J4 Drilling passes to withdraw to the starting plane Defines the number of steps which the drill is to make...

Page 170: ...the value of INPOSW2 3 New drilling step G01 movement of the longitudinal axis to the incremental depth programmed in I If INPOSW2 0 in G7 If not in G50 5 Withdrawal at rapid feedrate G00 of the long...

Page 171: ...ing to 1 mm before the coordinate where the hole stopped From then on it continues at the F and S programmed in the cycle Go to the next hole To go to the next hole activate the PLC mark SKIPCYCL The...

Page 172: ...ch it withdraws for chip relief In this case the dwell K is only applied on the last pass not on the relief passes Working in Cartesian coordinates the basic structure of the block is as follows G84 G...

Page 173: ...ing thespindlemustbereadytooperateinclosedloop inotherwords that it must have a servo drive motor system with rotary encoder When rigid tapping the CNC interpolates the movement of the longitudinal ax...

Page 174: ...ne parameter SREVM05 is selected and parameter K has a value other than 0 5 Dwell if parameter K has been programmed 6 The spindle reverses turning direction 7 Withdrawal at J times the working feedra...

Page 175: ...will have the following options Finish the hole Go to the next hole Go into tool inspection After this the CNC will display the following message To end the cycle press START to skip to the next SKIPC...

Page 176: ...go to the next hole it is possible to go into a standard tool inspection In this case a block must be selected and a standard repositioning must be done before resuming the execution of the program Af...

Page 177: ...he axes of the main plane to position the tool at the machining point This point can be programmed in Cartesian coordinates or in polar coordinates and the coordinates may be absolute or incremental a...

Page 178: ...ttom of the machined hole and reaming 4 Dwell if parameter K has been programmed 5 Withdrawal at working feedrate of the longitudinal axis as far as the reference plane 6 Withdrawal at rapid feedrate...

Page 179: ...tion the tool at the machining point This point can be programmed in Cartesian coordinates or in polar coordinates and the coordinates may be absolute or incremental according to whether the machine i...

Page 180: ...mmed the cutter does not separate from the wall of the hole along the X axis Both Q and D must be programmed for the cutter to separate from the wall of the hole E 5 5 Gap between the cutter and the w...

Page 181: ...for the parameters D and E If the values are not programmed correctly it could cause the blade to collide with the wall instead of pulling away from it 7 Tool withdrawal in rapid G00 to the starting p...

Page 182: ...G98 G99 Withdrawal plane G98 The tool withdraws to the Initial Plane once the pocket has been made G99 The tool withdraws to the Reference Plane once the pocket has been made X Y 5 5 Machining coordin...

Page 183: ...et according to the ordinate axis B 5 5 Penetration step Defines the cutting depth according to the longitudinal axis If this is programmed with a positive sign the entire cycle will be executed with...

Page 184: ...th B If not programmed a value of 0 is assumed H 5 5 Feedrate for the finishing pass Defines the working feedrate during the finishing pass If not programmed or programmed with a 0 value it assumes th...

Page 185: ...rate in the passes defined by C up to a distance L finishing pass from the pocket wall 5 Finishing pass milling L at the work feedrate defined by H 6 Once the finishing pass has been completed the too...

Page 186: ...ussuppose a workplane formed by theX and Yaxis Z beingthe longitudinalaxisandthe starting point X0 Y0 Z0 Tool selection TOR1 6 TOI1 0 T1 D1 M6 Starting point G0 G90 X0 Y0 Z0 Canned cycle definition G8...

Page 187: ...Z being thelongitudinal axisand thestarting point X0 Y0 Z0 Tool selection TOR1 6 TOI1 0 T1 D1 M6 Starting point G0 G90 X0 Y0 Z0 Work plane G18 Canned cycle definition N10 G87 G98 X200 Y 48 Z0 I 90 J52...

Page 188: ...to the Reference Plane once the pocket has been made X Y 5 5 Machining coordinates These are optional and define the movement of the axes of the main plane to position the tool at the machining point...

Page 189: ...with the given step except for the last step which will machine whatever remains C 5 5 Milling pass Defines the milling pass along the main plane If the value is positive the entire cycle will be exe...

Page 190: ...deepening operation this amount will be added to incremental depth B If not programmed a value of 0 is assumed H5 5 Feedrate for the finishing pass Defines the working feedrate during the finishing p...

Page 191: ...CANNED CYCLES 9 M EN MODELS SOFT V02 2X 191 G88 Circular pocket canned cycle V 5 5 Tool penetrating feedrate Defines the tool penetrating feedrate If not programmed or programmed with a 0 value it ass...

Page 192: ...ate in the passes defined by C up to a distance L finishing pass from the pocket wall 5 Finishing pass milling L at the work feedrate defined by H 6 Once the finishing pass has been completed the tool...

Page 193: ...supposea work planeformedbythe XandY axis Z being thelongitudinal axisand thestarting point X0 Y0 Z0 Tool selection TOR1 6 TOI1 0 T1 D1 M6 Starting point G0 G90 X0 Y0 Z0 Canned cycle definition G88 G...

Page 194: ...l and define the movement of the axes of the main plane to position the tool at the machining point This point can be programmed in Cartesian coordinates or in polar coordinates and the coordinates ma...

Page 195: ...longitudinal axis to the bottom of the machined hole and boring 4 Dwell if parameter K has been programmed 5 Withdrawal at working feedrate of the longitudinal axis as far as the reference plane 6 Wit...

Page 196: ...ines the reference plane coordinate It may be programmed either in absolute or incremental coordinates in which case it will be referred to the starting plane If not programmed it assumes as reference...

Page 197: ...s must be equal to or larger than J K 4 If these two conditions are not met the CNC issues the corresponding error B 5 5 Penetration step It defines the penetration step when machining the hole With a...

Page 198: ...e along the longitudinal axis 4 Tangential entry to the helical path of the drilling 5 Helical movement with the pitch given by parameter B and in the direction given by parameter J down to the bottom...

Page 199: ...the Y axis If not programmed it will assume the current tool position on that axis Z 5 5 Reference plane Defines the reference plane coordinate It may be programmed either in absolute or incremental c...

Page 200: ...rogramming C 0 the threading will be done in a single pass When programming C 1 it will make one thread per each pass single edge cutter When programming C n where n is the number of cutting edges of...

Page 201: ...cal thread exiting movement tangent to the previous helical path If parameter E has not been programmed the exit point will correspond with the coordinates of the hole center It mustbeborne in mind th...

Page 202: ...on that axis Z 5 5 Reference plane Defines the reference plane coordinate It may be programmed either in absolute or incremental coordinates in which case it will be referred to the starting plane If...

Page 203: ...l make one thread per each pass single edge cutter When programming C n where n is the number of cutting edges of the cutter it will make n threads per each pass If not programmed a value of C 1 is as...

Page 204: ...he longitudinal axis If C 1 1 Helical movement with the pitch and direction given in parameter J to the bottom of the thread 2 Helical thread exiting movement tangent to the previous helical path Itmu...

Page 205: ...luence of a modal subroutine To perform multiple machining follow these steps 1 Move the tool to the first point of the multiple machining operation 2 Define the canned cycle or modal subroutine to be...

Page 206: ...ding error code P Q R S T U V Points where no drilling takes place These parameters are optional and are used to indicate at which points or between which of those programmed points it is not required...

Page 207: ...fter completing multiple machining the tool will be positioned at the last point along the programmed path where machining was performed Programming example assuming that the work plane is formed by t...

Page 208: ...int Due to the fact that machining may be defined according to the abscissa axis with any two points of the X I K group the CNC allows the following definition combinations XI XK IK Nevertheless if fo...

Page 209: ...ing is required at points 10 11 12 and 13 When it is required to define a group of points Q10 013 care should be taken to define the final point with three digits as if Q10 13 is programmed multiple m...

Page 210: ...er completing multiple machining the tool will be positioned at the last point along the programmed path where machining was performed Programming example assuming that the work plane is formed by the...

Page 211: ...to the fact that machining may be defined according to the abscissa axis with any two points of the X I K group the CNC allows the following definition combinations XI XK IK Nevertheless if format XI...

Page 212: ...is required at points 10 11 12 and 13 When it is required to define a group of points Q10 013 care should be taken to define the final point with three digits as if Q10 13 is programmed multiple mach...

Page 213: ...ltiple machining the tool will be positioned at the last point along the programmed path where machining was performed Programming example assuming that the work plane is formed by the X and Y axes th...

Page 214: ...ounterclockwise clockwise K5 Total number of machining operations Defines the total number of machining operations along the circle including the machining definition point It will be enough to progra...

Page 215: ...ing is required at points 10 11 12 and 13 When it is required to define a group of points Q10 013 care should be taken to define the final point with three digits as if Q10 13 is programmed multiple m...

Page 216: ...ogrammed path has been completed After completing multiple machining the tool will be positioned at the last point along the programmed path where machining was performed Programming example assuming...

Page 217: ...the sign indicates the direction counterclockwise clockwise K5 Total number of machining operations Defines the total number of machining operations along the circle including the machining definitio...

Page 218: ...required at points 10 11 12 and 13 When it is required to define a group of points Q10 013 care should be taken to define the final point with three digits as if Q10 13 is programmed multiple machini...

Page 219: ...mmed path has been completed After completing multiple machining the tool will be positioned at the last point along the programmed path where machining was performed Programming example assuming that...

Page 220: ...cular interpolations G02 G03 A 5 5 Angle of the chord Defines the angle formed by the perpendicular bisector of the chord with the abscissa axis and is expressed in degrees I 5 5 Angular pass between...

Page 221: ...after this movement After completing multiple machining the tool will be positioned at the programmed point Programming example assuming that the work plane is formed by the X and Y axes that the Z a...

Page 222: ...222 Programming manual CNC 8055 CNC 8055i 10 MULTIPLE MACHINING M EN MODELS SOFT V02 2X G65 Machining programmed with an arc chord...

Page 223: ...ocket In a 2D pocket all the walls of the outside profile and of the islands are vertical To define the contours of a 2D pocket the plane profile for all the contours must be defined 3D pocket In a 3D...

Page 224: ...operations each one is programmed with its relevant G function G66 defines the operations that make up the machining of the pocket and where they are defined in the program This function also indicate...

Page 225: ...operation F 0 9999 K 0 9999 Finishing operation Label number of the first block F and last block K defining the finishing operation When not setting K only block F is executed When not setting F ther...

Page 226: ...d On each surface milling pass the steps below will be followed depending on the type of machining that has been programmed Case A When the machining paths are linear and maintain a certain angle with...

Page 227: ...ference coordinates In the pocket canned cycle with islands there are four coordinates along the longitudinal axis selected with G15 which due to their importance are discussed below 1 Initial plane c...

Page 228: ...inition parameters must be programmed together with the required function In a block of this type only cycle definition parameters must be programmed without defining XY positioning as the canned cycl...

Page 229: ...h will need to bear a label number in order to indicate to the canned cycle the block where the roughing operation is defined The function for the roughing operation is G67 and its programming format...

Page 230: ...he entire pocket being performed with the given pass and the canned cycle adjusts the last milling pass If not programmed or programmed with a 0 value it assumes a value of 3 4 of the diameter of the...

Page 231: ...rameter value in canned cycle F5 5 Machining feedrate Optional It sets the machining feedrate in the plane S5 5 Spindle speed Optional It sets the spindle speed T4 Tool number Defines the tool used fo...

Page 232: ...ed pass and the canned cycle will adjust the last pass to obtain the total programmed depth L 5 5 Lateral finishing stock Defines the value of the finishing stock left on the side walls of the pocket...

Page 233: ...tion Defines the type of profile intersection to be used K 0 Basic profile intersection K 1 Advanced profile intersection If the island has a roughing operation it is not necessary to define this para...

Page 234: ...necessary All types of programmed profiles must be closed The following examples cause a geometry error No profile must intersect itself The following examples cause a geometry error When more than on...

Page 235: ...es a new external profile as a result of the difference between the external and the internal profiles If there is an inside profile which has an intersection with another inside profile and with the...

Page 236: ...into several lines that could be grouped as Lines external to the other contour Lines internal to the other contour This type of profile intersection selects in each contour the group of lines where t...

Page 237: ...rth The initial point of the resulting profiles always coincides with the initial point that defined the first profile Resulting profile Once the profiles of the pocket and islands have been obtained...

Page 238: ...238 Programming manual CNC 8055 CNC 8055i 11 IRREGULAR POCKET CANNED CYCLE M EN MODELS SOFT V02 2X 2D pockets...

Page 239: ...beginning of the profile Once the definition of the profiles has been completed a label number must be assigned to the last block programmed in order to indicate the canned cycle G66 the end of the g...

Page 240: ...inition of profiles G01 Linear interpolation G02 Clockwise circular interpolation G03 Counter clockwise circular interpolation G06 Circle center in absolute coordinates G08 Arc tangent to previous pat...

Page 241: ...the finishing operation has a 0 value When parameter J of the finishing operation has been programmed with a value greater than the finishing tool radius ERROR 1044 The plane profile intersects itself...

Page 242: ...DELS SOFT V02 2X 2D pockets ERROR 1227 Wrong profile intersection in a pocket with islands It comes up in the following instances When two plane profiles have a common section drawing on the left When...

Page 243: ...on N100 G81 Z5 I 40 T3 D3 M6 Definition of roughing operation N200 G67 B20 C8 I 40 R5 K0 V100 F500 T1 D1 M6 Definition of finishing operation N300 G68 B0 L0 5 Q0 V100 F300 T2 D2 M6 Definition of pocke...

Page 244: ...ogramming of a pocket with islands G0 G17 G43 G90 X0 Y0 Z25 S800 G66 D100 R200 F300 S400 E500 M30 Definition of drilling operation N100 G81 Z5 I 40 T3 D3 M6 Definition of roughing operation N200 G67 B...

Page 245: ...J80 Contour a G1 Y 80 G2 G6 X 120 Y 80 I 100 J 80 G1 Y80 G0 X 40 Y0 Contour b G2 G6 X 40 Y0 I 100 J0 G0 X 180 Y20 Contour c G1 X 20 G2 G6 X 20 Y 20 I 20 J0 G1 X 180 G2 G6 X 180 Y20 I 180 J0 Contour of...

Page 246: ...ning the semi finishing operation When not setting J only block c is executed When not setting C there is no semi finishing operation F 0 9999 K 0 9999 Finishing operation Label number of the first bl...

Page 247: ...g paths are linear and maintain a certain angle with the abscissa axis It first contours the external profile of the part If the finishing operation has been selected on the cycle call this contouring...

Page 248: ...ter the roughing some ridges appear on the external profile as well as on the islands themselves as shown in the illustration below With the semi finishing operation it is possible to minimize these r...

Page 249: ...ocket canned cycle with islands there are four coordinates along the longitudinal axis selected with G15 which due to their importance are discussed below 1 Initial plane coordinate This coordinate is...

Page 250: ...to the abscissa axis It defines the angle of the machining path with respect to the abscissa axis If parameter A is not programmed the roughing operation is carried out following concentric paths It...

Page 251: ...sts the last milling pass If not programmed or programmed with a 0 value it assumes a value of 3 4 of the diameter of the selected tool If programmed with a value greater than the tool diameter the CN...

Page 252: ...d for the roughing operation It must be programmed D4 Tool offset Optional Defines the tool offset number M Auxiliary miscellaneous functions Optional Up to 7 miscellaneous M functions can be programm...

Page 253: ...pass and the canned cycle will calculate a pass equal or smaller than the one programmed If programmed with a negative sign the whole semi finish operation will be run with the programmed pass The ca...

Page 254: ...Defines the tool used for the semi finishing operation It must be programmed D4 Tool offset Optional Defines the tool offset number M Auxiliary miscellaneous functions Optional Up to 7 miscellaneous...

Page 255: ...ls of the pocket left by the roughing and semi finishing operations There is no finishing stock left on top of the islands nor on the bottom of the pocket If programmed with a positive value the finis...

Page 256: ...neither roughing nor semi finishing operation this parameter must be defined R 5 5 Reference plane Defines the reference plane coordinate and is programmed in absolute coordinates If defined the cycl...

Page 257: ...CNC 8055i IRREGULAR POCKET CANNED CYCLE 11 M EN MODELS SOFT V02 2X 257 3D pockets This operation allows M06 with an associated subroutine to be defined and the tool change is performed before beginni...

Page 258: ...ofile 3 and the depth profile 4 forall thecontours must be defined even if they are vertical Since the canned cycle applies the same depth profile to the whole contour the same start point must be use...

Page 259: ...e 1 For the inside contours the one corresponding to the base or bottom 2 2 The profile in the plane must be closed same starting and end points and it must not intersect itself Examples The following...

Page 260: ...e profile and depth profile must be the same one Nevertheless the depth profile must be programmed For the outside contour of the pocket starting from the top or surface coordinate 1 For the inside co...

Page 261: ...1000 M4 G5 Defines the 3D pocket G66 R200 C250 F300 S400 E500 M30 Roughing operation N200 G67 B5 C4 I 30 R5 V100 F400 T1 D1 M6 Semi finishing operation N250 G67 B2 I 30 R5 V100 F550 T2 D1 M6 Finishing...

Page 262: ...yramid island Conic island Semi spherical island Plane profile G17 G0 G90 X17 Y4 G1 X30 G1 Y30 G1 X4 G1 Y4 G1 X17 Depth profile G16 YZ G0 G90 Y4 Z4 G1 Y17 Z35 Plane profile G17 G0 G90 X35 Y8 G2 X35 Y8...

Page 263: ...0 M30 Roughing operation N200 G67 B5 C4 I9 R25 V100 F400 T1D1 M6 Semi finishing operation N250 G67 B2 I9 R25 V100 F550 T2D1 M6 Finishing operation N300 G68 B1 5 L0 75 Q0 I9 R25 V50 F275 T3D1 M6 Defini...

Page 264: ...a depth profile per contour must be defined The plane profile and the depth profile of the contour gathering several sides must start at the same point The resulting plane profile will be formed by t...

Page 265: ...ines which could be grouped as Lines external to the other contour Lines internal to the other contour The starting point of each contour x determines the group of lines to be selected The following e...

Page 266: ...when having an intersection of more than 3 profiles The profile intersection process is performed according to the order in which the profiles have beenprogrammed Thisway theresultoftheintersectionbet...

Page 267: ...nate of the top profile 2 must coincide with the surface coordinate of the bottom profile 1 If there is a gap between them the cycle will consider that they are 2 different profiles and it will elimin...

Page 268: ...n one depth profile the contours must be defined one by one indicating on each one the plane profile and then its depth profile The first profile defining block of the plane profile as well as that of...

Page 269: ...a special meaning the irregular pocket canned cycle allows the use of the following functions for the definition of profiles G01 Linear interpolation G02 Clockwise circular interpolation G03 Counter c...

Page 270: ...TOR1 2 5 TOL1 20 TOI1 0 TOK1 0 Initial positioning and definition of the 3D pocket G17 G0 G43 G90 Z50 S1000 M4 G5 G66 R200 C250 F300 S400 E500 M30 Definition of roughing operation N200 G67 B5 C4 I 20...

Page 271: ...ofile G16 YZ G0 G90 Y90 Z0 G1 Z 20 Definition of contour B Profile on the plane G17 G0 G90 X10 Y50 G1 Y100 X 10 Y0 X10 Y50 Depth profile G16 XZ G0 G90 X10 Z0 G1 X20 Z 20 Definition of contour C Profil...

Page 272: ...3 0 Initial positioning and definition of the 3D pocket G17 G0 G43 G90 Z50 S1000 M4 G5 G66 R200 C250 F300 S400 E500 M30 Definition of roughing operation N200 G67 B7 C14 I 25 R3 V100 F500 T1 D1 M6 Defi...

Page 273: ...X50 Y30 G1 X70 Y70 X35 Y30 X50 Depth profile G16 YZ G0 G90 Y30 Z 25 G2 Y50 Z 5 J20 K0 Definition of contour B Profile on the plane G17 G0 G90 X40 Y50 G1 Y25 X65 Y75 X40 Y50 Depth profile G16 XZ G0 G9...

Page 274: ...and contour C Tool dimensions TOR1 4 TOI1 0 TOR2 2 5 TOI2 0 Initial positioning and definition of the 3D pocket G17 G0 G43 G90 Z25 S1000 M3 G66 R200 C250 F300 S400 E500 M30 Definition of roughing oper...

Page 275: ...I0 K 5 G1 X7 5 Z 20 Definition of contour A Profile on the plane G17 G90 G0 X37 Y19 G2 I0 J12 Depth profile G16 YZ G0 Y19 Z 20 G1 Z 16 G2 Y31 Z 4 R12 Definition of contour B Profile on the plane G17...

Page 276: ...276 Programming manual CNC 8055 CNC 8055i 11 IRREGULAR POCKET CANNED CYCLE M EN MODELS SOFT V02 2X 3D pockets Programming example 4 To define the island 10 contours are used as shown here...

Page 277: ...N200 G67 B5 C0 I 30 R5 V100 F700 T1 D1 M6 Definition of the semi finishing operation N250 G67 B1 15 I 29 R5 V100 F850 T1 D1 M6 Definition of finishing operation N300 G68 B1 5 L0 25 Q0 I 30 R5 V100 F50...

Page 278: ...G1 Z0 Definition of contour 3 G17 G0 X57 5 Y 25 G1 G91 Y 31 X2 Y62 X 2 Y 31 Depth profile G16 XZ G0 G90 X57 5 Z 30 G1 Z0 Definition of contour 4 G17 G0 X0 Y 75 G1 G91 X 31 Y 2 X62 Y2 X 31 Depth profil...

Page 279: ...2 X2 Y31 Depth profile G16 XZ G0 G90 X 57 5 Z 30 G1 Z0 Definition of contour 8 G17 G0 X 42 5 Y5 G1 G91 X 16 Y 60 X32 Y60 X 16 Depth profile G16 YZ G0 G90 Y5 Z 30 G3 Y 25 Z0 J 30 K0 Definition of conto...

Page 280: ...TOK1 0 Initial positioning and definition of the 3D pocket G17 G0 G43 G90 Z50 S1000 M4 G5 G66 R200 C250 F300 S400 E500 M30 Definition of roughing operation N200 G67 B5 C4 I 25 R5 V100 F400 T1 D1 M6 De...

Page 281: ...ets Definition of the low A type contour Plane profile G17 G90 G0 X30 Y 6 G1 Y 46 X130 Y 6 X30 Depth profile G16 XZ G0 X30 Z 25 G1 Z 20 G2 X39 Z 11 I9 K0 Definition of the high B type contour Plane pr...

Page 282: ...lowing instances When thedepthprofilesof2sectionsofthesame contour simple orcomposite crosseach other When the finishing operation cannot be performed with the programmed tool A typical case is a sphe...

Page 283: ...Programming manual CNC 8055 CNC 8055i IRREGULAR POCKET CANNED CYCLE 11 M EN MODELS SOFT V02 2X 283 3D pockets When the initial points of two profiles in the main plane coincide drawing on the right...

Page 284: ...284 Programming manual CNC 8055 CNC 8055i 11 IRREGULAR POCKET CANNED CYCLE M EN MODELS SOFT V02 2X 3D pockets...

Page 285: ...f the different types of probes to these inputs are explained in the appendix to the Installation manual This control allows the following operations to be performed by using probes Programming probin...

Page 286: ...l it no longer receives the probe signal G76 At this time the CNC will consider the block finished taking as the theoretical position of the axes the real position they have at that time If the axes r...

Page 287: ...selected as the longitudinal axis Canned cycles will be programmed by means of the high level mnemonic PROBE which has the following programming format PROBE expression assignment instruction This ins...

Page 288: ...he machine and with its faces parallel to axes X Y Z Its position will be indicated in absolute coordinates with respect to machine zero by means of the general machine parameters PRBXMIN Indicates th...

Page 289: ...onal parameters that usually need not be defined On certain machines due to lack of repeatability in the mechanical positioning of the probe the probe must be calibrated again before each tool calibra...

Page 290: ...r along its shaft I 1 Calibration of the tool length or measurement of the tool length wear on its tip If not programmed the cycle will assume the IO value F5 5 Probing feedrate It sets the probing fe...

Page 291: ...pindle stopped When set with a positive value the spindle starts in M3 When set with a negative value the spindle starts in M4 C Behavior when exceeding the amount of wear allowed Only if L has been s...

Page 292: ...ting that the tool has been rejected and acts as follows If tool life monitoring is not available or the measuring difference does not exceed the maximum allowed In this case it updates global arithme...

Page 293: ...minute J Type of operation J 0 Tool calibration J 1 Tool wear measurement K Probe side used It sets the probe side being used to probe the radius K 0 Side X K 1 Side X K 2 Side Y K 3 Side Y E5 5 Dist...

Page 294: ...red radius Previous radius R I R Measured radius I 0 Once the wear measuring cycle has ended When using tool live monitoring In this case it compares the measured value with the theoretical radius ass...

Page 295: ...ts the probing feedrate It must be programmed in mm minute or inches minute J Type of operation J 0 Tool calibration J 1 Tool wear measurement K Probe side used It sets the probe side being used to pr...

Page 296: ...wear is greater than the defined value the tool will be rejected Only if J1 has been defined and tool life monitoring is being used If not programmed a value of M0 will be assumed C Behavior when exce...

Page 297: ...available or the measuring difference does not exceed the maximum allowed In this case it updates global arithmetic parameters P298 and P299 as well as the radius wear and length wear value of the too...

Page 298: ...here ball of the probe This value will be loaded into the table manually L Length of the probe This value will be indicated by the tool length calibration cycle I Deviation of the probe ball with resp...

Page 299: ...es the safety distance Must be programmed with a positive value and over 0 J5 5 Real diameter of the hole Defines the real diameter of the hole Must be programmed with a positive value and over 0 E5 5...

Page 300: ...orresponding error code and stop the movement of the axes 2 Return of the probe in rapid G00 the distance indicated in E 3 Probe movement along the ordinate axis at the feedrate indicated by F until t...

Page 301: ...called 3 Movement in the main work plane to the point where the cycle is called Correction of the tool offset Once the cycle has been completed the CNC will have updated the I and K values correspond...

Page 302: ...thepointover whichitisrequiredtomeasure B5 5 Safety distance Defines the safety distance Must be programmed with a positive value and over 0 The probe must be placed with respect to the point to be me...

Page 303: ...mpleted If this is not programmed or is programmed with a value of 0 the CNC will understand that it is not required to make this correction L5 5 Error tolerance Defines the tolerance that will be app...

Page 304: ...ing error code and stop the movement of the axes Once probing has been made the CNC will assume as their theoretical position the real position of the axes when the probe signal is received 3 Withdraw...

Page 305: ...easurement error is equal to or greater than the tolerance L Depending on the axis the measurement is made with K the correction will be made on the length or radius value If the measurement is made w...

Page 306: ...corner to be measured Y 5 5 Theoretical coordinate along the Y axis of the corner to be measured Z 5 5 Theoretical coordinate along the Z axis of the corner to be measured Depending on the corner of t...

Page 307: ...bing point to the first approach point 4 Second approach movement Rapid probe move G00 from the first approach point to the second The approaching movement is made in two stages 1 Movement along the o...

Page 308: ...measurement in the following global arithmetic parameters P296 Real coordinate of the corner along the abscissa axis P297 Real coordinate of the corner along the ordinate axis P298 Error detected alon...

Page 309: ...etical coordinate along the X axis of the corner to be measured Y 5 5 Theoretical coordinate along the Y axis of the corner to be measured Z 5 5 Theoretical coordinate along the Z axis of the corner t...

Page 310: ...ding error code and stop the movement of the axes 3 Withdrawal movement Rapid probe movement G00 from the probing point to the approach point 4 Second probing movement Movementoftheprobealongthe absci...

Page 311: ...easurement in the following global arithmetic parameters P296 Real coordinate of the corner along the abscissa axis P297 Real coordinate of the corner along the ordinate axis P298 Error detected along...

Page 312: ...heoretical coordinate along the X axis of the vertex of the angle to be measured Y 5 5 Theoretical coordinate along the Y axis of the vertex of the angle to be measured Z 5 5 Theoretical coordinate al...

Page 313: ...al movement Rapid probe movement G00 from the probing point to the first approach point 4 Second approach movement Rapid probe move G00 from the first approach point to the second It is at a distance...

Page 314: ...ll return the real values obtained after measurement in the following global arithmetic parameter Considerations for the cycle This cycle may be used to measure angles between 45 If the angle to be me...

Page 315: ...te along the Z axis of the corner to be measured If it is an outside corner depending on the corner of the part it is required to measure the probe must be placed in the corresponding shaded area see...

Page 316: ...obe in rapid G00 from the first approach point to the second situated at a distance 2B from the second side to be probed The approaching movement is made in two stages 1 Movement along the ordinate pl...

Page 317: ...mpleted the CNC will return the real values obtained after measurement in the following global arithmetic parameters Considerations for the cycle This cycle may be used to measure angles between 45 If...

Page 318: ...d probe movement G00 from the probing point to the first approach point 4 Second probing movement Movementoftheprobealongthe abscissaaxisattheindicatedfeedrate F untiltheprobesignal is received The ma...

Page 319: ...completed the CNC will return the real values obtained after measurement in the following global arithmetic parameters Considerations for the cycle This cycle may be used to measure angles between 45...

Page 320: ...J5 5 Theoretical diameter of the hole Defines the theoretical diameter of the hole Must be programmed with a positive value and over 0 This cycle allows holes to be measured with diameters of no more...

Page 321: ...CNC does not receive the probe signal it will display the corresponding error code and stop the movement of the axes 2 Return of the probe in rapid G00 the distance indicated in E 3 Movement of the pr...

Page 322: ...oint where the cycle is called Arithmetic parameters modified by the cycle Once the cycle has been completed the CNC will return the real values obtained after measurement in the following global arit...

Page 323: ...ines the theoretical diameter of the boss Must be programmed with a positive value and over 0 This cycle allows bosses to be measured with diameters of no more than J B E5 5 Withdrawal distance Define...

Page 324: ...ent of the probe along the ordinate axis at the indicated feedrate H until the probe signal is received The maximum distance to be traveled in the probing movement is B J 2 if after travelling that di...

Page 325: ...ed Movement in the main work plane to the point where the cycle is called Arithmetic parameters modified by the cycle Once the cycle has been completed the CNC will return the real values obtained aft...

Page 326: ...the part Parameters X 5 5 X coordinate where probing will begin X coordinate of the probe position where the first probing move will start If not programmed it will assume the current X position of t...

Page 327: ...0 value it generates the corresponding error message E 5 5 Withdrawal distance Distance the probe retracts after finding the part to make the measurement If not programmed or programmed with a 0 valu...

Page 328: ...remaining sides considering half the lengths and the calculated inclination angle 16 Probing movement at the feedrate given in H to go down to the probing Z coordinate If it touches the part the probe...

Page 329: ...inate where probing will begin X coordinate of the probe position where the first probing move will start If not programmed it will assume the current X position of the probe Y 5 5 Y coordinate where...

Page 330: ...thdrawal distance Distance the probe retracts after finding the part to make the measurement If not programmed or programmed with a 0 value it generates the corresponding error message H5 Probing feed...

Page 331: ...ordinate If it touches the part the probe goes back up to the safety Z position and moves the distance indicated by parameter B in the same direction until clearing the part 14 Probing movement at the...

Page 332: ...obe the CNC will issue the relevant error message Measuring on the X axis If the X coordinate of the tool before running the cycle is greater than half the maximum and minimum X coordinates of the pro...

Page 333: ...ple or double I 0 Single calibration the calibration is carried out in the 4 quadrants of the probe with the spindle that holds the tool oriented at 0 I 1 Double calibration the calibration is carried...

Page 334: ...indicated in the same direction This movement is repeated until clearing the probe 11 Probing movement on X at the feedrate given in H until touching that side 12 Rapid withdrawal along the X axis di...

Page 335: ...is a double calibration orient the spindle at 180 and repeat steps 2 through 36 38 Setting the relevant parameters with the real values of the sides of the calibrated probe Arithmetic parameters modif...

Page 336: ...336 Programming manual CNC 8055 CNC 8055i 12 PROBING M EN MODELS SOFT V02 2X PROBE 12 Tabletop probe calibration...

Page 337: ...adecimal format must be preceded by the symbol and they must not have more than 8 digits A constant higher than the format 6 5 must be assigned to a variable by means of arithmetic parameters by means...

Page 338: ...338 Programming manual CNC 8055 CNC 8055i 13 HIGH LEVEL LANGUAGE PROGRAMMING M EN MODELS SOFT V02 2X Lexical description Simbols The symbols used in high level language are...

Page 339: ...The variables and block preparation The variables that access the real values of the CNC interrupt block preparation The CNC waits forthatcommandtobeexecutedbeforeresumingblockpreparation Thus precaut...

Page 340: ...used in high level language may be defined either using the above format or by using the letter A Z except for so that A is equal to P0 and Z to P25 The following example shows these two methods of de...

Page 341: ...oned after interrupting the execution of the program the CNC will update the parameter tables with values corresponding to the block that was being executed When accessing the local parameter and glob...

Page 342: ...is a special tool The nominal life is given either in minutes or in operations 0 65535 The real actual life is given either in hundredths of a minute 0 9999999 or in operations 0 999999 Tool magazine...

Page 343: ...f 10 5 mm in the table and execute the profile 10 4 mm in the table and execute the profile 10 3 mm in the table and execute the profile 10 2 mm in the table and execute the profile 10 1 mm in the tab...

Page 344: ...n to be read or modified in the tool table TLFFn This variable allows the family code of the indicated tool n to be read or modified in the tool table TLFNn This variable allows the value assigned as...

Page 345: ...es X Y Z U and B it only allows the variables ORGX ORGY ORGZ ORGU and ORGB in the case of ORG X C Read only variables ORG X C Returns the value of the active zero offset in the selected axis The value...

Page 346: ...dified in the table corresponding to the indicated zero offset n PLCOF X C Thisvariable allowsthe valueoftheselected axisto be read ormodified in the table ofadditive offsets indicated by the PLC Acce...

Page 347: ...respect to home Z coordinate of the new part zero with respect to home ORGROA ORGROB ORGROC ORGROI ORGROJ ORGROK ORGROQ ORGROR ORGROS Value assigned to parameter A Value assigned to parameter B Value...

Page 348: ...ecuted before resuming block preparation When having a swivel or angular spindle general machine parameter XFORM P93 with a value of 2 or 3 the CNC shows the following data TOOROF It indicates the pos...

Page 349: ...e variables can be used to modify the value of certain machine parameters Refer to the installation manual for the list of machine parameters that may be modified In order to be able to modify these p...

Page 350: ...axis X C Upper limit of zone 1 along the selected axis X C SZONE SZLO X C SZUP X C Status of work zone 2 Lower limit of zone 2 along the selected axis X C Upper limit of zone 2 along the selected axi...

Page 351: ...elected by DNC If it has a value of 0 it means that it is not selected PLCF It returns the feedrate in mm minute or inches minute selected by PLC If it has a value of 0 it means that it is not selecte...

Page 352: ...y PLC and from the switch DNCFRO It returns the feedrate override currently selected by the DNC If it has a value of 0 it means that it is not selected PLCFRO It returns the feedrate override currentl...

Page 353: ...splays between 340 and 20 If ORG 60 it displays between 60 and 300 displays between 420 and 60 TPOS X C It returns the theoretical position value real coordinate following error of the tool base refer...

Page 354: ...mount of deflection obtained at the time by the Renishaw probe SP2 on each axis X Y Z DPLY X C It returns the position value coordinate shown on the screen for the selected axis DRPO X C It returns th...

Page 355: ...X C With these variables it is possible to set a second travel limit for each axis LIMPL for the upper limit and LIMMI for the lower one Since the second limits are activated or deactivated from the...

Page 356: ...xis Once the switch has been turned to one of the handwheel positions the CNC checks this variable and depending on the values assigned to each axis bit c b a it applies the multiplying factor selecte...

Page 357: ...one bit set to 1 for an axis the least significant bit will be considered Thus The HBE handwheel has priority That is regardless of the mode selected at the CNC switch continuous or incremental JOG h...

Page 358: ...CNC s sinusoidal feedback for the X C axis BSIN X C B signal of the CNC s sinusoidal feedback for the X C axis ASINS A signal of the CNC s sinusoidal feedback for the spindle BSINS B signal of the CN...

Page 359: ...NC If it has a value of 0 it means that it is not selected PLCS Returns the turning speed in revolutions per minute selected by PLC If it has a value of 0 it means that it is not selected PRGS Returns...

Page 360: ...sition of the main spindle Its value may be within 99999 9999 It interrupts block preparation RPOSS It returns the real position of the main spindle Its value is given in 0 0001 degree units between 3...

Page 361: ...override percentage of the main spindle currently selected by program It is given in integer values between 0 and MAXFOVR maximum 255 If it has a value of 0 it means that it is not selected P110 PRGSS...

Page 362: ...inute selected by DNC If it has a value of 0 it means that it is not selected SPLCS Returns the turning speed in revolutions per minute selected by PLC If it has a value of 0 it means that it is not s...

Page 363: ...ly selected by program SPOSS It returns the real position of the second spindle Its value may be within 99999 9999 SRPOSS It returns the real position of the second spindle Its value is given in 0 000...

Page 364: ...erride percentage of the second spindle currently selected by program It is given in integer values between 0 and MAXFOVR maximum 255 If it has a value of 0 it means that it is not selected P110 SPRGS...

Page 365: ...e live tool Read only variables ASPROG It must be used inside the subroutine associated with function M45 Returns the revolutions per minute programmed in M45 S If programmed only in M45 the value 0 w...

Page 366: ...ith the one indicated n The value of the inputs which are used by the electrical cabinet cannot be modified as their values are determined by it Nevertheless the status of the remaining inputs can be...

Page 367: ...GE PROGRAMMING 13 M EN MODELS SOFT V02 2X 367 Variables PLCMMn This variable permits reading or modifying the PLC mark n PLMM4 1 It sets mark M4 to 1 and leaves the rest untouched PLCM4 1 It sets mark...

Page 368: ...arameters have been defined and which have not in the call to the subroutine by means of the PCALL or MCALL mnemonic The information will be given in the 26 least significant bits bits 0 25 each of th...

Page 369: ...0 through 7 Sercos identifier 218 GearRatioPreselection It may also have up to 8 parameter sets 0 through 7 Sercos identifier 217 ParameterSetPreselection With these variables the work range or gear...

Page 370: ...2 1 0000 0010 8055 FL model 8055 Power model 5 Sercos integrated into CPU board 6 Sercos module on manager board 7 Axes module 10 9 8 001 010 011 100 One I O module Two I O modules Three I O modules...

Page 371: ...000 001 010 011 Expansion board missing Feedback I O expansion board Feedback only expansion board I O only expansion board 101 110 111 Axes 2 board for expansion of feedback I O Axes 2 board for exp...

Page 372: ...he software version of the hard disk HD 4 digits For example SOFCON 01010311 indicates HDMEGA It returns the size of the hard disk in megabytes KEYIDE Keyboard code according to the auto identificatio...

Page 373: ...e configurations and set to 0 In the rest of cases it returns a 0 if the board is missing There could be a large Sercos card that takes up the whole module or the small board that is installed in the...

Page 374: ...returns the checksum of the code for the software version installed It is the value appearing on the code test IONODE It returns in 16 bits the position of the ADDRESS switch of the CAN of the I O If...

Page 375: ...8055 CNC 8055i HIGH LEVEL LANGUAGE PROGRAMMING 13 M EN MODELS SOFT V02 2X 375 Variables IOSREM They may be used to read the number of remote digital I O available Bit Meaning 0 15 Number of inputs 16...

Page 376: ...n 21 G function simulation 22 G M S and T function simulation 23 Simulation with movement in the main plane 24 Simulation with rapid movement 25 Rapid simulation with S 0 30 Normal editing 31 User edi...

Page 377: ...meter table 101 Axis machine parameter tables 102 Spindle machine parameter table 103 Serial port machine parameter tables 104 PLC machine parameter table 105 M function table 106 Leadscrew error comp...

Page 378: ...standard screen 43 Doing a home search 45 In tool calibration mode 60 Managing parts PPROG mode OPMODA Indicates the operating mode currently selected when working with the main channel Use the OPMOD...

Page 379: ...ctions Bit 2 G M S T functions Bit 3 Main plane Bit 4 Rapid Bit 5 Rapid S 0 OPMODC Indicates the axes selected by handwheel This information is given at the least significant bits indicating with a 1...

Page 380: ...unctions G00 through G24 The status of each one of the functions will be given in the 25 least significant bits and it will be indicated by a 1 when active and a 0 when not active or when not availabl...

Page 381: ...175 through G199 The status of each one of the functions will be given in the 25 least significant bits and it will be indicated by a 1 when active and a 0 when not active or when not available in the...

Page 382: ...by a 1 when active and a 0 when not active or when not available in the current software version GGSP It returns the status of functions G375 through G399 The status of each one of the functions will...

Page 383: ...assigns the value 4 to parameter P122 MIRROR Returns in the least significant bits of the 32 bit group the status of the mirror image of each axis 1 in the case of being active and 0 if not The axis...

Page 384: ...preparation is interrupted and the CNC waits for this command to be executed to resume block preparation DATE Returns the date in year month day format If this variable is accessed block preparation i...

Page 385: ...variable will show TANGAN Variable associated with the tangential control function G45 It indicates the programmed angular position TPIOUT X C Output of the PI of the tandem master axis in rpm TIMEG...

Page 386: ...able may be used as a write variable only inside a customizing program user channel If this variable is accessed block preparation is interrupted and the CNC waits for this command to be executed to r...

Page 387: ...C DISABMOD This variable is used to disable some actions or modes by setting the corresponding bit value to 1 This variable may be written from the PLC and read from the PLC DNC and CNC The following...

Page 388: ...GUAGE PROGRAMMING M EN MODELS SOFT V02 2X Variables Programming example It is recommended to use a CYCCHORDERR value of 25 tenths of a micron This value improves part finish and it does not increase m...

Page 389: ...TANTS 13 3 CONSTANTS Constants are defined as being all those fixed values which cannot be altered by a program The following are considered as constants Numbers expressed in the decimal system Hexade...

Page 390: ...P5 P1 AND NOT P2 OR P3 Trigonometric functions There are two functions for calculating the arc tangent ATAN which returns the result between 90 and ARG given between 0 and 360 add P1 3 4 P1 7 subtrac...

Page 391: ...0000 0000 0000 0000 0000 1001 1100 BCD 0000 0000 0000 0000 0000 0001 0101 0110 ABS absolute value P1 ABS 8 P1 8 LOG decimal logarithm P2 LOG 100 P2 2 SQRT square root P3 SQRT 16 P3 4 ROUND rounding u...

Page 392: ...the expression is to be evaluated P3 P4 P5 P6 P7 P8 P9 P3 P4 P5 P6 P7 P8 P9 Using redundant or additional brackets will neither cause errors nor slow down the execution In functions brackets must be u...

Page 393: ...rs IF P8 EQ 12 8 It checks if the value of P8 is equal to 12 8 IF ABS SIN P24 GT SPEED Analyzes if the sine is greater than the spindle speed IF CLOCK LT P9 10 99 Analyzes if the clock count is less t...

Page 394: ...394 Programming manual CNC 8055 CNC 8055i 13 HIGH LEVEL LANGUAGE PROGRAMMING M EN MODELS SOFT V02 2X Expressions...

Page 395: ...structions Display instructions Enable disable instructions Flow control instructions Subroutine instructions Probe related instructions Interruption subroutine instructions Program instructions Kinem...

Page 396: ...ical constant P102 FZLOY ORGY 55 ORGY 54 P100 In the specific case of designating a local parameter using its name A instead of P0 for example and the arithmetic expression being a numerical constant...

Page 397: ...tant or an arithmetic parameter When using a local parameter its numeric format must be used P0 thru P25 instead of A thru Z Programming examples ERROR 5 ERROR P100 ERROR User error ERROR 3 User error...

Page 398: ...nicsESBLKandDSBLKwill beexecutedinacontinuous cycle i e execution will not be stopped at the end of a block but will continue by executing the following one ESTOP and DSTOP After executing the mnemoni...

Page 399: ...t belong to the same program by first defining the initial block and then the final block The execution of the program will continue in the block following the one in which the mnemonic RPT was progra...

Page 400: ...hat in a high level block local parameters can be named by means of letters expressions of this type can be obtained IF E EQ 10 M10 If the condition of parameter P5 E having a value of 10 is met the m...

Page 401: ...ofprogramblocksprogrammednextuntilreaching the RET subroutine The subroutine is identified with an integer which also defines the type of subroutine either general or OEM The OEM subroutines are treat...

Page 402: ...nd one from the second to a third etc the CNC limits these calls to a maximum of 15 nesting levels it being possible to repeat each of the levels 9999 times Programming example G90 G00 X30 Y20 Z10 CAL...

Page 403: ...in addition to generating a new subroutine nesting level a new local parameter nesting level will be generated there being a maximum of 6 levels of local parameter nesting within the 15 levels of sub...

Page 404: ...ny times as the number of repetitions indicates Should block repetitions be chosen the first execution of the modal subroutine will be made with updated call parameters but not for the remaining times...

Page 405: ...P0 Pn Optional Initializing parameters Example G183 P1 12 3 P2 6 G187 A12 3 B45 3 P10 6 Defining local parameters The values of the parameters are defined after the call function and they may be defin...

Page 406: ...PROBE expression assignment instruction assignment instruction The mnemonic PROBE calls the probe cycle indicated by means of a number or any expression that results in a number In addition it allows...

Page 407: ...execution of the subroutine is over the CNC resumes the execution of the program which was interrupted REPOS X Y Z The REPOS instruction must always be used inside an interruption subroutine and facil...

Page 408: ...rogram is in the CNC s RAM memory If it is in another device it must be so indicated in directory HD in the Hard Disk KeyCF DNC2 in a PC connected through the serial line DNCE in a PC connected throug...

Page 409: ...ey have at the time WRITE G1 XP100 YP101 F100 G1 X10 Y20 F100 When it is a parametric block edited in high level use the character to indicate that the parameter is supposed to be replaced by the nume...

Page 410: ...of B C or P2 Angular increment for calculation D or P3 The maximum feedrate of the axes A way to use this example could be Program generating subroutine G00 X0 Y0 G93 PCALL 2 A0 B30 C5 D500 M30 N100 S...

Page 411: ...rogram may have different subroutines that will set the machine parameters for each kinematics Then the spindle change subroutine will call the subroutine with the parameters to be activated and then...

Page 412: ...be the following 1 n jpg 2 n jpeg 3 n pan The format of the JPG JPEG files must be a 3 digit number For example 001 jpg for page 1 The size of the page must be 638x335 User defined pages will be from...

Page 413: ...ars the sign it will allow positive and negative values and if it does not have a sign it will only allow positive values The integer part indicates the maximum number of digits 0 6 desired to the lef...

Page 414: ...ws displaying the data in decimal hexadecimal and binary format the following instructions are available DW1 100 Decimal format Value 100 displayed in window 1 DWH2 100 Hexadecimal format Value 64 dis...

Page 415: ...ways WBUF text expression It adds the text and value of the expression once it has been evaluated to the block that is being edited and within the data entry window Expression may contain a number or...

Page 416: ...customizing program must be selected as user program associated to the Editing Mode After selecting the Editing Mode and pressing the USER softkey this program starts executing and it allows assisted...

Page 417: ...ited Enters the edited block into memory For example PCALL 1 X2 Y3 GOTO N0 Displays page 12 and defines 3 data entry windows N20 PAGE 12 ODW 1 10 60 ODW 2 13 60 ODW 3 16 60 Editing WBUF PCALL 2 Adds P...

Page 418: ...418 Programming manual CNC 8055 CNC 8055i 14 PROGRAM CONTROL INSTRUCTIONS M EN MODELS SOFT V02 2X Screen customizing instructions...

Page 419: ...sformation three machine coordinate systems will be considered in the following examples Machine coordinate system X Y Z in the figures Part coordinate system X Y Z in the figures Tool coordinate syst...

Page 420: ...coordinate system function G47 must be used when programming the movement of the Z axis G01 G47 Z In this type of movements when the tool coordinate system does not coincide with the machine coordinat...

Page 421: ...with the machine coordinate system the CNC moves several axes in order to move the tool according to the part coordinates In the example the X and Z axes move To move the tool according to the machine...

Page 422: ...the part coordinates In the example the X and Z axes move Now to move the tool according to the tool coordinate system function G47 must be used when programming the movement of the Z axis G01 G47 Z...

Page 423: ...al logic input MACHMOVE M5012 must be activated at the PLC Case D It is working with TCP Tool Center Point When working with TCP transformation function G48 active the CNC allows changing the tool ori...

Page 424: ...plane To work with inclined planes always proceed as follows 1 Define with G49 the inclined plane corresponding to the machining operation G49 is described later on in this chapter 2 The CNC variables...

Page 425: ...is first and around the Z axis last the amounts indicated in A B C respectively X Y Z Define the coordinate origin of the inclined plane Indicate the X Y Z coordinates with respect to the current coor...

Page 426: ...axis first then around the Y axis and again around the Z axis the amounts indicated by Q R S respectively X Y Z Define the coordinate origin of the inclined plane Indicate the X Y Z coordinates with...

Page 427: ...last rotate around the Z axis the amount indicated by S G49 X Y Z I J K R S Defines the inclined plane specifying the angles forming the new inclined plane with the X Y and Z axes of the machine s coo...

Page 428: ...e new Cartesian plane G49 T X Y Z S It defines a new work plane perpendicular to the direction of the tool Is it a good idea to have a swivel or angled spindle machine parameter XFORM P93 set to 2 or...

Page 429: ...when the tool is parallel to the Z axis of the machine Later every time the spindle is rotated the relative tool coordinates will also rotate On the two machines on the left only the main rotary axis...

Page 430: ...X Y Z I J K R S W G49 T X Y Z S W The spindle orients to the new plane and later movements are carried out in X Y W To observe the graphics in the new plane set general machine parameter GRAPHICS P16...

Page 431: ...on type spindles 45 spindles the L parameter has been added to function G49 definition of inclined plane that indicates which one of these two solution is to be used It is optional and it is defined a...

Page 432: ...by using the second gains and accelerations The parameters associated with G49 are optional When programming G49 without parameters the active coordinate transformation is canceled G49 is modal and n...

Page 433: ...of the parameters that have been defined For example when programming G49 XYZ ABC the CNC updates the variables ORGROX ORGROY ORGROZ ORGROA ORGROB ORGROC The rest of variables keep their previous val...

Page 434: ...orient the spindle perpendicular to the indicated inclined plane It is the same value as shown by the TOOROF variable P298 It indicates the position to be occupied by the spindle s secondary rotary ax...

Page 435: ...the plane The programming sequence is ABC regardless of which one is the main axis or the secondary G90 G01 Z5 Tool approach to the work plane G90 G01 X20 Y120 Positioning at the 1st point G Machinin...

Page 436: ...the tool moves according to the part coordinate system Now to move the tool according to the tool coordinate system function G47 must be used when programming the movement of the Z axis G01 G47 Z The...

Page 437: ...value other than 0 To orient the tool without changing its tip position the CNC must move several axes of the machine TCP transformation is activated and deactivated by function G48 G48 S1 Turn TCP tr...

Page 438: ...olation to point 170 90 maintaining the same tool orientation along the whole path Block N24 positions the tool at 170 120 orienting it to 0 TheCNCinterpolatestheXZBaxesexecutingthe programmedlinearin...

Page 439: ...y oriented at all times In other words perpendicular to the path Block N34 positions the tool at 170 120 Block N35 cancels the TCP transformation Example C Machining of a profile G18 G90 Selects the Z...

Page 440: ...rogram G48 S0 orG48 without parameters It is also canceled after a home search G74 While TCP is on the following operations are possible Zero offsets G54 G59 Pattern rotation G73 Presets G92 G93 Movem...

Page 441: ...order sequence G48 S1 Turn TCP transformation on G49 Define the inclined plane G01 AP298 BP297 Position the tool perpendicular to the plane G Start machining End of the machining operation G49 Cancel...

Page 442: ...442 Programming manual CNC 8055 CNC 8055i 15 COORDINATE TRANSFORMATION M EN MODELS SOFT V02 2X TCP Transformation G48...

Page 443: ...ation of an inclined plane that converts the movements of the real non perpendicular axes Z X This way a movement programmed on the X axis is transformed into movements on the Z X axes i e it then mov...

Page 444: ...s Coordinate preset Movements in continuous incremental jog and handwheels The following operations are not possible while the transformation is active Movement until making contact against a hard sto...

Page 445: ...ian system The angular transformation is turned on using function G46 whose programming format is G46 S1 This instruction turns a frozen suspended transformation on again See 16 2 Freezing the angular...

Page 446: ...gular transformation is frozen suspended using function G46 whose programming format is G46 S2 Programming movements after freezing the angular transformation If an angular transformation is frozen su...

Page 447: ...055 CNC 8055i SOFT V02 2X 447 APPENDIX A ISO code programming 449 B Program control instructions 451 C Summary of internal CNC variables 455 D Key code 463 E Programming assistance screens of the syst...

Page 448: ......

Page 449: ...e limits 3 7 1 G22 Enable disable work zones 3 7 2 G28 Second spindle selection 5 4 G29 Main spindle selection 5 4 G28 G29 Axis toggle 7 5 G30 Spindle synchronization offset 5 5 G32 Feedrate F as an i...

Page 450: ...2 General and specific scaling factor 7 6 G73 Rotation of the coordinate system 7 7 G74 Machine reference home search 4 2 G75 Probing move until touching 12 1 G76 Probing move while touching 12 1 G77...

Page 451: ...It causes a jump within the same program to the block defined by the label N expression RPT N expression N expression P expression It repeats the execution of the portion of the program between the bl...

Page 452: ...the information contained in block text as a new program block section 14 9 INIPAR Validates the machine parameters modified from the OEM subroutine that defines the kinematics section 14 10 PAGE expr...

Page 453: ...e it has been evaluated to the block that is being edited and within the data entry window WBUF Enters the block being edited into memory It can only be used in the screen customizing program to be ex...

Page 454: ...454 Programming manual CNC 8055 CNC 8055i B M EN MODELS SOFT V02 2X Program control instructions...

Page 455: ...Tool radius wear of offset n TOKn R W R W Tool length wear of offset n Variable CNC PLC DNC section 13 2 3 ORG X C R R Active zero offset on the selected axis The value of the additive offset indicate...

Page 456: ...elected axis X C SZONE R R W R Status of work zone 2 SZLO X C R R W R Work zone 2 Lower limit along the selected axis X C SZUP X C R R W R Work zone 2 Upper limit along the selected axis X C TZONE R R...

Page 457: ...ayed on the screen DRPO X C R R R Position indicated by the Sercos drive of the selected axis GPOS X C n p R Coordinate of the selected axis programmed in the n block of the program p Variable CNC PLC...

Page 458: ...in ten thousandths of a degree within 999999999 and from the CNC in degrees within 99999 9999 RPOSS R R R Real spindle position Reading from the PLC in ten thousandths of a degree between 3600000 and...

Page 459: ...med in M19 via program for the second spindle SFLWES R R R Spindle following error Variable CNC PLC DNC section 13 2 13 ASPROG R R Speed programmed in M45 S within the associated subroutine Variable C...

Page 460: ...mote I O available Variable CNC PLC DNC section 13 2 19 OPMODE R R R Operation mode OPMODA R R R Operating mode when working in the main channel OPMODB R R R Type of simulation OPMODC R R R Axes selec...

Page 461: ...s TIMEG R R R Remaining time to finish the dwell block in hundredths of a second SELPRO R W R W R When having two probe inputs it selects the active input DIAM R W R W R It changes the programming mod...

Page 462: ...462 Programming manual CNC 8055 CNC 8055i C M EN MODELS SOFT V02 2X Summary of internal CNC variables...

Page 463: ...Programming manual CNC 8055 CNC 8055i D M EN MODELS SOFT V02 2X 463 Key code KEY CODE Alpha numeric keyboard and monitor...

Page 464: ...464 Programming manual CNC 8055 CNC 8055i D M EN MODELS SOFT V02 2X Key code...

Page 465: ...Programming manual CNC 8055 CNC 8055i D M EN MODELS SOFT V02 2X 465 Key code Alphanumeric operator panel...

Page 466: ...466 Programming manual CNC 8055 CNC 8055i D M EN MODELS SOFT V02 2X Key code MC operator panel...

Page 467: ...Programming manual CNC 8055 CNC 8055i D M EN MODELS SOFT V02 2X 467 Key code...

Page 468: ...468 Programming manual CNC 8055 CNC 8055i D M EN MODELS SOFT V02 2X Key code...

Page 469: ...Programming manual CNC 8055 CNC 8055i D M EN MODELS SOFT V02 2X 469 Key code MCO TCO operator panel...

Page 470: ...470 Programming manual CNC 8055 CNC 8055i D M EN MODELS SOFT V02 2X Key code Alphanumeric keyboard...

Page 471: ...Programming manual CNC 8055 CNC 8055i D M EN MODELS SOFT V02 2X 471 Key code 11 LCD Monitor...

Page 472: ...472 Programming manual CNC 8055 CNC 8055i D M EN MODELS SOFT V02 2X Key code...

Page 473: ...ber 254 of the directory if there is one Page 1015 Same as number 255 of the directory if there is one Page 1016 High level language dictionary from A to G Page 1017 High level language dictionary fro...

Page 474: ...al entry G37 Page 1046 Tangential exit G38 Page 1047 Chamfer G39 Page 1048 Dwell interruption of block preparation G04 G04K Page 1049 Square round corner G07 G05 Page 1050 Mirror image G11 G12 G13 G14...

Page 475: ...asswords table Syntax aids high level language Page 1100 ERROR and MSG instructions Page 1101 GOTO and RPT instructions Page 1102 OPEN and WRITE instructions Page 1103 SUB and RET instructions Page 11...

Page 476: ...ogramming by means of an arc chord G65 Page 1076 Irregular pocket canned cycle G66 Page 1077 Irregular pocket roughing G67 Page 1078 Irregular pocket finishing G68 Page 1079 Deep hole drilling canned...

Page 477: ...of electrostatic charges that could result in electrostatic shocks The plastics used on the front panel are resistant to Grease and mineral oils Bases and bleach Dissolved detergents Alcohol Fagor Aut...

Page 478: ...478 Programming manual CNC 8055 CNC 8055i F M EN MODELS SOFT V02 2X Maintenance...

Page 479: ...Programming manual CNC 8055 CNC 8055i F SOFT V02 2X 479...

Page 480: ...480 Programming manual CNC 8055 CNC 8055i F SOFT V02 2X...

Page 481: ......

Page 482: ...or Automation S Coop B San Andr s 19 Apdo 144 E 20500 Arrasate Mondrag n Spain Tel 34 943 719 200 34 943 039 800 Fax 34 943 791 712 E mail info fagorautomation es www fagorautomation com FAGOR AUTOMAT...
Reviews: