


- 46 -
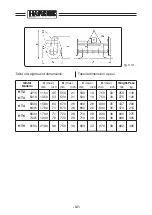
Z25
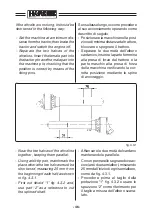
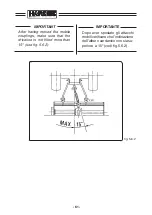
fig. 4.3.1
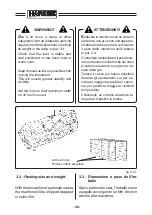
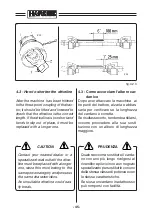
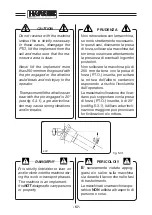
- Affiancare le due metà del cardano
mantenendole parallele.
- Con un pennarello segnare dove ac-
corciare i due semialberi, misurando
25 mm dall’inizio di ogni semialbero,
come da fig. 4.3.1.
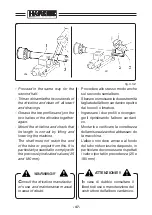
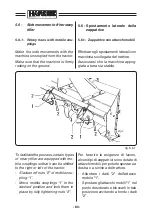
- Procedere prima al taglio della
protezione “1” fig. 4.3.2 e usare lo
spezzone “2” come riferimento per
il taglio a misura dell’albero scana-
lato.
- Near the two halves of the driveline
together, keeping them parallel.
- Using a felt-tip pen, matchmark the
place where the two halves must be
shortened, measuring 25 mm from
the beginning of each half, as shown
in fig. 4.3.1.
- First cut shield “1” fig. 4.3.2 and,
use part “2” as a reference to cut
the splined shaft.
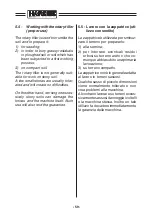
Se risultasse lungo, occorre procedere
al suo accorciamento operando come
descritto di seguito.
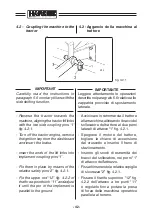
- Posizionare la macchina nella posi-
zione di minima distanza dal trattore,
bloccare e spegnere il trattore.
- Separare le due metà dell’albero
cardanico, inserire la parte femmina
alla presa di forza del trattore e la
parte maschio alla presa di forza
della macchina verificando la cor-
retta posizione mediante le spine
di ancoraggio.
If the driveline is too long, it should be
shortened in the following way:
- Set the machine at a minimum dis-
tance from the tractor, then brake the
tractor and switch the engine off.
- Separate the two halves of the
driveline. Insert the female part into
the tractor pto and the male part into
the machine pto, checking that the
position is correct by means of the
fixing pins.
Summary of Contents for HARDEE HT3
Page 2: ......
Page 22: ...10...
Page 27: ...15 39914100 g 2 2 1 g 2 2 2 Z11 399143000 g 2 2 4 Z13 Z14 g 2 2 3 399CEE001 399CEE002 Z12...
Page 42: ...30 g 2 9 1 Z06...
Page 43: ...31 1 g 2 9 2 399CEE001 39914100 Z11 Z12...
Page 44: ...32 g 2 9 3 2 72 0386 00...
Page 45: ...33 3 g 2 9 4 72 0390 00...
Page 46: ...34 5 g 2 9 5 72 0391 00...
Page 50: ...38...
Page 98: ...86...
Page 106: ...94...
Page 107: ...95 9 Assembly instructions for Kit standing jack Schema di montaggio per Piedino di appoggio...
Page 108: ...STANDING JACK PIEDISTAL STUTZHALTER PIEDINO DI APPOGGIO HT2 1 10 12 11 4 5...
Page 110: ...7 3 6 2 4 5 STANDING JACK PIEDISTAL STUTZHALTER PIEDINO DI APPOGGIO HT3...
Page 112: ...7 12 12 8 10 9 11 6 STANDING JACK PIEDISTAL STUTZHALTER PIEDINO DI APPOGGIO HT4...
Page 114: ...STANDING JACK PIEDISTAL STUTZHALTER PIEDINO DI APPOGGIO HT6 7 11 11 8 10 9 12 6...
Page 116: ...STANDING JACK PIEDISTAL STUTZHALTER PIEDINO DI APPOGGIO HT9 8 13 13 9 11 10 12 7...
Page 118: ......
Page 119: ......


