Section 2: Getting Started
2 - 6
Euphonix CS3000/2000 Operation Manual
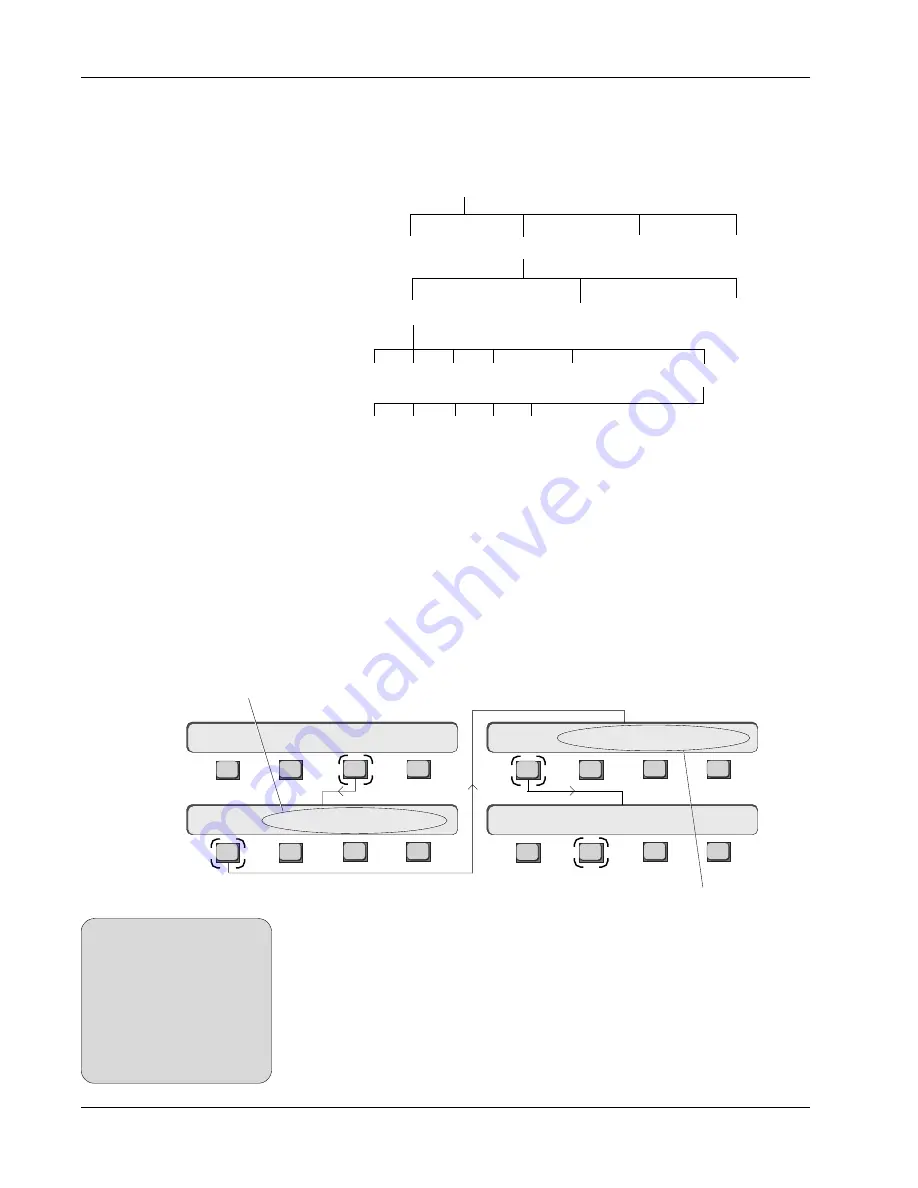
Disks:
A:
C:
D:
Mixes: #1
#2 #3 #4 Montage Final1 Montage Final2
Passes: 1 2 3 4
5…
Projects: NFL Football Surround Demo Nightly News RKK
Titles: AES NAB IBC
(RAM based)
Also stored under the title name are 50 SnapShots, title template, title setup,
ES108A Dynamics and Audio Cube assignments, MX464 Master Expander GPI
relay assignments, factory-programmed macros, comments, and cues.
The Euphonix support computer can address a SCSI drive attached to it for
storage. Normally, all computer hard disks (C: drive, etc.) appear in the Drive
list window when accessed. If you insert a DOS (IBM-compatible) formatted
removable cartridge into the D: drive, the list does not show the disk immedi-
ately. The disk must be mounted first. To do this, make sure you are at the top-
level Main menu; if not, press the DSC [
Esc
]ape key repeatedly, then press
[
F3
] (System), [
F1
] (File), [
F1
] (Disk) and then [
F2
] (Read):
A typical MixView
file tree:
File Hierarchy
Mounting Disks
Euphonix console data is organized in a basic “file system” structure. The
drives are at the top of the hierarchy, followed by projects, titles and mixes.
Remember that drive C: is the computer’s internal hard drive, that D: is the
removable disk drive and that A: accesses the 3.5” floppy:
SIDE NOTE:
After inserting a floppy or
removable disk, make sure you
press the [
F2
] (Read) key,
otherwise the system will not
recognize the new disk. As soon
as you press [
F2
] all disks
attached to the system will
appear in the list.
You will now see that the word ‘mounting’ appears in the
Disk list and the SmartDisplay. If the cartridge is DOS
formatted it will appear in the list. This applies to the 3.5” floppy drive as well.
Euphonix software does not include disk format routines for floppies. You must
use pre-formatted IBM-compatible disks. You can format floppies by quitting
MixView (press [
Alt-Q
] on the QWERTY keyboard) and issuing the appropriate
DOS commands if you wish, but it’s simpler to buy pre-formatted disks. Refer
to the DOS manuals that came with the support computer if you need to
format your own floppies.
[
Project
], [
Title
] & [
Mix
] select
the appropriate lists and show
options available for that list
F3
F1
F2
F4
F3
F1
F2
F4
F3
F1
F2
F4
F3
F1
F2
F4
Disk Menu
Disk:
Read
Setup
Snap
System
Grps
File
F-Link
GPI
MIDI
Disk
Project
Title
Mix
File Menu
Main Menu
System Menu
[
F-Link
], [
GPI
] & [
MIDI
] are used for
internal fader linking and communication
with external equipment
Summary of Contents for MixView CS2000
Page 1: ...CS3000 CS2000 Operation Manual Version 3 0 Revision 1...
Page 14: ...Table of Contents xiv Euphonix CS3000 2000 Operation Manual This page intentionally left blank...
Page 303: ...Euphonix CS3000 2000 Operation Manual A 1 A APPENDICES EUPHONIX MIXING SYSTEMS...
Page 304: ...A 2 Euphonix CS3000 2000 Operation Manual This page intentionally left blank...
Page 315: ...Index CS3000 2000 Operation Manual I 1 I INDEX EUPHONIX MIXING SYSTEMS...
Page 316: ...I 2 CS3000 2000 Operation Manual Index This page intentionally left blank...
Page 324: ...I 10 CS3000 2000 Operation Manual Index This page intentionally left blank...


