235
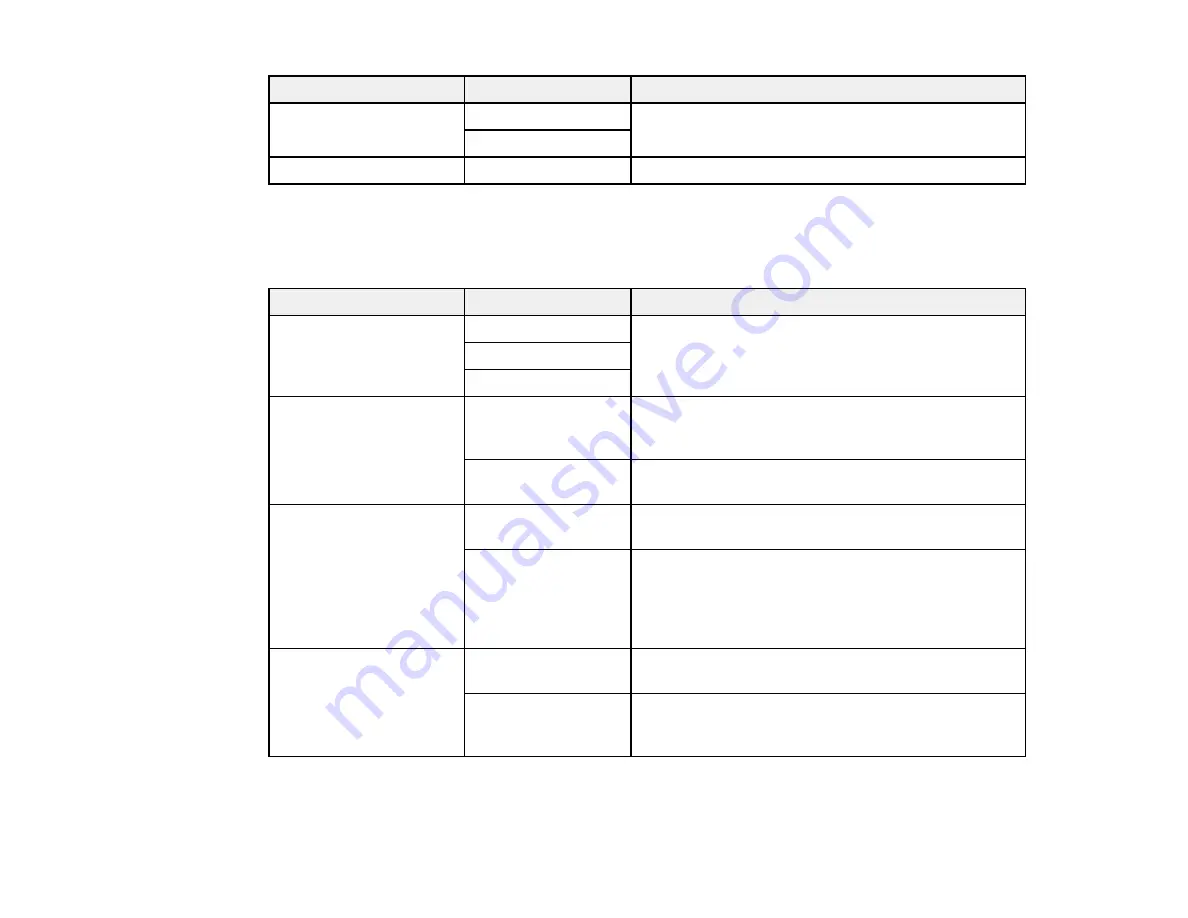
Setting
Options
Description
Initial Tab
Frequent
Selects the tab that first appears when you select
Fax
from the home screen
Recipient
Quick Operation Button
1 to 4
Sets up to four frequently used fax settings
Parent topic:
Selecting Advanced Fax Settings
Basic Settings - Fax
Set the basic options you want to use for incoming and outgoing faxes.
Setting
Options
Description
Fax Speed
Fast(33,600bps)
Sets the speed at which you send and receive faxes
Medium(14,400bps)
Slow(9,600bps)
ECM
On
Turns on Error Correction Mode (ECM) to
automatically correct errors in sent or received fax
data
Off
Turns off Error Correction Mode (ECM); color faxes
cannot be sent or received
Dial Tone Detection
On
Automatically dials the number you enter for faxing
when the product detects a dial tone
Off
Turns off automatic dial tone detection, which may
be necessary if the product is connected to a PBX
(Private Branch Exchange) or a TA (Terminal
Adapter). However, turning this setting off may cause
the product to drop the first digit of a fax number.
Dial Mode
Tone
Selects a tone dialing system and assigns each
number a tone during dialing
Pulse
Select a pulse dialing system and assign numbers a
series of pulses during dialing. You can temporarily
switch to
Tone
by pressing
*
during dialing.
Summary of Contents for WF-C20590 Series
Page 1: ...WF C20590 User s Guide ...
Page 2: ......
Page 14: ......
Page 28: ...28 You see the Basic Settings screen 4 Select Date Time Settings ...
Page 80: ...80 You see a screen like this 5 Select PDL Print Configuration ...
Page 89: ...89 You see this screen 2 Select Load Paper under the How To options ...
Page 90: ...90 You see this screen 3 Select one of the options ...
Page 91: ...91 You see this screen 4 Select How To ...
Page 99: ...99 You see a screen like this 2 Select the paper source you want to select settings for ...
Page 110: ...110 Parent topic Placing Originals on the Product Related topics Copying Scanning Faxing ...
Page 191: ...191 You see a screen like this 4 Select Email ...
Page 200: ...200 You see an Epson Scan 2 window like this ...
Page 202: ...202 You see an Epson Scan 2 window like this ...
Page 207: ...207 You see this window ...
Page 223: ...223 DSL connection 1 Telephone wall jack 2 DSL filter 3 DSL modem ...
Page 224: ...224 ISDN connection 1 ISDN wall jack 2 Terminal adapter or ISDN router ...
Page 246: ...246 You see a screen like this 3 Select the Recipient tab ...
Page 251: ...251 You see a screen like this 3 Select the Recipient tab 4 Select Add New 5 Select Add Group ...
Page 311: ...311 You see a screen like this 6 Select Print Head Nozzle Check ...
Page 318: ...318 5 Open the interior of the document cover ...


