background image

A

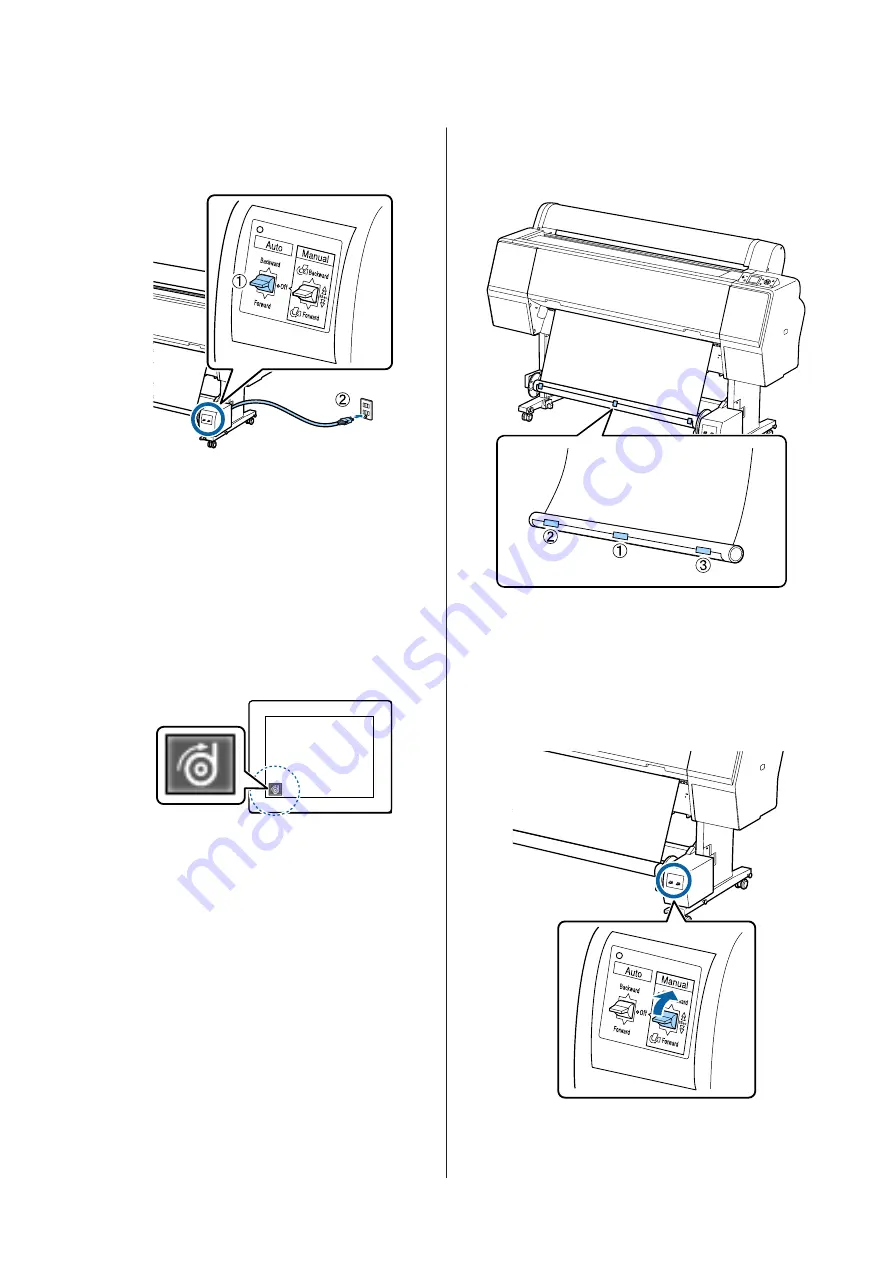
Set the auto take-up reel unit Auto switch to Off.
Plug the power cord into an outlet and confirm
that the power lamp lights.

B

Press the 

P

 button to turn on the printer.

C

Check that the roll paper is correctly loaded in the
printer.

D

Check that the auto take-up reel unit icon is
displayed on the printer's screen.

If the icon is not displayed, check that the auto
take-up reel unit is connected correctly and is
turned on.

E

Press the 

l

 button on the printer, and then select

Roll Paper

 from the Paper Source menu.

F

Keep the 

d

 button on the printer pressed until

the end of the roll reaches the roll core.

G

Tape the end to the roll core.

Place tape (available from third-party suppliers)
at the center and then at the left and right ends.

H

Keep the 

d

 button in the printer pressed until

you have fed enough paper for about three wraps
around the roll core.

I

Keep the Manual switch on the auto take-up reel
unit pressed to Backward to wrap the paper three
times around the core.

SC-P9000 Series/SC-P7000 Series/SC-P8000 Series/SC-P6000 Series     User's Guide

Basic Operations


46

Summary of Contents for SC-P6000 Series

Page 1: ...User s Guide CMP0044 01 EN ...

Page 2: ...d as Original Epson Products or Epson Approved Products by Seiko Epson Corporation SeikoEpsonCorporationshallnotbeheldliableforanydamageresultingfromelectromagneticinterferencethatoccursfromtheuseofanyinterfacecables other than those designated as Epson Approved Products by Seiko Epson Corporation EPSON Epson UltraChrome EPSON EXCEED YOUR VISION EXCEED YOUR VISION and their logos are registered tr...

Page 3: ...ut Sheets 34 Loading Cut Sheets A3 Size or Larger and Poster Board 34 Loading Cut Sheets Smaller than A3 Size 36 Removing Cut Sheets 36 Checking and Setting the Paper Type 37 Checking the Paper Type 37 Paper Type Settings 38 Using the Paper Basket 39 Ejecting Paper to the Rear 39 Ejecting Paper to the Front 41 Storing 42 Using the Auto Take up Reel Unit SC P9000 Series SC P8000 Series Only 43 Usin...

Page 4: ...nting at Non Standard Sizes 93 Banner printing on roll paper 96 Layout Manager Windows Only 98 Setting Procedures for Printing 98 Saving and Recalling Settings 100 Color Management Printing About Color Management 101 Color Management Print Settings 101 Setting profiles 102 Setting color management with the applications 102 Setting color management with the printer driver 104 Color management print...

Page 5: ...ansporting the Printer 180 Notes When Moving the Printer 180 Notes on Transporting 180 Notes when reusing the printer 181 System Requirements 182 System Requirements of the Printer Driver 182 Specifications Table 183 Standards and Approvals 184 Where To Get Help Technical Support Web Site 186 Contacting Epson Support 186 Before Contacting Epson 186 Help for Users in North America 187 Help for User...

Page 6: ... power outlets Avoid using outlets on the same circuit as copiers or air control systems that regularly switch on and off Avoid electrical outlets controlled by wall switches or automatic timers Keep the entire computer system away from potential sources of electromagnetic interference such as loudspeakers or the base units of cordless telephones Use only the type of power source indicated on the ...

Page 7: ... this ink cartridge retains a variety of cartridge related information such as the ink cartridge status so that the cartridge may be removed and reinserted freely However each time the cartridge is inserted some ink is consumed because the printer automatically performs a reliability check If you remove an ink cartridge for later use protect theinksupplyareafromdirtanddust andstoreitin the same en...

Page 8: ...ard Edition Windows Server 2008 refers to Windows Server 2008 Standard Edition and Windows Server 2008 Enterprise Edition WindowsServer2008x64referstoWindowsServer 2008 x64 Standard Edition Windows Server 2008 x64 Enterprise Edition Windows Server 2008 R2 Standard Edition and Windows Server 2008 R2 Enterprise Edition Windows Server 2003 refers to Windows Server 2003 Standard Edition and Windows Se...

Page 9: ...is basket keeping the media clean and free of creases U Using the Paper Basket on page 39 D Casters There are two casters on each leg The casters are normally kept locked once the printer is in place E Paper support Use this to control the paper eject direction for the roll paper F Manual box Holds the manual for the printer This can be installed on the left or on the right G Control panel U Contr...

Page 10: ...nce Box Absorbs waste ink The SC P9000 Series SC P8000 Series has one on the left and one on the right and the SC P7000 Series SC P6000 Series has one on the right U Replacing Maintenance Boxes on page 134 B USB port Connects the USB cable C Option port Connects the optional SpectroProofer mounter or Auto Take up Reel Unit for the SC P9000 Series SC P8000 Series only D LAN port Connects the LAN ca...

Page 11: ...ing Receiving data F Status light The color indicates the network transmission speed Off 10Base T Red 100Base TX Green 1000Base T G AC inlet Connect the supplied power cable here H Option slot Connects the optional hard disk unit SC P9000 Series SC P7000 Series SC P8000 Series SC P6000 Series User s Guide Introduction 11 ...

Page 12: ... down Off The power is off B Power button P Turns the printer on or off C Pause Cancel button W The printer enters pause status if this is pressed while printing To release the pause status press the W button again or select Pause Cancel on the screen and then press the Z button To cancel print jobs being processed select Job Cancel on the screen and then press the Z button Pressing this button wh...

Page 13: ...nter s menu can be changed the printer is ready to print or there is no paper the Settings menu is displayed U Using the Control Panel Menu on page 108 If this is pressed while a menu is displayed you are taken to the next menu J Paper cut button X Itisusedtomanuallycutrollpaperusingthebuilt in cutter U Manual cut method on page 32 K Load paper button Y Locksorreleasesthepressureroller Whenyouwant...

Page 14: ...een Off No error Screen View 1 Messages Displays the printer s status operations and error messages U What to do When a Message is Displayed on page 139 U Using the Control Panel Menu on page 108 2 Paper Source The settings for Paper Source roll paper or cut sheets and Auto Cut for roll paper are indicated by the icons in the following table The paper name selected in Paper Type is displayed on th...

Page 15: ...C Cyan Y Yellow SC P8000 Series SC P6000 Series LC Light Cyan MK Matte Black PK Photo Black VM Vivid Magenta LK Light Black LLK Light Light Black VLM Vivid Light Magenta Ink remaining using Cyan as an example Icon Ink Remaining in Cartridge No error The height of the indicator changes with the level of ink remaining Ink is low You need to prepare a new ink cartridge Ink cartridge is expended repla...

Page 16: ...ntinksmaintainmorebeautifulandmorevibrant prints over a long period of time with their high light fastness They are also extremely fade resistant and can be safely displayed in direct sunlight Additionally the high water and ozone resistance is not only ideal for photo printing but also allows for store displays and banners outdoor displays of posters and so on When you are printing for outdoor us...

Page 17: ...ided on the software disc supplied allows you to easily perform color calibration using the printer s built in sensors Adjust all prints with one calibration By saving the calibration data to the printer you do not need to perform calibration for every paper type or mode Also you do not need to make individual calibrations when sharing the printer with multiple users Perform color management for m...

Page 18: ...eel Unit SC P9000 Series SC P8000 Series Only on page 43 Notes on Usage and Storage Installation space Make sure that you secure a space of at least 300 mm around the entire printer clear of any other objects so thatpaperejectionandconsumablereplacementarenot obstructed See the Specifications Table for the external dimensions of the printer U Specifications Table on page 183 Notes when using the p...

Page 19: ...e If the print head is not capped turn the printer on and then turn it off To prevent the accumulation of dust and other foreign matter in the printer close all covers before placing it in storage If the printer will be not be used for an extended period protect it with an anti static cloth or other cover The print head nozzles are very small and they can become clogged easily if fine dust gets on...

Page 20: ...er just before printing Do not use wavy or warped paper For roll paper cut off any parts that are wavy or curled and then load the paper again For cut sheets use new paper Do not wet the paper Do not throw away the paper packaging as you can use it for storing the paper Avoid locations that are subject to direct sunlight excessive heat or humidity Keep cut sheets in their original package after op...

Page 21: ...ied with Epson special media for detailed information on handling the paper after printing The colors of photos posters and other printed materials appear different under different lighting conditions light sources The colors of print outs from this printer may also appear different under different light sources Light sources include sunlight fluorescent light incandescent light and other types SC...

Page 22: ...versions on the Epson website http www epson com Software Name Explanation Printer Driver Theprinterdriverisrequiredwhenusingtheprinter Followthestepsinthe SetupGuide to install U Summary of the Printer Driver on page 23 Epson Network Utilities When a network connection is setup using the Setup Guide network related modules are installed See the Network Guide PDF EpsonNet Config With this software...

Page 23: ...gs dialogs Windows You can save these settings and easily import or export these saved settings U Customizing the Printer Driver on page 63 Mac OS X Allows you to execute printer maintenance functions to maintain print quality check the printer s status and so on Windows You can easily import or export printer driver settings U Summary of the Utility Tab on page 66 SC P9000 Series SC P7000 Series ...

Page 24: ...lications Check the folder containing the necessary software and install Mac OS X Select the necessary software and then click Install Clear the checkboxes for any software that has already been installed Follow the on screen instructions to install See the following for instructions on starting and closing the software U Starting and Closing Software on page 26 SC P9000 Series SC P7000 Series SC ...

Page 25: ...ner printing and enlarged printing Before installing the plug in check the following Office applications are installed Office applications are not running LFP HDD Utility TheUtilitycanbeusedtomanageprintjobsstoredontheoptionalharddiskunit Usethis when connecting the printer directly to the computer using a USB cable Epson Print Layout This is a plug in for Adobe Photoshop and Adobe Lightroom By op...

Page 26: ...epending on the software being used a shortcut icon may not be created during installation Starting from the menu Windows 8 1 Windows 8 Enter the software name in the search charm and then select the icon displayed Other than Windows 8 1 Windows 8 Click the Start button click the installed software name from All Programs or Programs or in the EPSON folder and then select the software you want to s...

Page 27: ...Panel 2 to remove EPSON LFP Remote Panel 2 D Select the target printer icon and then click OK P E Follow the on screen instructions to continue When the delete confirmation message appears click Yes Restart the computer if you are reinstalling the printer driver Mac OS X When reinstalling or upgrading the printer driver or other software follow the steps below to uninstall the target software firs...

Page 28: ...eck the loading methods Buttons that are used in the following settings A Turn on the printer by pressing the P button B Press the l button and then select Roll Paper from the Paper Source menu To automatically cut after printing select Roll Paper Cut If you do not want to cut select Roll Paper No Cut C Open the roll paper cover D Lower the lock lever for the adapter holder to release the lock E M...

Page 29: ...I Attach the roll paper adapters to both ends of the roll paper and then lower the lock levers on the left and right to lock them in place Make sure you insert the adapters fully before locking them J Pushtherollpapertotherightuntilittouchesthe roll paper loading guide K Move the adapter holder so that the u on the adapter holder and the left roll paper adapter are aligned SC P9000 Series SC P7000...

Page 30: ...dge of the roll paper into the paper feed slot and then feed the roll paper by hand until the leading edge comes out from below the front cover If the leading edge of the roll paper does not appear use the u or d button to adjust the Paper Suction Q With both hands pull the roll paper until the leading edge of the paper is in the center of the stand the position of the label shown in the illustrat...

Page 31: ...by the built in cutter Furthermore cutting the following media types may damage or reduce the lifetime of the built in cutter Fine art paper Canvas Vinyl Matte poster board Adhesive paper Banner media Cut these media types with commercially available scissors or a cutter in the following manner With the front cover closed holddown the d button on the control panel while viewing the inside of the p...

Page 32: ...paper needs to be 60 to 127 mm The necessary length differs depending on the paper type and cannot be changed If the necessary length has not been reached paper is fed automatically leaving a margin Use a commercially available cutter to remove the unnecessary margin B Press the X button A confirmation screen is displayed Press the Z button to cut using the built in cutter Press the l button to re...

Page 33: ... unit If the paper is not rewound automatically you need to rewind manually Note When removing the roll paper you can use the optional roll paper belt to prevent the roll paper from unwinding D Lower the lock lever for the adapter holder to release the lock E Move the adapter holder to the left When moving the adapter holder make sure you use the handle F Roll overthe paper roll tothe front side t...

Page 34: ...r curled paper is loaded this printer may not be able to recognize the paper size feed the paper or print correctly We recommend that you return the paper to its original package and store it flat and take it out of the package just before you use it Loading Cut Sheets A3 Size or Larger and Poster Board cImportant Insert the paper just before printing The roller may leave an impression on paper th...

Page 35: ...eries SC P8000 Series poster board that is over 762 mm long can be inserted horizontally Note For Epson Color Calibration Utility color charts insert the page from the top with the printed side facing up F Position the trailing and right edges of the paper as shown by the loading mark If it is hardto positionthick paper use theu ord buttons to adjust the suction strength G Press the Y button The p...

Page 36: ...g the P button B Press the l button and then select Cut Sheet from the Paper Source menu C Close the roll paper cover D Insert the paper into the printer keeping its right edge aligned with the loading mark on the roll paper cover cImportant Load cut sheets vertically For paper smaller than A4 size insert by keeping the right edge aligned with the additional line below the paper feed slot Press th...

Page 37: ...the following screens is displayed Information Selected Paper Type Keep Settings Above Change Settings Proceed Information screen This is displayed when loading roll paper that does not have a printed barcode or when loading cut sheets Follow the steps below and then make settings U Paper Type Settings on page 38 Ready Screen This is displayed when loading roll paper that has a printedbarcode Theb...

Page 38: ...e Z button C Select the media name and then press the Z button D When Remaining Setup is set to On use the d ubuttonstosettherollpaperlengthto5 0to99 5 m and then press the Z button You can set in increments of 0 5 m E Check that Ready is displayed on the screen When printing immediately Send the print data from the computer When using commercially available paper for the first time Make custom pa...

Page 39: ...duced and the paper may not be ejected correctly See the following for the paper ejection method to the rear of the printer U Ejecting Paper to the Rear on page 39 Ejecting paper to the front of the printer for banner printing and printing on thick paper When performing banner printing on roll paper or printing on thick cut sheets eject paper to the front of the printer This is available forroll p...

Page 40: ...e vertical as shown in the illustration D Carefullyraisethebasketatthefrontbyonelevel When the cloth touches the floor secure using the hook and loop fastener tape as shown in the illustration cImportant If image quality is smudged in Doubleweight Matte Paper or Enhanced Matte Paper raise all paper supports by one level SC P9000 Series SC P7000 Series SC P8000 Series SC P6000 Series User s Guide B...

Page 41: ...the basket at the rear according to the length of the print outs Whenthepaperlengthis1 189mm A1length or less Raise the basket so that it is straight up Whenthepaperlengthis1 189mm A1length or more Lay the basket straight out Ejecting Paper to the Front This section explains how to switch the paper basket from the stored state to the ready state A Raise the paper supports to the horizontal positio...

Page 42: ...en storing perform each ejection procedure in reverse and store the front and rear paper baskets vertically as shown in the illustration U Ejecting Paper to the Rear on page 39 U Ejecting Paper to the Front on page 41 Front Place the paper supports in the position shown in the illustration to prevent the front paper basket from falling to the floor and getting soiled Back SC P9000 Series SC P7000 ...

Page 43: ...ribed in the documentation Dropping the roll core could cause injury Be careful that your hands hair or other objects do not get caught in the moving parts of the auto take up reel unit Failure to observe this precaution could result in injury cImportant Confirmthattheendoftherolliscutstraightacross The unit will not function as expected if the end of the roll is wavy or curved U Manual cut method...

Page 44: ...e autotake upreelunitwhenOnisselected willcause errors U Cutting the roll paper on page 31 Taking Up the Paper Printable Side Out For information on installing the roll core see the Setup Guide for the optional auto take up reel unit Buttons that are used in the following settings A Set the auto take up reel unit Auto switch to Off Plug the power cord into an outlet and confirm that the power lamp...

Page 45: ...sufficiently loose Note The tensioner supplied with the auto take up reel unit is used with some types of paper Slacken the paperandinsert thetensioner nearthecenterofthe paper as shown See the following section for information on paper that requires the tensioner U Epson Special Media Table on page 159 J Set the auto take up reel unit Auto switch to Forward Taking Up the Paper Printable Side In F...

Page 46: ...tton on the printer and then select Roll Paper from the Paper Source menu F Keep the d button on the printer pressed until the end of the roll reaches the roll core G Tape the end to the roll core Place tape available from third party suppliers at the center and then at the left and right ends H Keep the d button in the printer pressed until you have fed enough paper for about three wraps around t...

Page 47: ...he auto take up reel unit Auto switch to Off B Cut the paper and take it up until it is all on the auto take up reel unit roll core U Manual cut method on page 32 After cutting the paper support the end to prevent the printed surface touching the floor continue to support the paper until it is all taken up Keep the Manual switch pressed in the take up direction either Forward or Backward C Unlock ...

Page 48: ...uter and then print A Turn on the printer and load the paper U Loading and Removing the Roll Paper on page 28 U Loading and Removing Cut Sheets on page 34 B When you have created the data click Print in the File menu C Make sure your printer is selected and then click Preferences or Properties to display the settings screen XX XXXXX Series SC P9000 Series SC P7000 Series SC P8000 Series SC P6000 S...

Page 49: ...progress bar the computer s processing status is displayed On this screen you can check the remaining ink level product numbers for the ink cartridges and so on Anerrormessageisdisplayedifanerroroccursoranink cartridge needs replacing while printing Printing Mac OS X Make print settings such as paper size and paper source from the connected computer and then print A Turn on the printer and load th...

Page 50: ... printing options and paper source in the Paper Size menu E Select Print Settings from the list and then set each item Set the Media Type Color Print Quality and other settings according to the type of paper loaded in the printer Normally you can print correctly just by setting items in the Print Settings screen F When settings are complete click Print Theprintericonis displayedin the Dock whilepr...

Page 51: ...rinter on page 52 When the progress bar is displayed Click Cancel When the progress bar is not displayed A Click the printer icon on the Taskbar Whether or not an icon is displayed depends on the settings selected for Windows B Select the job you want to cancel and then select Cancel from the Document menu Tocancelalljobs clickCancelAllDocumentsin the Printer menu P SC P9000 Series SC P7000 Series...

Page 52: ...using the above operation See Canceling Printing Windows or Canceling Printing Mac OS X in the previous section for information on deleting print jobs from the print queue Printable area Thissectiondescribestheprintableareasfortheprinter If the margin set in an application is larger than the following setting values sections beyond the specified margins are not printed For example if 15 mm is sele...

Page 53: ...C 15mm B D 3 mm Top150mm Bottom15mm A 150mm C 15mm B D 3 mm 3mm A B C D 3 mm Roll Paper Margin Parameter Margin Values 15mm A B C D 15mm When Normal is selected the value for A is 20 mm for the following paper Premium Glossy Photo Paper 250 Premium Semigloss Photo Paper 250 Premium Luster Photo Paper 260 Premium Semimatte Photo Paper 260 Also when using Enhanced Adhesive Synthetic Paper the value ...

Page 54: ... page 159 Note If there is not enough ink remaining for the switch you will need to replace the cartridge It may be possible to printwithinkcartridgesthatcouldnotbeusedforablack ink switch Switching Automatically You can switch black inks and print from the printer driver Set Auto Black Ink Change to On from the Printer Setup menu in advance U Printer Setup on page 120 A Display the printer driver...

Page 55: ...ted Media on page 159 If the printer status cannot be acquired the black ink type may change automatically C Check other settings and then start printing Switching Manually Change from the control panel Buttons that are used in the following settings A Turn on the printer by pressing the P button B Press the button Follow the on screen instructions SC P9000 Series SC P7000 Series SC P8000 Series S...

Page 56: ...goes blank as if the power has been turned off but the P light remains lit Power Off Timer The printer is equipped with a Power Off Timer option that automatically turns the printer off if no errors occur noprintjobsarereceived andnocontrolpanelor other operations are performed for a set period of time The delay before the printer turns off automatically can be selected from values between 1 and 2...

Page 57: ...t paper sizes widths that are larger than that selected with the printer Note Held print jobs can be saved if On is selected for Store Held Job in the control panel Printer Setup menu The factory default setting is Off U Printer Setup on page 120 Viewing and Printing Stored Jobs Printjobscanbestoredonthe hard diskandprinted ata later date Print jobs selected for printing at a later date can be pri...

Page 58: ...overy of lost or corrupted data Saving Print Jobs This section describes the printer driver settings used to save print jobs Settings on Windows A When you have created the data click Print in the File menu P B Afterconfirmingthattheprinterisselected click Printer properties or Properties to display printer settings P C On the Page Layout screen click the Settings button from Hard Disk Unit and th...

Page 59: ... job without saving to the hard disk Save only Saves the job without printing Next print the document normally Viewing and Printing Saved Print Jobs This section describes how to view and print saved jobs from the control panel Buttons that are used in the following settings A Confirm that the printer is ready and press the r button The settings menu will be displayed B Press the d button and then...

Page 60: ... Print File or Delete and then press the r button When Delete is selected a confirmation screen appears Press the Z button to delete the job When Print File is selected proceed to Step 7 G Press the d u buttons enter the number of copies and then press the Z button Printing starts SC P9000 Series SC P7000 Series SC P8000 Series SC P6000 Series User s Guide Using the Optional Hard Disk Unit 60 ...

Page 61: ...or Windows 7 Click Start and then Devices and Printers For Windows Vista Click Control Panel Hardware and Sound and then Printer For Windows XP Click Start Control Panel Printers and Other Hardware and then Printers and Faxes Note If your Windows XP Control Panel is in Classic View click Start Control Panel and then Printers and Faxes B Right click your printer icon and click Printing preferences ...

Page 62: ...y displaying help you can use the contents page or keyword search to read the help Right click on the item you want to check and display Right click the item and then click Help Note In Windows XP click on the title bar and then click the help item you want to view SC P9000 Series SC P7000 Series SC P8000 Series SC P6000 Series User s Guide Using the Printer Driver Windows 62 ...

Page 63: ...ave saved from Select Setting on the Main screen Note You can save up to 100 settings Select the settings you want to save and then click Export to save them to a file You can share the settingsbyclickingImporttoimportthesavedfileon another computer Select the settings you want to delete and then click Delete Adding a Paper Type This section explains how to register new paper information Paper Con...

Page 64: ...in Name and click Save the settings are saved in Settings List You can select saved settings from Media Type on the Main screen Note You can save up to 100 settings Select the settings you want to save and then click Export to save them to a file You can share the settingsbyclickingImporttoimportthesavedfileon another computer Select the settings you want to delete and then click Delete SC P9000 S...

Page 65: ...ms in the List box Youcanmoveandorderitems bydraggingand dropping To add a new group folder click Add Group To delete a group folder click Delete Group Drag and drop unnecessary items to Not Display Note When Delete Group is performed the group folder is deleted however the settings in the deleted group folder remain You also need to delete individually from Settings List in the save location D Cl...

Page 66: ...omputer s screen Monitoring Preferences You can select the error notifications displayed on the EPSON Status Monitor 3 screen or register a shortcut for the Utility icon to the Taskbar Note If you select the Shortcut Icon on the Monitoring Preferences screen the Utility shortcut icon is displayed on the Windows Taskbar By right clicking the icon you can display the following menu and perform maint...

Page 67: ...rs EPSON LFP Remote Panel 2 You can configure custom paper settings and other settings Fordetails seethe EPSONLFPRemote Panel2 help Epson Color Calibration Utility Start Epson Color Calibration Utility and perform calibration See the Epson Color Calibration Utility manual for details Note If EPSON LFP Remote Panel 2 and Epson Color Calibration Utility are grayed out the applications are not instal...

Page 68: ...om Epson Color Calibration Utility When using commercially available paper in Epson Color Calibration Utility we recommend saving settings in Presets Saving to Presets A SeteachiteminPaperSizeandPrintSettingsthat you want to save to the preset When registering commercially available paper as custom paper 1 Select Print Settings from the list and then select the Epson special media type that is clo...

Page 69: ...erUtility 4 You can perform maintenance tasks such as Nozzle Check or Head Cleaning by using Epson Printer Utility 4 This utility is installed automatically when you install the printer driver Starting Epson Printer Utility 4 A Click the Apple menu System Preferences Printers Scanners or Print Fax B Selecttheprinter andclickOptions Supplies Utility Open Printer Utility Epson Printer Utility 4 Func...

Page 70: ...nt quality U Cleaning the print head on page 127 Print Head Alignment Perform print head alignment if the print results appear grainy or blurred The Print Head Alignment function corrects print head gaps U Adjusting print misalignments Head Alignment on page 126 EPSON LFP Remote Panel 2 You can configure custom paper settings and other settings Fordetails seethe EPSONLFPRemote Panel2 help Note If ...

Page 71: ...color management function start from step 2 Depending on the type of the application make the settings following the table below Adobe Photoshop CS3 or later Adobe Photoshop Elements 6 0 or later Adobe Photoshop Lightroom 1 or later OS Color Management Settings Windows 8 1 Windows 8 Windows 7 Windows Vista Printer Manages Colors Windows XP Service Pack 2 or later and NET 3 0 or later Windows XP ot...

Page 72: ...tune Gamma Brightness Contrast Saturation and color balance for the selected option Use this option when the application in use does not have a color correction function Making Settings in Windows A When using applications featuring a color management function specify how to adjust colors from these applications When using applications without a color management function start from step 2 Dependin...

Page 73: ... the left side of the screen You can also use the color circle to fine tune the color balance E Check other settings and then start printing Making Settings for Mac OS X A When using applications featuring a color management function specify how to adjust colors from these applications When using applications without a color management function start from step 2 Whenusingthefollowing applications ...

Page 74: ...ications if Step 1 is omitted Adobe Photoshop CS3 or later Adobe Photoshop Lightroom 1 or later Adobe Photoshop Elements 6 or later D SelectPrintSettingsfromthelist andthenselect Color Controls as the Color Settings setting When adjusting the parameters manually click Advanced Color Settings E Make the necessary settings See the printer driver help for more details on each item F Check other setti...

Page 75: ...hout a color management function start from step 2 Depending on the type of the application make the settings following the table below Adobe Photoshop CS3 or later Adobe Photoshop Elements 6 0 or later Adobe Photoshop Lightroom 1 or later OS Color Management Settings Windows 8 1 Windows 8 Windows 7 Windows Vista Printer Manages Colors Windows XP Service Pack 2 or later and NET 3 0 or later Window...

Page 76: ...hese applications Whenusingthefollowing applications selectthe Printer Manages Colors color management option Adobe Photoshop CS3 or later Adobe Photoshop Elements 6 or later Adobe Photoshop Lightroom 1 or later In other applications set No Color Management Note For information on supported platforms see the website for the application in question Setting example for Adobe Photoshop CS5 Open the P...

Page 77: ...e Color U Printing Mac OS X on page 49 C Click Advanced Color Settings D Make the necessary settings See the printer driver help for more details on each item E Check other settings and then start printing SC P9000 Series SC P7000 Series SC P8000 Series SC P6000 Series User s Guide Printing Varieties 77 ...

Page 78: ... borderless printing Use settings such as Page Setup in the applications to set the size of the image data as follows Match the paper size and page setting for the print data If the application has margin settings set the margins to 0 mm Make the image data as large as the paper size Retain Size Create the print data larger than the paper size in the applications to produce borderless output The p...

Page 79: ...t Position U Maintenance on page 114 When you print one page only or print one page multiple times the operation is the same as that for Double Cut When continuously printing multiple sheets the printer cuts1mminside onthetop edge of the first page and the bottom edge of the subsequent pages to avoid showing margins The top area may become slightly uneven depending ontheimagesincetheprint operatio...

Page 80: ...C Select Auto Expand or Retain Size as the Method of Enlargement If you select Auto Expand set how much of the image goes beyond the edge of the paper as shown below Max 3 mm for left and 5 mm for right the image shifts 1 mm to the right Normal 3 mm for left and right Min 1 5mm for left and right Note MovingtheslidertowardsMindecreasestheimage enlargement ratio Therefore some margins may appear at...

Page 81: ...x Sheet Borderless Retain Size Where XXXX is the actual paper size such as A4 Note If page setting options are not available in the application s print dialog display the page settings dialog B Select Page Layout Settings from the list and then set Roll Paper Option or Expansion See the following for more details on Auto Cut from Roll Paper Option U About Roll Paper Cutting on page 79 Expansion is...

Page 82: ...educe the size of your data There are three setting methods Fit to Page printing Automatically enlarges or reduces the image size to fit the paper size Fit to Roll Paper Width Windows only Automatically enlarges or reduces the image size to fit the roll paper width Custom You can specify the enlargement or reduction ratio Use this method for a non standard paper size SC P9000 Series SC P7000 Serie...

Page 83: ...selected as Reduce Enlarge C Check other settings and then start printing Making Settings for Mac OS X A Open the Print screen select Paper Handling from the list and then check Scale to fit paper size U Printing Mac OS X on page 49 B Selectthesizeofthepaperloadedintheprinteras the Destination Paper Size Note When performing enlarged printing clear the Scale down only check box C Check other setti...

Page 84: ...ist Fit to Page is selected as Reduce Enlarge D Select Fit to Roll Paper Width E Select the width of the roll paper loaded in the printer from the Roll Width list F Check other settings and then start printing Custom Scale Setting Making Settings in Windows A When the printer driver s Page Layout screen is displayed set the same paper size as the data s paper size in Page Size or Paper Size U Prin...

Page 85: ... Check other settings and then start printing Making Settings for Mac OS X A WhenthePrint screenis displayed select thesize of the paper loaded in the printer from the Paper Size list U Printing Mac OS X on page 49 B Click Scale and then enter the scale IfthePrintscreenintheapplicationyouareusing does not have an input item for the scale that you want to use display the Page Setup screen and make ...

Page 86: ...is printed as shown below Note In Windows you cannot use the Multi Page printing function when performing borderless printing In Windows you can use the reduce enlarge function Fit to Page to print the data on different sizes of paper U Enlarged Reduced Printing on page 82 SC P9000 Series SC P7000 Series SC P8000 Series SC P6000 Series User s Guide Printing Varieties 86 ...

Page 87: ... is selected page frames are printed on each page C Check other settings and then start printing Making Settings for Mac OS X A WhenthePrint screen is displayed select Layout from the list and then specify the number of pages per sheet and so on U Printing Mac OS X on page 49 Note You can print frames around arranged pages using the Border function B Check other settings and then start printing SC...

Page 88: ...ay misalign at the joins To join the pages precisely perform the following poster printing with margins Poster printing with margins This automatically enlarges and divides the print data and prints with margins You need to cut the margins and then join the output paper together to make a poster Although the final size is slightly smaller since you have to cut off the margins the image joins fit p...

Page 89: ... Available Paper on page 176 When with margins is selected Clear Borderless Poster Print Note Regarding the size after joining together When Borderless Poster Print is cleared and printingwithmarginsisselected thePrintCutting Guides items are displayed The finished size is the same whether or not Trim Lines is selected However if Overlapping Alignment Marks is selected the finished size is smaller...

Page 90: ...dicated by the lines drawn through and around the X marks in the illustration below will be printed on each sheet Note The alignment marks are black for black and white printing Thefollowingsectiondescribeshowtojoinfourprinted pages together A Ready the two top sheets and trim the excess from the left sheet by cutting along the line joining the two join guides the centers of the X marks B Lay the ...

Page 91: ...er E Repeat Steps 1 to 4 for the lower sheets F Trim the bottom from the upper sheets by cutting along the line joining the two guides the lines above the X marks G Lay the upper sheet on top of the lower sheet Lineup the X marks as shown in the illustration below and temporarily fasten them using an adhesive tape on the back SC P9000 Series SC P7000 Series SC P8000 Series SC P6000 Series User s G...

Page 92: ...the line joining the two cut guides the lines above the X marks I Join the upper and lower sheets together Use an adhesive tape to stick the backs of the sheets together SC P9000 Series SC P7000 Series SC P8000 Series SC P6000 Series User s Guide Printing Varieties 92 ...

Page 93: ...llowing for paper sizes supported by the printer U Printable area on page 52 Paper Width SC P9000 Series SC P8000 Series 89 1 to 1118 mm SC P7000 Series SC P6000 Series 89 1 to 610 mm Paper Height Windows 127 1 to 15000 mm Mac OS X 127 1 to 15240 mm 2 1 The smallest size supported by the printer is 182 mm wide by 254 mm long If a smaller size is entered in the printer driver as a Custom Paper Size...

Page 94: ... width ratio is the same as a defined paper size select the defined paper size from Fix Aspect Ratio and select either Landscape or Portrait for the Base In this case you canonly adjust either the paper width or paper height Note To change the paper size you saved select the paper size name from the list on the left To delete the user defined size you saved select the paper size name from the list...

Page 95: ...e left To copy a saved custom size select the size in the list on the left and click Duplicate Todeleteasavedcustomsize selectitinthelist on the left and click The custom paper size setting differs depending on the operating system version See your operating system s documentation for details D Click OK You can select the paper size you saved from the Paper Size pop up menu You can now print as no...

Page 96: ... by the given application while maintaining the printing length and width ratio See the following for available paper sizes U Printing at Non Standard Sizes on page 93 Making Settings in Windows A In the printer driver s Main screen select Media Type U Printing Windows on page 48 B Select Roll Paper or Roll Paper Banner from the Source list Note You can only use Roll Paper Banner for applications ...

Page 97: ...rgement check box is selected E Check other settings and then start printing Making Settings for Mac OS X A WhenthePrint screen is displayed selectthe size of the data created with the application in Paper Size If page setting options are not available in the application s print dialog display the page settings dialog U Printing Mac OS X on page 49 B Check other settings and then start printing SC...

Page 98: ...y placing multiple pieces of print data where you like Also Layout Manager allows you to use paper effectively The following is a layout example Placing multiple data items Placing the same data Placing data freely Placing data on roll paper Setting Procedures for Printing A Check that the printer is connected and ready to print SC P9000 Series SC P7000 Series SC P8000 Series SC P6000 Series User ...

Page 99: ...ge is placed on the paper of the Layout Manager screen as one object E Leave the Layout Manager screen open and repeat steps 2 to 4 to arrange the next pieces of data The objects are added to the Layout Manager screen F Arrange the objects on the Layout Manager screen Objects can be dragged to new positions and resized in addition they can be rearranged or rotated using the options in the Object m...

Page 100: ...rk Saving A On the Layout Manager screen click File menu and then Save as B Enter the file name select the location and then click Save C Close the Layout Manager screen Opening saved files A Right click the utility icon in the Windows taskbar and select Layout Manager from the menu that appears The Layout Manager screen is displayed If the Utility shortcut icon is not displayed on the Windows Tas...

Page 101: ...colors on the printed results and display by color management between the input device and the printer To match both colors you need to perform color management between the input device and the display as well Color Management Print Settings You can perform color management printing using this printer s printer driver in the following two ways Choose the best method according to the application yo...

Page 102: ...inter driver s settings screen U Color management printing by Driver ICM Windows Only on page 105 U Color management printing by Host ICM Windows on page 104 U Color management printing by ColorSync Mac OS X on page 105 U Setting color management with the applications on page 102 Setting color management with the applications Print using applications with a color management function Make the color...

Page 103: ...nd Windows XP Service Pack 2 or later and NET 3 0 Off No Color Adjustment is selected automatically For Mac OS X SelectPrintSettingsfromthelist andthenselect Off No Color Adjustment as the Color Settings setting D Check other settings and then start printing SC P9000 Series SC P7000 Series SC P8000 Series SC P6000 Series User s Guide Color Management Printing 103 ...

Page 104: ... or later Windows XP other than the above No Color Management In other applications set No Color Management Note For information on supported platforms see the website for the application in question Setting example for Adobe Photoshop CS5 Open the Print screen Select Color Management and then Document Select Printer Manages Colors as the Color Handling setting and then click Print When using appl...

Page 105: ...other settings and then start printing Color management printing by Driver ICM Windows Only The printer driver uses its own printer profiles to perform color management You can use the following two color correction methods Driver ICM Basic Specify one type of profile and intent for processing the entire image data Driver ICM Advanced Theprinterdriverdistinguishesthe image data into the Image Grap...

Page 106: ...nt and then Document Select PrinterManagesColorsastheColorHandlingsetting and then click Print A In the printer driver s Main screen select Custom as the Mode select ICM and then click Advanced U Printing Windows on page 48 B From ICM Mode in the ICM screen select Driver ICM Basic or Driver ICM Advanced If you select Driver ICM Advanced you can specify the profiles and intent for each image such a...

Page 107: ...ingprintcoordinates This feature is used for many types of color matching Absolute Colorimetric Assigns absolute color gamut coordinates to the original and print data and converts the data Therefore color tone adjustment is not performed on any white point or color temperature for the original or print data This feature is used for special purposes such as logo color printing C Check other settin...

Page 108: ... Method Roll Paper Cut Sheet Under A3 Cut Sheet Over A3 Poster Board Proceed Back Select Ink Cover to Open Open Right Cover Open Left Cover Open Both Covers Done Back Paper Source Roll Paper Cut Roll Paper No Cut Cut Sheet Done Back Switching Black Ink Switch black ink to Yes No Done 1 After pressing the Z button to select the highlighted option press the l button to return to the previous menu Pr...

Page 109: ...rt move Print Queues menu This menu is only available when the optional hard disk unit is installed U Print Queues on page 115 Menu item Description Print Queue XXXXXXXXXXX name of print queue Lists the Waiting Job Name User Estimated Start Time and Estimated Print Time Hold Queue View Hold Queue XXXXXXXXXXX name of hold queue Lists the Paused Job Name User Paper Type Source Size and Reason For Ho...

Page 110: ...hoto Paper Lists supported Epson media Proofing Paper Fine Art Paper Matte Paper Plain Paper Others No Paper Selected Platen Gap Narrow Standard Wide Wider Widest Detect Paper Thickness Press Z to start printing Paper Feed Adjust Pattern Press Z to start printing Value 0 70 to 0 70 Paper Suction 4 to 0 Drying Time Per Pass 0 to 10 sec Roll Paper Tension Normal High Extra High Remove Skew On Off Se...

Page 111: ...onal hard disk unit is installed U Printer Setup on page 120 Menu item Description Platen Gap Narrow Standard Wide Wider Widest Paper Size Check On Off Paper Skew Check On Off Auto Nozzle Check Auto Cleaning Setting Periodically Every Job Off Auto Clean Max Repeat 1 to 3 Timer Cleaning XX hours Off Print Nozzle Pattern Every 10 pages Every Page Off Auto Black Ink Change On Off BK Ink Change Settin...

Page 112: ...EP vxxxx Calibration Tile S N xxxxxx Device Temperature XX C Firmware Version xxxxxx Air Temperature XX C Backing Color Displays the installed backing colors SProofer Setting Press Z to start printing alignment Auto Take up Reel Unit xxxxxx Network Setup Menu U Network Setup on page 122 Menu item Description IP Address Setting Auto Panel IP Address Subnet Mask Default Gateway IPv6 Setting On Off I...

Page 113: ...Menu item Description Change Password Enter a password Operational Control Network Setup Password Required No Password Required Powerful Cleaning All Nozzles Yes No XX XX where XX indicates the ink color code Yes No Date And Time MM DD YY HH MM Time Zone EnterthetimedifferencebetweenGMTandthecurrenttime zone Format HDD Non Secure Quick Whenyouconfirmthemessagedisplayed formattingstarts Secure Quic...

Page 114: ...nt when setting up the printer for the first time and after moving or transporting the printer Perform print head alignment when the print results look grainy or out of focus Normally select Auto U Adjusting print misalignments Head Alignment on page 129 Auto The printer reads adjustment patterns using the sensor while printing the patterns and makes adjustments automatically Manual Theprinterprin...

Page 115: ...ce the paper and take whatever other steps may be necessary to ready the device for printing 2 Select Resume All Jobs View Hold Queue XXXXXXXXXXX name of hold queue Paused Job Name User Paper Type Source Size Reason For Hold Resume All Jobs Press the Z button to resume all held jobs currently in the queue Saved Job Queue Shows the status of the selected stored job when it was last printed If you p...

Page 116: ...ount of remaining roll paper If On is selected you will be prompted to enterthelengthoftheroll Whenalengthhasbeenenteredfortheloaded roll paper a barcode will automatically be printed on the roll stating the length remaining the value selected for the roll remaining alert and the paper type when the roll is removed The barcode is automatically read and settings adjusted the next time the paper is ...

Page 117: ...ally trim the leading edge to remove any ink stains that may have been left by the previous copy to disable this feature choose Off Off Roll End Option Continue Select the action to perform for a roll after replacement print the remaining data Continue do not print Stop Printing print again from the beginning Reprint Reprint is only available when the optional hard disk unit is installed Stop Prin...

Page 118: ...aper types Platen Gap Narrow Select the platen gap which is the distance between the print head and thepaper Normally selectStandard Selectawidersettingifprintresults are scratched or smudged If upon performing head alignment you feel that it is still not completely aligned select Narrow Standard Wide Wider Widest Detect Paper Thickness Press the Z button to print a pattern to determine the thickn...

Page 119: ...n or soft paper will increase the distance between the paper and the print head causing print quality todeclineorpreventingthepaperfeedingcorrectly Insuchcases youwill needtolowerthepapersuction Thesuctionpowerisweakenedwhenthe parameter is lowered Drying Time Per Pass 0 to 10 seconds 0 Select the time the print head pauses to allow drying after each pass Choose from values between 0 0 and 10 0 se...

Page 120: ... the status ofthe nozzles and if clogged nozzles are detected set the number of times to perform auto cleaning If the nozzles are not clogged cleaning is not performed U Automatically detecting clogged nozzles on page 125 Auto Cleaning Setting Periodically Set the timing for performing an Auto Nozzle Check that will run before printing starts Periodically Checks at fixed intervals at a timing dete...

Page 121: ...rs from those currently selected with the printer will be saved as held jobs select Off to disable this feature If Off is selected an error will be displayed and will printing will stop if the source selected for the print job does not match that selected with the printer If On is selected printing will not stop if an error occurs instead jobs with non matching settings will be saved to the hard d...

Page 122: ...fer Setting The printer automatically initializes the settings for the SpectroProofer mounter For details on procedures for initializing settings and so on see the User s Guide PDF Auto Take up Reel Unit Displaysthefirmwareversionoftheautotake upreelunitinstalledonthe printer Network Setup Default setting Item Description IP Address Setting Auto Select whether to use DHCP to set the IP address Aut...

Page 123: ... an extended period of time This setting selects the amount of time until the printer enters sleep mode U Turning Off the Power Using Power Off Timer on page 56 Power Off Timer Off The printer turns off automatically when there are no errors no print jobs being received and no control panel or other operations are performed for eight hours Thedelaybeforetheprinterturnsoffcanbeselectedfromvaluesbet...

Page 124: ...g logs and status sheets Time Zone Enter the difference between the current time zone and GMT The selected time zone is used in e mail notifications sent by Remote Manager when an error occurs Format HDD Non Secure Quick Only available when the optional hard disk unit is installed Formatting starts after you select the type of format and confirm the message displayed You can select from the follow...

Page 125: ...Even if Auto Cleaning Setting from Auto Nozzle Check is set to Off an auto nozzle check is always performed at the following times After initial ink charging An auto nozzle check is performed after ink charging to check the status of the nozzles If clogged nozzles are detected auto cleaning is performed once Before changing the type of black ink Since black inks cannot be changed correctly if nozz...

Page 126: ...computer or using printer s control panel From the computer Explanations in this section use the Windows printer driver as an example Use Epson Printer Utility 4 for Mac OS X U Epson Printer Utility 4 Functions on page 69 A Make sure that the roll paper or a cut sheet of A4 size or larger is loaded in the printer U Loading and Removing the Roll Paper on page 28 U Loading and Removing Cut Sheets on...

Page 127: ... all nozzles or select only those nozzles for which the printed nozzle check pattern indicates a problem You can also select two levels of cleaning strength U From the printer on page 128 Notes on Head Cleaning Ink is consumed during head cleaning Clean the print head only if print quality declines for example iftheprintoutisblurryorthecoloris incorrect or missing When cleaning all nozzles ink is ...

Page 128: ...fter repeating cleaning several times in succession select Heavy from Head Cleaning on the printer s control panel U From the printer on page 128 From the printer Before starting this procedure be sure to read the following U Notes on Head Cleaning on page 127 Buttons that are used in the following settings A Press the r button to display the setup menu B Confirm that Maintenance is highlighted an...

Page 129: ...ect the color pairs with faint or missing segments in the check pattern If there are faint or missing segments in all colors Select All Nozzles and then press the r button If there are faint or missing segments in part of the colors Select the colors that need to be confirmed and then press the Z button to confirm You can select more than one at once When you have finished selecting press the r bu...

Page 130: ...sition for bi directional printing for all colors It takes about 17 minutes to print an adjustment pattern The time required varies depending on the menu selected U From the printer on page 131 Notes on Head Alignment Adjustments are made depending on the paper loaded in the printer Make sure that the paper is loaded correctly and that a Select Paper Type is selected U Loading and Removing the Rol...

Page 131: ...registers the optimum adjustment value to the printer Check the adjustment results to confirm if graininess or misalignment recurs in the printed image If you are not satisfied with the adjustment results perform manual adjustment from the printer U From the printer on page 131 From the printer Before starting this procedure be sure to read the following U Notes on Head Alignment on page 130 Butto...

Page 132: ...3 or Bi D 4 1 to 4 displays the size of the ink dots Since this differs depending on the printer driver settings when printing perform 1 to 4 in order H Pressthed ubuttonstoselectBi D2 color and then press the Z button The adjustment pattern is printed on the loaded paper Note Multiple adjustment patterns are printed for cut sheets Once printing the first sheet is complete load the next sheet of p...

Page 133: ... Epson recommends the use of genuine Epson ink cartridges Epson cannot guarantee the quality or reliability of non genuine ink The use of non genuine ink may cause damage that is not covered by Epson s warranties and under certain circumstances may cause erratic printer behavior Information about non genuine ink levels may not bedisplayed anduseofnon genuineinkisrecorded for possible use in servic...

Page 134: ... You may not be able to print properly H With the u mark on the ink cartridge facing up press it in until you hear it click Matchthecoloroftheinkcartridgetothecolorof the label on the back of the ink cover cImportant Install all ink cartridges into each slot You cannot print if any of the slots are empty I Close the ink cover Replacing Maintenance Boxes If the message No Enough Space is displayed ...

Page 135: ...ntenance Box when the printer is turned on Waste ink may leak A Turn off the printer B Remove the new maintenance box from the package C Remove the maintenance box without tilting it D Place the used maintenance box in the clear bag included with your new maintenance box and make sure that the zipper is closed tight E Insert the new maintenance box cImportant Do not touch the IC chip on the mainte...

Page 136: ...ess the r button to display the setup menu C Confirm that Maintenance is highlighted and then press the r button The Maintenance menu will be displayed D Press the u d buttons to select Cutter Maintenance and then press the r button E Press the u d buttons to select Replace Cutter and press the r button A confirmation dialog will be displayed F Press the Z button to move the cutter to the replacem...

Page 137: ... turnedoff andthescreen has turned off and then unplug the power cable from the outlet C Use a soft clean cloth to carefully remove any dust or dirt If the printer is particularly dirty dampen the cloth with water containing a small amount of neutral detergent and then firmly wring the cloth dry before using it to wipe the printer s surface Next use a dry cloth to wipe away any remaining moisture ...

Page 138: ...ar dirt wipe in the direction indicated by the arrow in the illustration If the printer is particularly dirty when the back of the paper is soiled while printing dampen the cloth with water containing a small amount of neutral detergent and then firmly wring the cloth dry before using it to wipe the printer s surface Then wipe the inside of the printer with a dry soft cloth cImportant Be sure not ...

Page 139: ... Auto Cleaning the set number of times To perform Auto Cleaning again select Yes To finish select No U Automatically detecting clogged nozzles on page 125 Paper Load Error No paper detected Roll Paper Remove and then reload the roll paper Before you reset the paper cut the edge of the roll paper straight horizontally Cut off any jagged or folded sections If there is a problem with the edge a paper...

Page 140: ...yed in circumstances other than those listed above check that the printer supports the current paper U Supported Media on page 159 F W Install Error Firmware update failed Restart the printer Turn the printer off wait for a few minutes and then turn on the printer again Update the firmware again If this message appears on the LCD panel again contact your dealer or Epson Support Command Error Check...

Page 141: ...disk unit can store print jobs up to 100 GB in size To print larger jobs select Print only from Hard Disk Unit Settings in printer driver alternatively make sure that print jobs are less than 100 GB in size U Saving Print Jobs on page 58 HDD Store Error Hard disk does not have enough space See documentation for how to delete stored print jobs Unwanted jobs can be deleted from Remote Manager or the...

Page 142: ...Turn on the printer again after a short pause See the manual supplied with the ILS30EP for more information on connecting cables ILS30EP Disconnected ILS30EP is not recognized Continue The ILS30EP is not connected to the printer correctly Connect the cables of the ILS30EP correctly and then select No to turn off the printer Turn on the printer again after a short pause See the manual supplied with...

Page 143: ...s for the mounter and paper Recommended environment for the printer U Specifications Table on page 183 80 Check the following points Do the numbers on the ILS30EP and the calibration tile label match RemovethemounterandchecktheILS30EPandthelabelofthecalibrationtile Ifyou havemultipleILS30EP makesureyouinstalltheonethatmatchesthenumberonthe calibration tile Is the lens of the ILS30EP or the calibra...

Page 144: ...rvicehasoccurred theprinterautomaticallystopsprinting Turn off the printer disconnect the power cable from the outlet and from the AC inlet on the printer and then reconnect Turn on the printer again multiple times If the same call for service is displayed on the LCD panel contact your dealer or EpsonSupport for assistance Tell them the call for service code is XXXX SC P9000 Series SC P7000 Series...

Page 145: ...k connection If it is not indicated the printer driver is not installed correctly Delete and reinstall the printer driver U Uninstalling Software on page 27 The printer driver is not installed properly Mac OS X o Is the printer added to the printer list Click the Apple menu System Preferences Printers Scanners or Print Fax If the printer name is not displayed add the printer The printer is not com...

Page 146: ...clear the Pause check box o DoesthecurrentprinterstatusshowPrinting Paused Mac OS X Open the status dialog for your printer and check whether printing is paused 1 SelectSystemPreferences Printers Scanners orPrint Fax OpenPrintQueue fromtheApple menu 2 Double click the icon for any printer that is Paused 3 Click Resume Printer Your problem is not listed here o Decide whether the trouble is caused b...

Page 147: ...lignment U Adjusting print misalignments Head Alignment on page 126 o AreyouusingagenuineEpsoninkcartridge This printer is developed for use with Epson ink cartridges If you use non Epson ink cartridges printouts may be faint or the color of the printed image may be changed because the remaining ink level is not correctly detected Be sure to use the correct ink cartridge o Are you using an old ink...

Page 148: ...ly the same You can achieve similar colors with the same color adjustment method or the same gamma setting by using the printer driver U Color Management Printing on page 101 To match the color precisely use the color measurement device to perform color management The print is not positioned properly on the media o Have you specified the print area Check the print area in the settings of the appli...

Page 149: ...head scuffing the edge of the paper In the Paper menu select Top35mm Bottom15mm as the Roll Paper Setup Roll Paper Margin option U Paper on page 116 o Widen the bottom margin Depending on the paper usage storage conditions and the content of the print data the bottom edge may be scuffed when printing In this situation it is best to create your data with a wider bottom margin o Does the interior of...

Page 150: ... Makesurethatthepapersettingsoftheprintermatch the paper that you are using o Have you changed the amount of enlargement Adjust the amount of enlargement for borderless printing Marginsmayappearifyousettheamountof enlargement to Min U Borderless Printing on page 78 o Is the paper stored correctly The paper may expand or contract if it is not stored correctly so that margins appear even when border...

Page 151: ...jects in the printer If paper is jammed see Paper jams below and clear the jammed paper o Is the paper suction too strong If you continue to have problems with ejected paper tryloweringthePaperSuction theamountofsuction used to keep the paper on the paper feed path U Custom Paper Setting on page 117 Paper does not collect in the paper basket or is creased or folded when the paper basket is used o ...

Page 152: ... may cause a malfunction F Remove the jammed paper Do not touch the rollers ink absorbing areas or ink tubes G Close the front cover H Turn the printer off and then back on I Reload the paper and resume printing U Loading Roll Paper on page 28 cImportant Before you reload the roll paper cut the edge straight horizontally Cut any wavy or creased sections If there is a problem at the edge decreased ...

Page 153: ...nction C Remove the jammed paper Do not touch the rollers ink absorbing areas or ink tubes D Close the front cover E Turn the printer off and then back on F Reload the paper and resume printing U Loading and Removing Cut Sheets on page 34 Others The control panel display keeps turning off o Is the printer in sleep mode Sleep mode is exited if a print job is received or the P button on the control ...

Page 154: ...t is printed outside the recommendedenvironmentalconditions thecorrect color measurement is not acquired See the manuals supplied with the printer and paper for the recommended environmental conditions Recommended environment for the printer U Specifications Table on page 183 o Do the RIP or application print settings differ from the actual print conditions Printing cannot be performed correctly i...

Page 155: ...ected an error is generated in Epson Color Calibration Utility and calibration cannot be performed U Custom Paper Setting on page 117 o Isanyexternallight directsunlight entering the printer when performing color measurement If any external light enters the printer the correct color measurement result cannot be acquired Prevent external light from entering the printer The printer turned off due to...

Page 156: ...cause erratic printer behavior Information about non genuine ink levels may not be displayed and use of non genuine ink is recorded for possible use in service support U Replacing Ink Cartridges on page 133 SC P9000 SC P7000 SC P8000 SC P6000 Color Name Part number 700 ml 350ml 150ml Photo Black T8041 T8241 T8341 Cyan T8042 T8242 T8342 Vivid Magenta T8043 T8243 T8343 Yellow T8044 T8244 T8344 Light...

Page 157: ... T7709 Orange T768A T769A T770A Green T768B T769B T770B Violet T768D T769D T770D Only available for the SC P9070 SC P7070 SC P9080 SC P7080 SC P8080 SC P6080 Color Name Part number 700 ml 350ml 150ml Photo Black T8061 T8261 T8361 Cyan T8062 T8262 T8362 Vivid Magenta T8063 T8263 T8363 Yellow T8064 T8264 T8364 Light Cyan T8065 T8265 T8365 Vivid Light Magenta T8066 T8266 T8366 Light Black T8067 T8267...

Page 158: ...installing You need a commercially available software RIP to use the mounter SpectroProofer Mounter 24 2 C12C890531 ILS30EP C12C932021 Color measurement device installed on the mounter See the manual supplied with the color measurement device for more information on installing on the mounter Auto Take up Reel Unit 1 C12C815323 Automatically winds printed roll paper around the paper core See the ma...

Page 159: ...Utility is available Available Unavailable Mounter Describes whether or not the optional SpectroProofer mounter is available Available Unavailable Take up Describes whether or not the optional auto take up reel unit is available for the SC P9000 Series SC P8000 Series When it is available the take up direction is also stated F Forward printed side out B Backward printed side in Unavailable Roll Pa...

Page 160: ..._LLK PremiumSemiglossPhotoPaper250 icc V ink set SC P9000_P7000_Series_V PremiumSemiglossPhotoPaper250 icc SC P8000 Series SC P6000 Series SC P8000_P6000_Series PremiumSemiglossPhotoPaper250 icc Supported paper sizes Size Borderless Calibration Mounter Take up 406 mm 16 inches F B 610 mm 24 inches 914 mm 36 inches 1118 mm 44 inches SC P7000 Series SC P6000 Series is not supported Premium Luster Ph...

Page 161: ...emium Semimatte Photo Paper 260 Paper thickness 0 268mm Roll core size 3 inches Printer driver settings Media Type Photo Paper Premium Semimatte Photo Paper 260 Type of black ink Photo Black PK ICC profile SC P9000 Series SC P7000 Series LLK ink set SC P9000_P7000_Series_LLK PremiumSemimattePhotoPaper260 icc V ink set SC P9000_P7000_Series_V PremiumSemimattePhotoPaper260 icc SC P8000 Series SC P60...

Page 162: ...Size Borderless Calibration Mounter Take up 420 mm A2 F B 610 mm 24 inches 728 mm B1 914 mm 36 inches 1118 mm 44 inches SC P7000 Series SC P6000 Series is not supported Premium Semigloss Photo Paper 170 Paper thickness 0 18mm Roll core size 2 inches Printer driver settings Media Type Photo Paper Premium Semigloss Photo Paper 170 Type of black ink Photo Black PK ICC profile SC P9000 Series SC P7000...

Page 163: ...hotoPaperGloss250 icc V ink set SC P9000_P7000_Series_V PhotoPaperGloss250 icc SC P8000 Series SC P6000 Series SC P8000_P6000_Series PhotoPaperGloss250 icc Supported paper sizes Size Borderless Calibration Mounter Take up 432 mm 17 inches F B 610 mm 24 inches 914 mm 36 inches 1118 mm 44 inches SC P7000 Series SC P6000 Series is not supported EPSON Proofing Paper White Semimatte Paper thickness 0 2...

Page 164: ...ing Paper Commercial Paper thickness 0 196mm Roll core size 3 inches Printer driver settings Media Type Proofing Paper Epson Proofing Paper Commercial Type of black ink Photo Black PK ICC profile SC P9000 Series SC P7000 Series LLK ink set SC P9000_P7000_Series_V EpsonProofingPaperCommercial icc V ink set SC P9000_P7000_Series_LLK EpsonProofingPaperCommercial icc SC P8000 Series SC P6000 Series SC...

Page 165: ...e up 419 mm 16 5 inches F 432 mm 17 inches 610 mm 24 inches F 2 914 mm 36 inches 1 1118 mm 44 inches 1 1 SC P7000 Series SC P6000 Series is not supported 2 Use the tensioner supplied with the optional auto take up reel unit Doubleweight Matte Paper Paper thickness 0 21mm Roll core size 2 inches Printer driver settings Media Type Matte Paper Doubleweight Matte Paper Type of black ink Matte Black MK...

Page 166: ...7000_Series_LLK EnhancedMattePaper_PK icc MK SC P9000_P7000_Series_LLK EnhancedMattePaper_MK icc V ink set PK SC P9000_P7000_Series_V EnhancedMattePaper_PK icc MK SC P9000_P7000_Series_V EnhancedMattePaper_MK icc SC P8000 Series SC P6000 Series PK SC P8000_P6000_Series EnhancedMattePaper_PK icc MK SC P8000_P6000_Series EnhancedMattePaper_MK icc Supported paper sizes Size Borderless Calibration Mou...

Page 167: ...per RadiantWhite_MK icc SC P8000 Series SC P6000 Series PK SC P8000_P6000_Series WatercolorPaper RadiantWhite_PK icc MK SC P8000_P6000_Series WatercolorPaper RadiantWhite_MK icc Supported paper sizes Size Borderless Calibration Mounter Take up 610 mm 24 inches 2 F B 914 mm 36 inches 1 1118 mm 44 inches 1 1 SC P7000 Series SC P6000 Series is not supported 2 Only operations guaranteed Color measurem...

Page 168: ...inches 2 F B 610 mm 24 inches 1118 mm 44 inches 1 1 SC P7000 Series SC P6000 Series is not supported 2 Only operations guaranteed Color measurement not guaranteed Enhanced synthetic paper Paper thickness 0 12mm Roll core size 2 inches Printer driver settings Media Type Others Enhanced Synthetic Paper Type of black ink Matte Black MK ICC profile SC P9000 Series SC P7000 Series SC P9000_P7000_Series...

Page 169: ...p 610 mm 24 inches F B 1118 mm 44 inches SC P7000 Series SC P6000 Series is not supported Cut sheet Premium Glossy Photo Paper Paper thickness 0 27 mm Printer driver settings Media Type Photo Paper Premium Glossy Photo Paper Type of black ink Photo Black PK ICC profile SC P9000 Series SC P7000 Series LLK ink set SC P9000_P7000_Series_LLK PremiumGlossyPhotoPaper icc V ink set SC P9000_P7000_Series_...

Page 170: ...00 Series SC P8000_P6000_Series PremiumSemiglossPhotoPaper icc Supported paper sizes Size Borderless Calibration Mounter A3 S B A3 A2 Premium Luster Photo Paper Paper thickness 0 27 mm Printer driver settings Media Type Photo Paper Premium Luster Photo Paper Type of black ink Photo Black PK ICC profile SC P9000 Series SC P7000 Series LLK ink set SC P9000_P7000_Series_LLK PremiumLusterPhotoPaper ic...

Page 171: ...ies_V EpsonProofingPaperWhiteSemimatte icc SC P8000 Series SC P6000 Series SC P8000_P6000_Series EpsonProofingPaperWhiteSemimatte icc Supported paper sizes Size Borderless Calibration Mounter S B A3 A3 Photo Quality Ink Jet Paper Paper thickness 0 12mm Printer driver settings Media Type Matte Paper Photo Quality Ink Jet Paper Type of black ink Matte Black MK ICC profile SC P9000 Series SC P7000 Se...

Page 172: ...per_MK icc V ink set PK SC P9000_P7000_Series_V ArchivalMattePaper_PK icc MK SC P9000_P7000_Series_V ArchivalMattePaper_MK icc SC P8000 Series SC P6000 Series PK SC P8000_P6000_Series ArchivalMattePaper_PK icc MK SC P8000_P6000_Series ArchivalMattePaper_MK icc Supported paper sizes Size Borderless Calibration Mounter A3 S B A3 A2 2 US C 1 1 SC P7000 Series SC P6000 Series is not supported 2 Only o...

Page 173: ...ries is not supported 2 Only operations guaranteed Color measurement not guaranteed Watercolor Paper Radiant White Paper thickness 0 29mm Printer driver settings Media Type Fine Art Paper Watercolor Paper Radiant White Type of black ink Photo Black PK Matte Black MK ICC profile SC P9000 Series SC P7000 Series LLK ink set PK SC P9000_P7000_Series_LLK WatercolorPaper RadiantWhite_PK icc MK SC P9000_...

Page 174: ...FineArtPaper_PK icc MK SC P9000_P7000_Series_V UltraSmoothFineArtPaper_MK icc SC P8000 Series SC P6000 Series PK SC P8000_P6000_Series UltraSmoothFineArtPaper_PK icc MK SC P8000_P6000_Series UltraSmoothFineArtPaper_MK icc Supported paper sizes Size Borderless Calibration Mounter S B A3 A2 2 US C 1 1 SC P7000 Series SC P6000 Series is not supported 2 Only operations guaranteed Color measurement not...

Page 175: ... guaranteed Color measurement not guaranteed Enhanced Matte Poster Board Paper thickness 1 3mm Printer driver settings Media Type Fine Art Paper Enhanced Matte Poster Board Type of black ink Photo Black PK Matte Black MK ICC profile SC P9000 Series SC P7000 Series LLK ink set PK SC P9000_P7000_Series_LLK EnhancedMattePosterBoard_PK icc MK SC P9000_P7000_Series_LLK EnhancedMattePosterBoard_MK icc V...

Page 176: ... loaded in the printer as long as they meet the following specifications Epson cannot guarantee the paper feeding and print quality When using the SpectroProofer mounter see the documentation supplied with your software RIP Roll Paper Roll core size 2 inch and 3 inch Roll paper outer diameter 2 inch core 103 mm or less 3 inch core 150 mm or less Paper Width SC P9000 Series SC P8000 Series 254 mm 1...

Page 177: ...er on which ink blurs or overflows when printing Paper which bends seriously during loading and printing When performing color calibration for multiple printers you can only use cut sheets A3 size or larger For one printer you can use A3 size or larger roll paper as well as cut sheets Before Printing on Commercially Available Paper Note Be sure to check the paper characteristics such as if the pap...

Page 178: ... the paper Make settings using one of the following methods Set Custom Paper Setting from the control panel s Paper menu You can make paper settings for all items except for the three mentioned above U From the printer on page 179 Set in EPSON LFP Remote Panel 2 software supplied You can make the same settings as the control panel s Paper menu from a computer For details see the EPSON LFP Remote P...

Page 179: ... setting items screen is displayed If you select a number to which settings have already been saved the setting is overwritten Make sure you set the following three items Select Reference Paper Detect Paper Thickness Paper Feed Adjust See the following for more information on each setup item U Custom Paper Setting on page 117 From the printer driver Windows Open the Main screen and then save the s...

Page 180: ... page 42 D Remove the optional auto take up reel unit or SpectroProofer mounter if they are installed U Setup Guide booklet supplied with optional items E Unlock the casters F Move the printer cImportant Use the casters to move the printer indoors a short distance over a level floor They can not be used for transport Notes on Transporting Make the following preparations in advance before transport...

Page 181: ...e the printer Move and transport the printer with ink cartridges installed Do not remove the ink cartridges otherwise the nozzles may be clogged and make it impossible to print or ink may leak Notes when reusing the printer After moving or transporting the printer follow the steps below to put it into a ready status See the Choosing a Place for the Printer section of the Setup Guide booklet in adv...

Page 182: ...t tier USB hub DependingontheUSBhubyouareusing the operation of the printer may become unstable If this should occur plug the USB cable directly into your computer s USB port 2 Use a shielded twisted pair cable Category 5 or higher Note When installing you must log in as a user with an computer administrator account a user belonging to the Administrators group Mac OS X Operating system Mac OS X v1...

Page 183: ...oltage AC 100 to 240 V Rated frequency 50 to 60 Hz Rated current 2A Power consumption In use SC P9000 Series SC P8000 Series Approximately 75 W SC P7000 Series SC P6000 Series Approximately 65 W Ready mode Approximately 19 W Sleep mode Approximately 2 0 W Power off 0 5 W or less Printer Specifications Temperature Operating 10 to 35 C 50 to 95 F Storage before unpacking 20 to 60 C 4 to 140 F within...

Page 184: ... Black Light Light Black Light Black Photo Black Matte Black Color Cyan Light Cyan Vivid Magenta Vivid Light Magenta Yellow Use by date See the date printed on the package at normal temperature Print quality guarantee expiry Six months after installing in the printer Storage temperature Uninstalled 20 to 40 C within a month at 40 C Installed in printer 20 to 40 C within a month at 40 C Transportin...

Page 185: ...EMC FCC part 15 subpart B Class B CAN CSA CEI IEC CISPR 22 Class B AS NZS CISPR 32 Class B SC P9000 Series SC P7000 Series SC P8000 Series SC P6000 Series User s Guide Appendix 185 ...

Page 186: ...not solve the problem using the troubleshooting information in your product documentation contact Epson support services for assistance If Epson support foryourareaisnotlistedbelow contactthedealerwhere you purchased your product Epson support will be able to help you much more quickly if you give them the following information Product serial number Theserialnumberlabelisusuallyonthebackofthe prod...

Page 187: ... http www epson ca Canadian sales Help for Users in Europe Check your Pan European Warranty Document for information on how to contact Epson support Help for Users in Australia Epson Australia wishes to provide you with a high level of customer service In addition to your product documentation we provide the following sources for obtaining information Your Dealer Don t forget that your dealer can ...

Page 188: ...Web http www epson co th Information on product specifications drivers for download Frequently Asked Questions FAQ and e mail are available Epson Hotline Phone 66 2685 9899 Our Hotline team can help you with the following over the phone Sales enquiries and product information Product usage questions or problems Enquiries on repair service and warranty Help for Users in Vietnam Contacts for informa...

Page 189: ...swers to Frequently Asked Questions FAQs Latest versions of Epson product drivers Users can access our World Wide Web home page at http www epson com hk Technical Support Hotline You can also contact our technical staff at the following telephone and fax numbers Phone 852 2827 8911 Fax 852 2827 4383 Help for Users in Malaysia Contacts for information support and services are World Wide Web http ww...

Page 190: ... number For Service CDMA Mobile Users 3900 1600 9AM 6PM Prefix local STD code Help for Users in the Philippines To obtain technical support as well as other after sales services users are welcome to contact the Epson Philippines Corporation at the telephone and fax numbers and e mail address below Trunk Line 63 2 706 2609 Fax 63 2 706 2665 Helpdesk Direct Line 63 2 706 2625 E mail epchelpdesk epc ...

Page 191: ...on Manual Data oss pdf in the Printer Software Disc 4 The license terms of each open source software program are described on Manual Data oss pdf in the Printer Software Disc 5 The list of open source software programs which this printer product includes are as follows GNU GPL ThisprinterproductincludestheopensourcesoftwareprogramswhichapplytheGNUGeneralPublicLicense Version 2 or later version GPL...

Page 192: ...ght to the e2fsprogs MIT license This printer product includes the open source software program jQuery v1 8 2 which apply the MIT License Bonjour This printer product includes the open source software programs which apply the Apple Public Source License Version1 2 or its latest version Bonjour Programs We provide the source code of the Bonjour Programs pursuant to the Apple Public Source License V...

Page 193: ...reof When code is released as a series of files a Modification is a any addition to or deletion from the contents of a file containing Covered Code and or b any new file or other representation of computer program statements that contains any part of Covered Code 1 7 OriginalCode means a theSourceCodeofaprogramorotherworkasoriginallymadeavailablebyAppleunder this License including the Source Code ...

Page 194: ...e code itself as well as in related documentation stating that Source Code of the Covered Code is available under the terms of this License with information on how and where to obtain such Source Code 2 4 Third Party Rights You expressly acknowledge and agree that although Apple and each Contributor grants the licenses to their respective portions of the Covered Code set forth herein no assurances...

Page 195: ...NTERFERENCE WITH YOUR ENJOYMENT OF THE COVERED CODE THAT THE FUNCTIONS CONTAINED IN THE COVERED CODE WILL MEET YOUR REQUIREMENTS THAT THE OPERATION OF THE COVERED CODE WILL BE UNINTERRUPTED OR ERROR FREE OR THAT DEFECTS IN THE COVERED CODE WILL BE CORRECTED NO ORAL OR WRITTENINFORMATIONORADVICEGIVENBYAPPLE ANAPPLEAUTHORIZEDREPRESENTATIVEOR ANY CONTRIBUTOR SHALL CREATE A WARRANTY You acknowledge th...

Page 196: ...ity or damages of any sort solely as a result of terminating this License in accordance with its terms and termination of this License will be without prejudice to any other right or remedy of any party 13 Miscellaneous 13 1GovernmentEndUsers TheCoveredCodeisa commercialitem asdefinedinFAR2 101 Governmentsoftware and technical data rights in the Covered Code include only those rights customarily p...

Page 197: ...cuments connexes soient rédigés en anglais EXHIBIT A Portions Copyright c 1999 2003 Apple Computer Inc All Rights Reserved This file contains Original Code and orModifications of Original Code as defined in and that are subject to the Apple Public Source License Version 2 0 the License You may not use this file except in compliance with the License Please obtain a copy of the License at http www o...

Page 198: ...o new operating systems existing ports with new graphical interfaces versions with modified or added functionality and dynamic shared or static library versions not from Info ZIP must be plainly marked as such and must not be misrepresented as being the original source or if binaries compiled from the original source Such altered versions also must not be misrepresented as being Info ZIP releases ...

Reviews: