


CHAPTER 13 S1C88 FAMILY DEBUGGER
S5U1C88000C MANUAL II
EPSON
159
WORKBENCH/DEV TOOLS/OLD ASSEMBLER
GUI utility
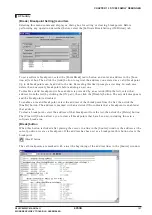
[Break | Breakpoint Setting] menu item
Selecting this menu command displays a dialog box for setting or clearing breakpoints. Before
performing any operation described below, select the [Software Break Setting (1MB Area)] tab.
To set a software break area, select the [Range Break] radio button, then enter the start and end
addresses of that area in the [Start Location] and [End Location to] text boxes, respectively. Then click
the [Add] button to register the area you entered as a valid software break area. All addresses in that
area are assumed to have breakpoints set. The start address of the area is shown in the Address
column of the list, and the area size (in bytes) is shown in the AreaNum column. Setting a new area
with a software break area already registered prompts a warning. In such case, delete the registered
software break area before setting a new one. Also note that because only one software break area can
exist at a time, any area that contains an address already registered as a breakpoint cannot be set as a
software break area.
To disable a valid breakpoint (whose address is preceded by an asterisk (
∗
) in the list), select that
address from the list (by clicking the ON part), then click the [Disable] button. The asterisk disappears
and the breakpoint is disabled.
To enable an invalid breakpoint, select the address of that breakpoint from the list, then click the
[Enable] button. The address is marked with an asterisk (
∗
) to indicate that a breakpoint is enabled at
that address.
To clear a breakpoint, select the address of that breakpoint from the list, then click the [Delete] button.
The [Clear All] button allows you to clear all breakpoints that have been set, including those in a
software break area.


