


CHAPTER 13 S1C88 FAMILY DEBUGGER
96
EPSON
S5U1C88000C MANUAL II
WORKBENCH/DEV TOOLS/OLD ASSEMBLER
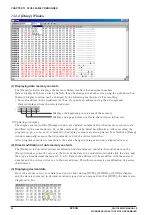
(2) Displaying the current PC
The source lines that include the address indicated by the current PC (program counter) are marked
with a yellow arrow at the beginning of the line.
(3) Displaying PC breakpoints
The source lines that include any address that has been set as a breakpoint are marked with a red
●
mark at the beginning of the line.
(4) Setting a break at the cursor position
Place the cursor at the source line at which a breakpoint is to be set. Then click the [Break]
button. This sets the source line (the start address of the effective object code corresponding to
the source) as a breakpoint. (A breakpoint can also be set by double-clicking anywhere in the
line.) If the same action is performed at the source line in which a PC breakpoint has been set,
the breakpoint is cleared. Multiple breakpoints can be set, one breakpoint per source line.
However, no breakpoints can be set in source lines that do not have actual code. Note that due
to optimization by the C compiler, no code can be generated for some C statements that would
otherwise have code generated. For source lines at which breakpoints cannot be set, change to
mix display mode and check.
Click the [Go to Cursor] button. The program starts running from the current PC and breaks at
the line at which the cursor is positioned. In this case, the cursor must also be located at the
source lines that have the actual code. Clicking the [Go to Cursor] button has no effect unless
the source has the actual code.
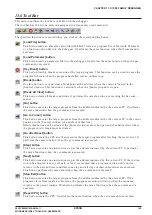
(5) Searching for a character string
In source display mode, the [Source] window displays the following find buttons, permitting a search
for a character string.
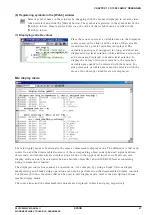
Click the [Find] button to display the dialog box shown below, allowing you to specify a search
string.
Enter a search string in the [Find what] edit
box and click the [Find Next] button. The
string search proceeds in the downward
direction of the [Source] window (toward the
end of the program) from the current cursor
position. If an instance of the specified string
is found in the [Source] window, it is placed
in a selected state.
When the [Find Next] button is clicked again, the next instance of the specified string is sought
from that position forward. To search up (toward the beginning of the program), select the
[Up] button for [Direction]. To search for instances that completely match the specified string,
check the [Match whole word only] check box. Or to discriminate between uppercase and
lowercase letters when searching, check the [Match case] check box, before clicking the [Find
Next] button.
Select a string by dragging the mouse in the [Source] window and clicking the [Find Next]
button on the [Source] window. The string search proceeds in the downward direction of the
[Source] window (toward the end of the program) from that selected position. If an instance of
the string is found, the newly found string is placed in a selected state. When the [Find Next]
button is clicked again, the next instance of the string is sought from that position forward.
This search is case-insensitive, and instances that do not completely match the string will also
be found.
The [Find Previous] button functions in the same way as the [Find Next] button described
above, except that string searches proceed up (toward the beginning of the program).


