Playing Back Photos
3-7
A
B
3
Erasing Pictures
The LCD screen provides two different methods for deleting
images after you play them back:
◗
You can delete the currently displayed picture
◗
You can select pictures for deletion or “lock” (protect)
them from deletion
You can also erase photos through your software when the
camera is connected to your computer. For instructions, see
Chapters 4 and 5.
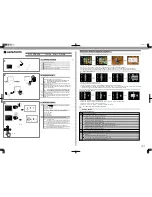
Erasing the Currently Displayed Picture
Make sure the LCD screen is set to
Playback
and the image
you want to erase is displayed. Then follow these steps:
1
Hold down the
Function
button and press the
BACK
button.
You see the following message on the LCD screen:
2
Press the
SELECT
button to erase the picture. The
screen returns to playback mode.
NOTE
If you try to erase a locked photo
, you see a warning message.
Press any button to clear the message. See pages 3-9 to 3-12 for
instructions on locking and unlocking images in the camera.
Selecting Pictures to Erase
You select pictures to erase using the Photo Control
menu. You can either select individual pictures, or
choose to erase all the pictures in the camera. Using the same
Popch3.fm5 Page 7 Friday, May 15, 1998 2:48 PM
Summary of Contents for PhotoPC 700
Page 1: ......
Page 2: ...A B Popfm fm5 Page i Friday May 15 1998 2 28 PM ...
Page 66: ...3 14 Playing Back Photos Popch3 fm5 Page 14 Friday May 15 1998 2 48 PM ...
Page 104: ...6 16 Working With Photos and Albums Popch6 fm5 Page 16 Friday May 15 1998 3 02 PM ...
Page 136: ...9 12 Using Your Camera for Presentations Popch9 fm5 Page 12 Friday May 15 1998 3 15 PM ...
Page 164: ...11 20 Printing Directly From the Camera DirectPt fm Page 20 Friday May 15 1998 3 23 PM ...
Page 176: ...12 12 Maintenance and Troubleshooting trouble fm Page 12 Friday May 15 1998 3 28 PM ...
Page 184: ...A 8 Optional Accessories Popapa fm5 Page 8 Friday May 15 1998 3 31 PM ...