2. Make sure that the power to the printer is turned off and that no
cable is connected from the printer to the computer.
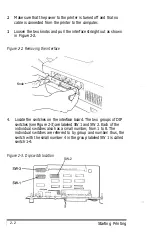
3. Loosen the two knobs and pull the interface straight out as shown
in Figure 2-2.
Figure 2-2. Removing the interface
Knob
4.
Locate the switches on the interface board. The two groups of DIP
switches (see Figure 2-3) are labeled SW 1 and SW 2. Each of the
individual switches also has a small number, from 1 to 8. The
individual switches are referred to by group and number: thus, the
switch with the small number 4 in the group labeled SW 1 is called
switch 1-4.
Figure 2-3. Dip switch location
SW-2
2-2
Starting Printing
Summary of Contents for GQ-3500
Page 2: ...EPSON G Q 3 5 0 0 User s Manual ...
Page 36: ......
Page 160: ...EPSON G Q 3 5 0 0 Quick Reference ...


