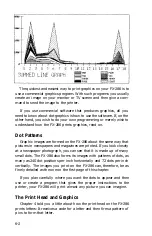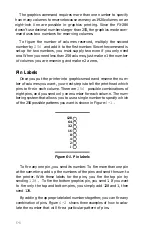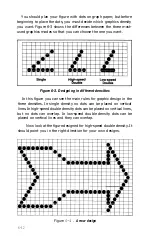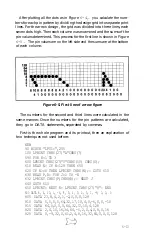
After plotting all the dots as in Figure
6-4,
you calculate the num-
bers for each pin pattern by dividing the design grid into separate print
lines. For the arrow design, the grid was divided into three lines, each
seven dots high. Then each column was examined and the sums of the
pin values determined. This process for the first line is shown in Figure
6-5.
The pin values are on the left side and the sums are at the bottom
of each column.
Figure 6-5. First line of arrow figure
The numbers for the second and third lines were calculated in the
same manner. Once the numbers for the pin patterns are calculated,
they go in DATA statements, separated by commas.
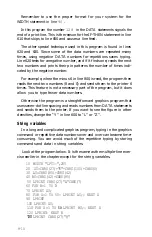
First is the whole program and its printout, then an explanation of
two techniques not used before:
NEW
90 WIDTH "LPT1:",255
100 LPRINT CHR$(27)"A"CHR$(7)
590 FOR K=1 TO 3
600 LPRINT CHR$(27)"Y"CHR$(50) CHR$(0);
610 READ N: IF N=128 THEN 650
620 IF N>=0 THEN LPRINT CHR$(N);: GOT0 610
630 READ P,R: FOR J=l TO -N
632 LPRINT CHR$(P)CHR$(R);: NEXT J
640 GOT0 610
650 LPRINT: NEXT K: LPRINT CHR$(27)"@": END
800 DATA 8, 4, 10, 1, -6, 8, 0, 4, 0, 2, 0, 1, -9, 0, 0, 0
805 DATA 23,8,4,2,1,-2,0,0,0,128
810 DATA 0,0,0,0,64,32,17,10,4,0,-6,0,0,-10
815 DATA 64,0,0,0,0,64,32,17,10,4,128
820 DATA 2,4,10,16,34,64,-5,2,0,4,0,8,0,16
825 DATA 0,-9,32,0,61,2,4,8,16,32,64,0,0,0,128
6-13
Summary of Contents for FX-286 - Impact Printer
Page 1: ......
Page 2: ......
Page 35: ......
Page 40: ...2 4 ...
Page 48: ...3 8 ...
Page 56: ...4 8 ...
Page 91: ...6 16 ...
Page 118: ...C 10 ...
Page 133: ...Epson Mode Commands G 5 ...
Page 134: ...G 6 ...
Page 166: ...H 4 ...
Page 173: ...International Character Width Table Roman characters Italic characters I 7 ...
Page 174: ...I 8 ...
Page 180: ...J 6 ...
Page 181: ...IBM Proprinter Mode Commands J 7 ...
Page 182: ...J 8 ...
Page 202: ...J 28 ...
Page 208: ...K 6 ...
Page 216: ......
Page 220: ...IBM Mode See Appendix J for detailed explanations of codes Character Width Pitch ...
Page 221: ...Notes ...
Page 223: ......

